You are using an out of date browser. It may not display this or other websites correctly.
You should upgrade or use an alternative browser.
You should upgrade or use an alternative browser.
Pride Goes Before a Fall: A Revolutionary Greece Timeline
- Thread starter Earl Marshal
- Start date
Threadmarks
View all 100 threadmarks
Reader mode
Reader mode
Recent threadmarks
Chapter 93: Mr. Smith goes to Athens Part 94: Twilight of the Lion King Part 95: The Coburg Love Affair Chapter 96: The End of the Beginning Chapter 97: A King of Marble Chapter 98: Kleptocracy Chapter 99: Captains of Industry Chapter 100: The Balkan LeagueArchaic was probably a bad choice of words on my part. In Greece, as in most countries with functioning legislatures, laws start out as bills created by individual legislators or a group of legislators in some cases. Once a bill is created it is sent to a committee to be reviewed and amended, and if approved by the committee it is sent to the floor of the Legislature for a final vote before going to another chamber of the legislature or the Executives desk to be signed into law. Sadly, most bills in most legislatures, die in committee which is exactly what is taking place in this last update.It said in the update greek parties used archaic rules to slow down the process did they get rid of those rules or try to reform the legislative process to stop similar stuff in the future?
As no single party held a majority of seats in the Vouli (House of Representatives) at the time, the Nationalists as the plurality party were able to use their considerable influence in the chamber to gain a majority of seats on several important committees and even gain a few chairmanships for these committees. This enabled them to simply vote down most bills in committee or defeat them through the use of pocket vetoes. The few bills that did go to the Vouli floor were simply filibustered ad nausem by the Nationalists until the sponsor of the bill gave up or the Nationalists relented and allowed the bill to pass.
Holy cow its already Turtledove awards season again!
Special thanks to @formion, @Daedalus, @TC9078, @Helmuth von Moltke, and @Wolttaire for nominating this timeline for Best Colonialism and Revolutions Timeline (and Best Early Modern Timeline too!) I feel like I've been slacking recently, but I want to thank everyone for continuing to support this timeline after 15 long months of craziness and mishaps on my part. Its my sincere hope that the year ahead will be better than the year behind, but only time will tell how things go from here. That being said, I do have a few interesting things coming down the pipeline that should be ready in the near future.
Special thanks to @formion, @Daedalus, @TC9078, @Helmuth von Moltke, and @Wolttaire for nominating this timeline for Best Colonialism and Revolutions Timeline (and Best Early Modern Timeline too!
) I feel like I've been slacking recently, but I want to thank everyone for continuing to support this timeline after 15 long months of craziness and mishaps on my part. Its my sincere hope that the year ahead will be better than the year behind, but only time will tell how things go from here. That being said, I do have a few interesting things coming down the pipeline that should be ready in the near future.Part 63: L’Aiglon
The French for their part would initially receive little recompense for their great suffering in the war, aside from some mild reparations and renewed access to Dutch and Prussian markets. However, in the May Referendum on Belgian Independence, four provinces of the much reduced Kingdom of Belgium (Hainut, Namur, Liege, and Arlon) voted to join with France. The vote in Brabant was highly contested however, with rampant reports of wrongdoing on taking place both sides. The worst allegations came from Brussels where many thousands of Flemish refugees who had fled the city during the war, were barred from returning to the city after the conflict, providing the Walloon populace with a slight advantage over their Fleming neighbors. Ultimately, the region was split in two, with the North of the province electing to join the Netherlands and the South choosing to unite with France. The true victor of the Second Belgian War of Independence however, were the liberals of Europe who took advantage of the chaos and carnage of the war to depose the July Monarchy in France, to unite Flanders with the Netherlands and Wallonia with France. They would bring about revolutionary changes to the German Confederacy and the Italian Peninsula, and they would bring about the demise of one of Europe's greatest powers.
View attachment 421502
The State of the Low Countries after the Second Belgian War of Independence
The Netherlands - Orange (Dutch gains outlined in dark orange)
France - Blue (French gains outlined in dark blue)
Prussia - Grey (Prussian gains outlined in dark grey)
Hannover - Pink
Right, I'm a little bit late to this particular party, so I apologise for bringing up literally months-old affairs, but; you gave Arerlerland (Arlon) to the French, even though Prussia got Luxembourg? As you didn't mention it at all, I'm not sure if you're familiar with Arlon's history or not, but it has traditionally been a part of the German-speaking part of the Grand Duchy of Luxembourg. It was separated from them and given to Belgium instead in 1839 because the French objected to, if I recall correctly, a very important road leading to Brussels that ran/runs through it ending up in the hands of the German Confederation. Granted, the same line of thought could be reserved for ITTL as well, but considering Prussia annexes Luxembourg outright in this timeline, it seems a bit of a strange thing for them to give up on Arelerland, especially considering that the alternative is (arguably obviously) French annexation of the area. Perhaps, if France and Prussia are in the mood to adjust borders, an exchange could be in order? Arlon for the Walloon border town of Malmedy? (Shameless semi-random plug for a great map of the area if needed, here)
Part 65: A Shining Star in a Stormy Sky
Ioannis Kolettis and his Nationalists, would deftly take advantage of their rival's weaknesses by stoking the fears of the people. Their anti-Turkic policy positions and support for Greek communities beyond the borders of the Kingdom of Greece also aided his cause to great effect as the Mavrokordatos Government had done little to help the Greeks beyond their borders, while cow-towing to foreign interests. This fear mongering would succeed for when election day finally arrived, the Nationalists won an easy victory, securing 53 seats in the Vouli out of 94, while the remaining 41 were largely divided between the Liberals (18 seats) and the People's Party (23 seats).
P.S. I think you mean "kowtowing", not "cow-towing." I don't think anyone tows cows
That is very interesting, and something I quite honestly overlooked when I originally wrote that update. Prussia already received Neutral Moresnet and the eastern half of Luxembourg (roughly equivalent to the modern Grand Duchy of Luxembourg IOTL), but on further review it probably should get Arlon as well so I'll edit it accordingly.Right, I'm a little bit late to this particular party, so I apologise for bringing up literally months-old affairs, but; you gave Arerlerland (Arlon) to the French, even though Prussia got Luxembourg? As you didn't mention it at all, I'm not sure if you're familiar with Arlon's history or not, but it has traditionally been a part of the German-speaking part of the Grand Duchy of Luxembourg. It was separated from them and given to Belgium instead in 1839 because the French objected to, if I recall correctly, a very important road leading to Brussels that ran/runs through it ending up in the hands of the German Confederation. Granted, the same line of thought could be reserved for ITTL as well, but considering Prussia annexes Luxembourg outright in this timeline, it seems a bit of a strange thing for them to give up on Arelerland, especially considering that the alternative is (arguably obviously) French annexation of the area. Perhaps, if France and Prussia are in the mood to adjust borders, an exchange could be in order? Arlon for the Walloon border town of Malmedy? (Shameless semi-random plug for a great map of the area if needed, here)
P.S. I think you mean "kowtowing", not "cow-towing." I don't think anyone tows cows
Thanks for bringing this to my attention, it has been fixed.
Last edited:
Chapter 66: Risorgimento
Chapter 66: Risorgimento

Charge of the Savoy Cavalry at the Second Battle of Goito
While it can be said that the Kingdom of Greece enjoyed a relatively tenuous peace in 1848 and 1849, the same cannot be said for the Austrian Empire which teetered on the edge of imminent catastrophe. Beginning in the Northern Italian city of Milan in early January 1848, unrest steadily built against the hated Austrian Chancellor Klemens von Metternich and his unpopular reactionary policies. Over time, demands for more autonomy for the Northern Italian Kingdom soon developed into mass protests and demonstrations against Austrian occupation of Lombardy-Venetia in general. After a failed putsch on the Governor's palace in Milan the city would descend into a bloody conflict by late March before quickly spreading to the rest of the country.
Despite being outnumbered and outgunned by the unruly mob and radical revolutionaries, the Austrian garrison was ordered by Vienna to hold their positions until reinforces from across the Alps could be sent to relieve them. Unfortunately for the Austrian soldiers, the promised reinforcements would not arrive in time as the Royal Sardinian Army promptly forced their way across the border on the 3rd of April; King Charles Albert of Sardinia-Piedmont had thrown in with the revolutionaries and was on his way to Milan with all haste. With the Sardinian Army charging across the border into Lombardy-Venetia and with their situation rapidly deteriorating in the city itself, Austrian Field Marshal Joseph Radetzky von Radetz was forced to order an immediate evacuation of the city and head for the Quadrilateral Fortresses, a series of defensive works centered on the fortresses of Legnano, Mantua, Peschiera del Garda, and Verona to the East where his army would regroup and await reinforcements from Austria.
Field Marshal Radetzky’s decision to withdrawal from Milan had not come a moment too soon, as the vanguard of the Sardinian Army quickly arrived on scene as the last beleaguered battalions of the Austrian Army made their escape. Cursory skirmishing would occur over the course of the next few hours and days, but by nightfall on the 6th of April 1848, the Austrian Army had escaped. Field Marshal Radetzky had managed to save his army, but his escape had come at a great cost. The loss of nearly 5,000 soldiers in the Milanese Uprising and another 1,600 in the escape to the Quadrilateral was a tragic blow to the 1st Army of Lombardy-Venetia, but the more damaging blow to the Austrian position in Italy would be the resulting political fallout that would soon follow.
The Fall of Milan and much of Lombardy to the Italians was a terrible humiliation for the prideful Austrian Empire and its’ embattled Chancellor Metternich as various liberal groups would quickly seize upon the news in Italy to muster in the streets of Vienna once more. Although he would weather this political storm just as he had the one prior in early March, it was clear that Metternich’s hold on the Austrian state was quickly loosening. Desperate to restore his credibility, Metternich looked to Radetzky for a scapegoat, blaming the old Field Marshal for the loss of Lombardy to the rebels and their Sardinian allies. For this “failure”, Field Marshal Radetsky was removed from command of the Austrian Army of Lombardy-Venetia. Radetzky, ever a loyal servant of Austria, accepted the decision without complaint and retired to his estates where he would live out the rest of his days in peace, dedicating himself to his family and his memoirs until the day he died. With Radetzky removed from command, Metternich would quickly move to replace him with his own man on the ground, Field Marshal Karl Ludwig von Ficquelmont.

Count Karl Ludwig von Ficquelmont, Field Marshal of the Austrian Empire
Count Ficquelmont was a man cut from the same cloth as Metternich; he was a nobleman, a conservative politician to his core, and a statesman renowned for his great skill as a diplomat. Unlike Metternich, Ficquelmont had served as a soldier during the Napoleonic Wars and was a gifted officer, providing him with a degree of military experience that Metternich lacked. However, he was by no means a young man by the start of 1848, having just celebrated his seventy-first birthday, and it had been many years since he had last seen the field of battle in 1814. Nevertheless, he was a trusted confidant and ally of Chancellor Metternich, one who could be relied upon to salvage the dire situation in Northern Italy for the Austrian Empire. However, while Count Ficquelmont was up to the task of reclaiming Lombardy, the army he had inherited from Field Marshal Radetzky was not.
Conditions in the Austrian Army of Lombardy-Venetia were abysmal. Much of their weaponry had been lost in the retreat from Milan, with the most significant loss being among the Army's cannons. 21 guns were lost at Milan, having been captured by the revolutionaries or spiked by their crews, while another 11 were lost in the ensuing escape to the Quadrilatero. Nearly two thousand soldiers had lost their rifles, and more than half of the men in the army were missing pieces of their uniforms. More concerning than the dearth of military equipment was the poor morale of the Army, which had reached an all-time low following Field Marshal Radetsky's removal from command.
Radetsky had been beloved by his men; he had lived among them, he listened to them, he cared for their concerns, and while he did drill his soldiers relentless, it was with the intent of making them the best soldiers that they could be. He was a quintessential gentleman whose stern, but fair judgement had earned him the respect and admiration of not only the men under his command, but the respect and admiration of his adversaries as well. Most importantly, he was the regular soldier’s patron in Vienna; a vocal proponent for increasing the soldiers’ salaries and military funding as a means of improving the Army’s quality in the face of mounting challengers. As such, his removal from command by Metternich, and the subsequent replacement with the aloof Count Ficquelmont was viewed as a betrayal by the men of the Army of Lombardy-Venetia. Because of this, the disastrous Milanese Uprising, and a host of other issues, desertions from the army would dramatically increase in the days and weeks ahead, depleting the Army of Lombardy-Venetia's already low numbers even further. Of the 70,000 Imperial soldiers stationed in Northern Italy at the start of the year, barely 40,000 remained under arms by mid-April 1848.
Most of the combat losses had been suffered at Milan, but rebellions across all of Lombardy-Venetia in the subsequent days would deplete Austrian manpower tremendously as isolated garrisons were attacked by Italian patriots with near impunity. While the casualties among the German, Czech, Croat, and Hungarian troops was certainly high and incredibly harmful to Ficquelmont’s efforts, the greatest blow to Austrian strength in Northern Italy was the near total desertion of the Italian contingent within their ranks. Of the 21 Italian Infantry battalions stationed in the Kingdom of Lombardy-Venetia, 18 battalions would defect in part or in full, joining with the revolutionaries, and providing them with a competent core of highly-disciplined and battle-hardened fighters. Moreover, these men were among the most capable and determined fighters on the Italians’ side, fighter longer and harder than their less skilled compatriots much to the dismay of their former allies in the Austrian Army.
Because of this betrayal, the Italian few units that did remain loyal to Vienna were distrusted so completely by Ficquelmont and Metternich, that they were relegated to menial posts far from the front where they could do little harm if they did turn traitor. Ficquelmont would also establish a state of martial law over the territories under his control; villages found to be supporting Italian Nationalist groups were burnt to the ground, civilians accused of supporting them were imprisoned indefinitely, and any armaments of war or beasts of burden were confiscated without payment. Finally, Count Ficquelmont had any man suspected of traitorous inclinations immediately arrested, while those soldiers who were caught attempting to desert his army were to be executed by firing squad without so much as a trial in their defense. While these initiatives would certainly curtail the flood of desertions by the Italians in his ranks to a small trickle, it did little to endear him to the local populace who grew to hate him.

Death of the Deserters
With the Austrian morale recovering, albeit slowly, Count Ficquelmont immediately began marshaling his forces in theater. At most, he had 40,000 to 46,000 men scattered North of the Appenines with most gathering in and around the Quadrilateral Fortresses of Legnano, Mantua, Peschiera del Garda, and Verona. Another 22,000 men had been gathered in Gorzia under the command of General Laval Nugent von Westmeath and were presently beginning their march through the Alps to reinforce him, but it would be some time before they finally arrived on scene. Ficquelmont would come to need every man he could get as the forces gathering against him numbered well over thrice his own.
Encouraged by the Austrians’ failures to subdue the revolt in Milan, other partisans and freedom fighters began to rise in rebellion across the entirety of the Italian Peninsula, stretching Austria’s already thin resources ever further. The most heated fighting outside of Milan would take place in the storied city of Venice as the people of the city rose in revolt against their Austrian occupiers. Their attempts to liberate Venice would run into an immediate problem when their raid on the Venetian Arsenal was discovered by the local authorities and crushed with ruthless brutality.[1] However, the massacre of the Arsenal rebels would prompt uprisings across the entire city, forcing the outnumbered Austrians to withdraw to the Castello where they would remain under siege by the Venetians for the next few months. Revolts elsewhere in Northern Italy would see more success for the Italians as Brescia, Cremona, Padua, and Treviso successfully managed to oust their Austrian occupiers, although Padua and Treviso would be quickly reoccupied by the Austrians later that Summer. By themselves, it was clear that the Lombards and Venetians stood little chance against the full might of the Imperial Army; it is fortunate then that they were not alone in this endeavor.
Soon after the initial outbreak of hostilities in Milan, the various armies of the Italian states began marching to their aid, first among them was the army of the Papal States. Despite his opposition to war and his reluctance to support Italian nationalism, Pope Pius IX could not resist the will of his people who cried out for freedom, nor could he abide by the evils committed on the part of the Austrian Empire which tyrannized the poor peoples of Italy for its own benefit. Metternich’s brazen occupation of various cities and lands lawfully belonging to the Papal States were an added motivation for the Pope and the Curia as well, prompting them to dispatch their own army in support of the Lombard rebels in late March. Led by the Liberal Sardinian expat, General Giovani Durrando, the Papal State’s Army, some 20,000 strong was mostly comprised of young volunteers and eager recruits with little fighting experience or martial discipline. Despite their relative inexperience, the Papal volunteers quickly proved their worth to the Italian cause, overwhelming the meager Austrian garrisons in Ferrara, Ravenna, and Bologna, before chasing the remaining Austrians across the Po in mid-April.
Next to declare against the Austrians were the Duchies of Modena and Lucca which had deposed their hated Dukes (Francis V of Modena and Reggio and Duke Charles of Lucca) in the days following the start of the Milanese Uprising. Comprised almost entirely of Italian nationalists and liberals, the new provisional governments of Modena and Lucca would immediately denounce the Austrian Empire’s occupation of Northern Italy before dispatching a thousand men each to join the Lombards in the fight against the Austrians. The neighboring duchy of Parma would see its ailing Hapsburg Duchess, Marie Louise coerced into issuing a more liberal constitution as well as permitting men and arms to be sent to the Lombards and Venetians.[2] Under pressure by popular sentiment, the Austrian-Este Grand Duke Leopold of Tuscany was also forced to issue a liberal constitution to appease the nationalists within his realm as liberal unrest threatened to dethrone him as well. Throwing his full support behind the Italian cause, Grand Duke Leopold would also dispatch a division of the Tuscan Army, some 7,600 strong into Northern Italy to aid the rebels. Even the conservative King Ferdinand II of the Two Sicilies was likewise compelled to send both men and munitions to the growing Anti-Austrian Alliance despite fighting his own war against the Sicilian Revolutionaries.
The Lombard Revolutionaries would also be aided by several thousand volunteers from abroad, with most coming from Germany, France, and Spain among a few other countries, but of all the bands of foreigners to fight in Italy, the most notable were the fighters of the so called “Greco Brigade”. Despite their name, the Greco Brigade was more akin to an understrength regiment, numbering around 1100 to 1400 men, many of whom were of various backgrounds and nationalities, although most were Greek. The “Greco Brigade” would prove to be a very potent fighting force who would serve admirably throughout the war to come, inflicting serious blows on their Austrian foes in the many battles ahead, earning high honors for their bravery and potency. More worrying than the Italian rebels or the diverse amalgamation of allies fighting alongside them, however, was the Royal Sardinian Army some 65,000 strong, which marched across the Ticino River into Lombardy-Venetia virtually unopposed on the 2nd of April.

The Royal Sardinian Army Crosses the Ticino
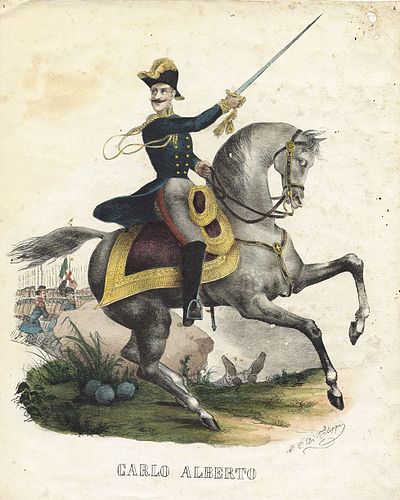
In what was an unabashed betrayal of the alliance between their two states and their two houses, King Charles Albert of the Kingdom of Sardinia-Piedmont threw himself headlong into the war against Austria.[3] Although he was very much a conservative man and he was himself married to an Austrian Archduchess; his personal relationship with the Austrian government had soured over the years owing to rising commercial competition between the two states in Switzerland and Lombardy-Venetia along with the constant interference of Chancellor Metternich into Sardinian affairs. Because of this, Charles Albert would undergo somewhat of a political metamorphosis over the course of the 1840’s, adopting more liberal views on Italian Nationalism and developing a highly negative view of the Austrian occupation of much of the Italian Peninsula. The Milanese Uprising and the apparent weakness of the Austrians would also provide Charles Albert with an ample opportunity to finally fulfill the House of Savoy’s long-standing ambition to acquire Lombardy. But perhaps the most important justification for Charles Albert’s betrayal of the Austrians lay in the politics of the day.
Sardinia-Piedmont, like much of Europe, was wracked with revolutionary activity and nationalistic fervor and to avoid the same sad fates that would befall King Otto of Belgium, King Ludwig of Bavaria, Duke Charles II of Lucca, and Duke Francis of Modena; Charles Albert, either willingly or reluctantly, played to the whims of the masses who desired war with Austria. Like his fellow Italian sovereigns, he would enact a liberal constitution establishing a popularly elected Chamber of Deputies, the right to vote, the right to assemble, freedom of the press, and a whole host other rights and liberties for the people of Sardinia-Piedmont. Finally, when the Milanese rose in revolt against the Austrians, Charles Albert readied his army for war. Assembling at the fortress town of Alessandria, the Royal Sardinian Army, comprised of 5 divisions of infantry and 2 brigades of cavalry, totaling 60,000 men and 64 artillery pieces, readied for war. Adopting the Italian tricolor as his own, King Charles Albert issued his orders and crossed the Ticino; the Milanese Uprising had become the Italian War for Independence.
The Sardinian advance towards Milan would be blisteringly fast as King Charles Albert hoped to capture the ancient city and the Austrian Army of Field Marshal Radetsky in one fell swoop. While they would ultimately fail to meet this objective as Radetzky would retreat from the city with time to spare, they would succeed in forcing the Austrian rearguard to battle north of the town of Crema where they bloodied it extensively forcing it to flight once again. In a bid to widen the gap between them, the retreating Austrians would destroy every bridge they came across in an effort to slow the Sardinian advance and to funnel them towards the mighty fortress of Peschiera del Garda.

Peschiera del Garda
Under normal circumstances, the Fortress of Peschiera del Garda could be expected to hold against adversaries for months on end, but it was not to be on this day. The Austrian soldiers within its walls were demoralized after a series of terrible defeats and exhausted from the nearly 80-mile chase from Milan. Seeking to push across the Mincio River as fast as possible, King Charles Albert ordered an immediate assault on the castle walls. While the Austrians would muster all their strength to successfully repel the first Sardinian assault, albeit with heavy casualties, when the Sardinians attempted a second assault the following day, the walls fell within minutes.[4]
The fall of Peschiera del Garda came as a shock to Field Marshal Radetzky and the Austrian General Staff, who had been relying upon a prolonged siege to occupy Sardinia’s army long enough for them to regroup. This turn of events would be quickly followed by an uprising at Mantua three days later which would successfully defeat the city's depleted garrison. Those poor soldiers unlucky enough to be captured alive would suffer a torturous fate as they were torn limb from limb by the frenzied Mantuan mob, others were drawn and quartered, while a few more were butchered beyond recognition in a terrible display of human barbarity that would come to define this conflict. With the loss of Mantua and Peschiera del Garda in rapid succession, Field Marshal Radetzky was forced to retreat even further to the East, behind the banks of the Adige in late April. It is here that King Charles Albert’s inexperience as a commander came to the fore.
Believing that the remaining fortresses at Verona and Legnano would be taken as easily as Mantua and Peschiera del Garda, King Charles Albert would order an assault on the walls of Verona. Despite achieving some success in securing parts of Verona's walls, the Austrians would swiftly counterattack, driving them back with horrific losses. Three more assaults would also be beaten back forcing the Sardinians to dig in for a protracted siege of the fortress. To the South, the Allied Italian Army of the Two Sicilies, the Papal States, Tuscany, Parma, Modena, and Lucca forced the surrender of the Austrians at Ostiglia, Rovigo, and Adira before marching on Legnano in late April. Progress would be slow at Legnano though, as the joint Central and Southern Italian Army would encounter many of the same problems which plagued the Sardinian Army had to the North, bringing the front along the Adige to a standstill.
As April came to an end and the stalemate continued, King Charles Albert’s interest in the day to day military affairs of the campaign began to wane, while his interest in other matters began to grow. Ultimately, on the 1st of May, he would choose to withdraw to Milan, leaving the continued prosecution of the war to his son Victor Emmanuel and his ablest generals Eusebio Bava and Ettore De Sonnaz who continued to fight with the Austrians in his stead. With management of the war no longer his chief concern, King Charles Albert immediately began consolidating his gains in the region, incorporating Lombardy into the Kingdom of Sardinia, appointing provincial governors over Lombardy, extending Sardinian laws to Lombardy, and planning his coronation in Milan among many other administrative things. Despite his best intentions, he would find a high amount of resistance to his efforts among the Milanese revolutionaries.
While all the Milanese were unanimous in the complete ouster of the hated Austrians, they remained incredibly divided over what should take its place. The Conservatives and Moderates under Count Gabrio Casati supported the ascension of Charles Albert as King of Lombardy as a precondition of his army’s support in the ongoing conflict against Austria, without which they would surely suffer defeat. Casati had even dispatched envoys to Turin back in March, hoping to turn the Sardinian King in favor of their cause. While Casati’s efforts appear altruistic and noble, they betray a disdain for the Milanese Liberals whose radical ideals he and many others opposed just as much as the Austrians. To that end, Charles Albert was a means of defeating the Austrians as well as the Liberals.
The Liberals, led by Carlo Cattaneo and Enricho Cernuschi opposed the coronation of Charles Albert, having come to despise him for his previous betrayals of the Carbonari and Young Italy in the 1822 and 1831 uprisings. In their eyes he was a wolf in a sheep’s clothing, pretending to be an avid supporter of Italian nationalism and liberalism, when in fact he was a loyal absolutist and conservative at heart. His past alliance with Austria also did little to ingratiate himself to the Milanese rebels which would succeed in souring many to the Sardinian King’s candidacy. Instead, the Milanese Liberals desired the creation of a Lombard Republic free from both Austrian and Sardinian tyranny.
Ultimately the decision to immediately and totally unite the lands of Lombardy with the Kingdom of Sardinia would be put to a vote by the people of Milan on the 15th of May. Of the nearly 530,000 men who voted in the referendum, more than 140,000 would vote against the measure, requesting more time to deliberate and debate alternative solutions to the initiative. They were to be massively outvoted however, by more than 390,000 of their compatriots who voted for union with Sardinia. While many Milanese Liberals and Republicans would continue to agitate for a republic government and autonomy from Sardinia, most would eventually come to accept the resolution, bringing the matter to a close. With his mandate to rule secured, King Charles Albert finally felt the need to return to the front in late May only to find that much had changed since he had last seen the front.
King Charles Albert Returns to War
Although a few skirmishes had taken place between the Sardinians and Austrians over the past two months, the Sardinians had repeatedly failed to draw out the Austrians from behind their walls. The Austrian Commander at Verona, General Heinrich von Rath would vigorously oppose any Sardinian assault on his ramparts, throwing back each attempt at great cost to the Italians. Ultimately, Prince Victor Emmanuel had decided to starve the fortress into submission, sending men to secure the east bank of the Adige and cut off their access to Trentino which was a vital artery for Austrian communication and resupply in the region. However, their attempts to seize the bridges over the Adige met with failure as the Austrians had destroyed all but three bridges in the area, which were heavily defended by General Rath’s men. The Italian attempt to force these crossings met with stern resistance and high casualties forcing Prince Victor Emmanuel to end the attack. Their attempts to cut the road to Trentino would also end in failure when a squadron of Hungarian hussars and Croatian skirmishers repelled a Sardinian incursion near the commune of Rovereto.
The Central and Southern Italian armies had little success against Legnano as well, although they would succeed in forcing the crossing at Badia Polesine, allowing them to encircle most of Legnano. Even still, progress remained slow for the Italians at Legnano as Count Ficquelmont vigorously opposed them with whatever men and resources he could muster. By mid-May though, the situation began to improve for the Austrians as General Laval Nugent von Westmeath arrived in Northern Italy with an additonal 21,000 men. These men were immediately put to work besieging the city of Treviso, which would fall two weeks later on the 29th of May, before moving to relieve the besieged garrison in Venice. Nugent’s men would quickly occupy the landward communes of Venice in early June, but their efforts to retake the Lagoon were harried by the Venetians whose galleys and ketchs ruled the lake with impunity. However, the arrival of the Imperial Austrian Navy on the 10th of June would aid immensely their efforts to retake the city.
The Imperial Austrian Navy was an organism which was thoroughly Italian in nature. Their ships were made in Italian ports, they bore Italian names on their hulls, and they were manned almost entirely by Italians, with over 4,000 of the 5,000 sailors in the Austrian Navy being of Italian origin. Upon hearing the news of the initial uprising in Milan, Archduke Friedrich-Ferdinand of Austria, Commander in Chief of the Austrian Navy, immediately moved the Navy out to sea from Venice and set for the small port of Pula to the east. The news from Milan was kept strictly confidential from his crew so as not to provoke a mutiny by the radicals among their ranks.
Once he had reached the safety of Pula's port, Archduke Friedrich had any sailor suspected of traitorous intent imprisoned, while rest were relieved of their duties. While this would deplete the strength of the Austrian Navy in the short term, it would prevent the Italians from mutinying and seizing their ships. Archduke Friedrich would soon bring in Croatians and Dalmatians, Germans and Hungarians, Slovenes and Slovacs to replace the Italians, and by early June they were ready for service once again. With the Navy secured, the Austrians would soon implement a blockade of the city before beginning a protracted reconquest of Venice, securing the Lagoon island by island.

The Blockade of Venice
The Austrians were also aided by the relative lack of cohesion and cooperation between the various Italian armies. King Charles Albert, as head of the largest Italian army in play, claimed overall authority in the war against Austria. However, this position was challenged by the various monarchs, generals, and diplomatic envoys of the Italian states who argued against his leadership for one reason or another. Some supported the candidacy of King Ferdinand II of the Two Sicilies, but his suppression of the revolution on Sicily, combined with his rather lukewarm support for the war against Austria turned many away from him. Only two other heads of states received any attention from their peers, but in spite of a vigorous campaign on the part of Grand Duke Leopold of Tuscany for the post, a majority of generals and politicians ignored him in favor of Pope Pius IX, whom they offered supreme leadership of the Italian Coalition as he had been first to declare against the Austrians.
While the election of the Pope as the Commander in Chief of the Provisional Italian Federation, helped unite the various states of Italy together, the Pope's growing opposition to continued hostilities proved problematic in many regards. The Venetians also did themselves no favors in winning support for their independence as they rejected King Charles Albert’s call for a united Northern Italian Kingdom, choosing instead to declare their independence as the Republic of San Marco with sovereignty over the whole of Veneto. However, their failure to extend much in the way of support to the cities of Treviso, Padua, and Chioggia when they came under assault by the Austrians did much to discredit the Republic in the eyes of the mainlanders of Venetia.
While the putative Republic of San Marco would continue to defy the Austrians for another month and a half, by mid-July 1848 the situation in the city had become untenable. Munitions were growing scarce, food was in short supply, and the Austrian noose was tightening around their necks both on land and at sea. With no other choice, the remaining defenders would attempt a final sortie on the 17th of July, cutting across the lagoon towards Chioggia where they would attempt to continue the fight. However, their escape would be short lived as the Austrians quickly discovered the Venetian breakout and fell upon them with fury and rage, forcing the beleaguered survivors to surrender.[5] With Venice secured, General Nugent turned his full attention to reducing the city of Chioggia which was subsumed a few days later and then Padua which would surrender by the end of the month, effectively bringing an end to the Republic of San Marco as every Italian city east of the Adige had fallen to the Austrians. Only the secluded townships of Este and Monselice would remain under Italian control, thanks to the difficult terrain of the Euganean Hills and the fierce resolve of their people.
So as not to lose their last foothold in Venetia, the Papal Army and Neapolitan Army, along with thousands of Lombard and Romagnan volunteers would immediately ford the Adige River near Badi Polesine before moving to relieve Este and Monselice which had been put under siege by the Austrians. Here they would not only find General Nugent and his men, but also Count Ficquelmont and the entire Army of Lombardy-Venetia which prepared to do battle against them. Despite being caught off guard by the assembled might of the Austrian Army, the Italians exhibited a youthful exuberance and eagerness for battle. As commander of the Papal Army, General Durando assumed control of the Italian forces, arranging his force into two wings; his left was to be composed of the Neapolitan soldiers and foreign volunteers under the command of General Guglielmo Pepe, his right would be comprised of his own troops and the Lombard and Romagnan volunteers. Ficquelmont arranged his forces in kind, taking up post on the Western end of the battlefield near Este, while Nugent was arraigned further East outside Monselice.
Despite fielding a slightly larger army than their Austrian adversaries, the Battle of Este-Monselice would be an unmitigated disaster for the Italians. Caught up in the excitement of it all, several young men from Ravenna on the Italian right wing would break ranks and recklessly charge the Austrian front line with great élan and vigor. Their jeers and jabs for blood and glory soon encouraged the boys of Ferrara, Bologna and Mantua to join them in their assault. Within minutes, thousands of their compatriots began to follow these brave patriots against the commands of their officers, pushing up the hill towards the Austrian lines with trumpets blaring, flags aflutter in the wind, and songs of victory on their lips.
Most of these young boys would be tragically cut down far short of the Austrian line in a ruthless massacre of smoke and lead. Their bright uniforms were soon stained with mud and blood, their flags ripped full of bullet holes, and their cheers of gallantry and bravado were replaced with cries of agony and despair. Those that survived the first volley were either cut down in the second and third volleys or fled the field in terror. Before long, the ad hoc Italian offensive had been gutted as the few remaining survivors ran back into the ranks of the more disciplined Papal soldiers, sparking a cascade of panic and fear throughout the ranks that come to consume it within seconds. With the Papal Army in retreat, the Neapolitan Army was left to fend for itself and soon came under the concentrated attack of both Ficquelmont and Nugent. Despite being outnumbered now 2 to 1, they would be spared complete destruction thanks to the heroic efforts of their commander General Pepe and the dogged resistance of the Greco Brigade and a few veteran units of the Neapolitan Army which fought a desperate rearguard action for several long hours before finally retreating to safety after nightfall.

The Battle of Este-Monselice
Nevertheless, the battle of Este-Monselice was a complete disaster for the Italians by every definition of the word. Of the roughly 60,000 men who took part in the battle, they would lose nearly a third, with most losses occurring in the opening assault and the horrific retreat that followed. The Austrians did much better for their part, only losing 4,900 men dead, wounded, missing, or captured out of their original 56,000. Following the battle, the remainder of the Central Italian Army would retreat southward across the Adige River where they had hoped to regroup. The Austrians would not allow this however, and immediately pushed across the river, breaking the siege of Legnano, and forcing the Italian Army would retreat across the Po River where it effectively disintegrated. The Neapolitan contingent would be recalled to Naples by King Ferdinand II soon after this defeat, while Pope Pius considered recalling his forces as well. Many of the foreigners discouraged by the results in Italy would depart for other battlefields where they might find greater success. Those that remained in camp on the 5th of August would make their way Northward to join with the Sardinian Army.
The collapse of the Republic of San Marco and the destruction of the Italian Army at Este-Monselice came as a shock to the Sardinian King and his Generals who had been confident in their total victory over the Austrians. Jolted out of their sense of complacency, the Sardinians now found themselves in a precarious position as Count Ficquelmont moved to face them with the full might of the Austrian Army of Lombardy-Venetia. Unwilling to be caught between the stone walls of Verona and the Imperial Austrian Army, King Charles Albert readied his forces for battle, leaving behind a screen to guard against an attack by the fortress’ defenders. While the situation for the Sardinians was dire, it was not irreparably so, as their scouts superbly followed the Austrian Army’s march up and down the length of the Adige. When it became clear that the Austrians were making for the bridge at Zevio, King Charles Albert moved his army to oppose them.
Despite their haste, Ficquelmont would arrive at the small riverside commune before the Sardinians, finding the town lightly defended by Lombard militiamen who were quickly driven from the town. Unable to prevent their crossing, King Charles Albert positioned his force opposite them, however in the midst of his preparations for battle, the king fell from his saddle. Nearly 5 months of constant campaigning, often in the oppressive heat of Summer and the torrential rains of Spring, the constant stress of political intrigue and subterfuge in Milan, as well as his own poor diet would all contribute to King suffering a heart attack that day. Although he would survive, the Sardinian King would be rendered bedridden for many days to come and would suffer from terrible coughing fits every so often.[6] With the King carried from the field of battle on a stretcher, command fell to his son Prince Victor Emmanuel who readied his men for battle against the Austrians at Zevio. However, seeing their King fall as he did devastated the Sardinian morale, with many believing God had struck him down for fighting against his fellow Christians. As such, their initial attack against the Austrians was slow and poorly executed, and when the Austrians counterattacked they were able to drive them from the field with relative ease bringing the battle to a quick and decisive end.
The battle of Zevio was a victory for Count Ficquelmont and the Austrians, but it was not the total victory which he desired as the Sardinian Army would manage to retreat in good order thanks to the efforts of the small Tuscan Army which held the Austrians at bay for several hours before escaping under the cover of darkness. With Prince Victor Emmanuel defeated at Zevio, the Sardinian force outside Verona was forced to abandon the siege of the fortress city and rejoin the main army as it retreated westward towards Milan. Over the next three days, Ficquelmont would chase Prince Victor Emmanuel and his men to the banks of the Mincio River, engaging in the occasional skirmish with the Piedmontese rearguard, but failing to bring the main army to battle. Finally, however, their chase would come to an end when he caught the Sardinians and their allies at the riverside town of Goito on the 10th of August.
Brushing aside the meager forces Prince victor Emmanuel had left to defend the bridgehead, the Austrians would discover the Sardinians stop their retreat and intended to fight, a fight which Ficquelmont readily accepted. The Sardinians assembled their forces in three columns, the 1st Corps under General Bava on the left flank, 2nd Corps under General de Sonnaz in the center, and the Italian and foreign volunteers comprising the right flank, while Prince Victor Emmanuel’s 5th Division was held in reserve. Ficquelmont in turn arranged his force in kind, with General Konstantin d'Aspre assuming command of the right column, General Laval Nugent von Westmeath commanding the center, and General Julius Jacob von Haynau commanding the Austrian left flank, while Ficquelmont, his reserves, and the Austrian artillery were positioned on the heights on the east bank of the Mincio. With his forces properly arranged, Ficquelmont ordered his men to advance, initiating the 2nd Battle of Goito.
The battle between the two armies would be evenly matched in the North and in the center were the fighting degenerated into a bloody melee, but the difference in quality of the Austrian soldiers and the irregulars of the Sardinian on the southern end of the battlefield would be especially stark. Most of these men were fresh conscripts from Milan, volunteers from Central and Southern Italy, or foreign adventurers like the fighting men of the Greco Brigade and while they were certainly brave and zealous to a fault, the fresh Milanese recruits proved to be no match for General von Haynau’s infamous “Tiger Corps” in open combat.[7] The ruthless commander honed his cannons on the Milanese position in particular, dealing them egregious casualties and before long they were broken underneath the weight of the Austrian cannonade. As had happened at Este-Monselice and again at Zevio, the Italian units fled the field in terror, prompting the rest of the Sardinian Right flank to collapse under the weight of the Austrian advance.

The Second Battle of Goito
With the Sardinian right flank routing from the field of battle, it appeared that victory was at hand for Count Ficquelmont who promptly ordered General von Haynau to continue driving the enemy from the field. The courier relaying Ficquelmont's commands to Haynau responded with vague directions rather than the precise strike that Ficquelmont had envisioned leading Haynau to misinterpret the commands for a pursuit of the fleeing men of the Sardinian Right Flank rather than an attack on the now exposed flank of the Sardinian center as originally intended. Haynau’s aggressive nature would get the better of him that day, as he would refrain from questioning his new orders and immediately set off with his men after the fleeing Milanese. Although Ficquelmont would quickly discover Haynau's mistake and dispatched another messenger to correct him, by this point in the battle it was too late.
General von Haynau's pursuit of the fleeing Milanese had extended the Austrian line well beyond its’ means, creating a small opening which the Sardinian Prince Victor Emmanuel immediately moved to exploit.
Throwing all his reserves, his cavalry, and his own personal guard into this one attack, Prince Victor Emmanuel’s men quickly crashed into the Austrian ranks with tremendous force and would successfully push their way through to the banks of the Mincio, effectively splitting the Austrian army in two. Now recognizing his mistake, General von Haynau would attempt to swing back and pin the Sardinian Prince between his soldiers and the Mincio river only to be confronted by the very same soldiers he had been pursuing only moments before. Having regrouped at a secondary position outside the range of the Austrian cannons, the Milanese, their foreign allies, and Italian compatriots now moved to block Haynau and his men for as long as they were able, preventing the Hapsburg Tiger from moving to assist Ficquelmont. With both sides now engaged in a brutal hand to hand melee, the discipline of the Austrians began to breakdown as the lines between each force began to blur.
Despite this setback, the Austrian Army remained confident in their chances for victory right until Prince Victor Emmanuel’s men seized control of the Goito Bridge. Dread soon engulfed the Austrian Army as it was now cut off from its line of retreat and soon discipline began to collapse in the Austrian ranks as well. Despite this Count Ficquelmont tried desperately to restore order in his ranks, but as he was on the other side of the river, there was very little he could do to save his army. Most immediately tried to force their way across the bridge in conjuncture with Ficquelmont's reserves, but Prince Victor Emmanuel’s men held firm, denying them this route of escape despite the desperate assault by the Austrians. By this point order had all but collapsed in the army as men began jumping into the river by the thousands in a desperate attempt to make their escape from the Sardinians. While most would succeed in escaping over the river, many had been forced to leave their kit and weaponry behind as several hundred poor souls were sadly dragged beneath the surface by the weight of their heavy loads, leaving them to die terrible deaths in its watery depths. By dusk, the battle was over, the Austrians were broken, the Second Battle of Goito was a total Sardinian victory.
Of the 62,000 Austrian soldiers to take part in the battle, over 19,000 would be captured, killed, missing, or wounded by day's end compared to 13,000 casualties for the Sardinians and their Allies. General Nugent's corps had been smashed to pieces in the battle, suffering nearly 10,000 losses alone, most of whom had been captured in the waning moments of the fight. While General A'spre's Corps managed better, having successfully managing to ford the river upstream, they had been involved in some of the toughest fighting of the day on the Northern edge of Goito and suffered upwards of 6,100 casualties, mostly dead and wounded. Surprisingly, it would be General Haynau's Corps which did the best that day, only suffering 2,900 casualties in the entire battle, with most being inflicted during their long fighting retreat eastward.
The successful retreat of General Haynau and his men would provide Count Ficquelmont and the Austrian Government with little comfort however, as valuable men and resources that could not be easily replaced were loss by the tens of thousands, while victory had provided the flagging Italian cause with new life. In the days ahead, the Austrian position in Northern Italy all but collapsed in the face of the Italian counteroffensive. By the end of the Summer campaigning season, the Sardinians and their allies would successfully drive the Austrians from Lombardy entirely, pushing them across the Adige and setting siege to the fortress cities of Verona and Legnano once more. While Ficquelmont would manage to hold the line at the Adige River, albeit barely, it was abundantly clear that he could do little else as Venetia threatened to fly into open revolt once again.
Desperate to fix the situation in Italy, Chancellor Metternich declared a state of emergency across the Empire and imposed new taxes on the Estates to help pay for the construction of a new army. In addition to these new taxes, Metternich also issued new draft laws that would raise another army by expanding conscription to all men age 18 to 36 from all the Empire's provinces, including Hungary despite the objection of their Diet. Rather than aid the embattled chancellor, the imposition of new war taxes and conscription plans would only worsen matters for Metternich and the Austrian Government as draft riots quickly emerged all across the Empire. Angered mobs resented seeing their young men and boys carted away to serve in Metternich’s war and would attack government officials and military recruiters where ever they could find them. By the end of August, rioters would come to rule the cities of Prague, Brno, Temeschwar, Lemberg, and Czernowitz, but by far the worst uprisings would take place in Hungary as the blatant disregard shown to their autonomy and the ongoing repression of their liberties would drive the people of Pest to rise in revolt against the Austrian authorities.
Next Time: Anarchy in Austria
[1] The OTL revolt in Venice was greatly inspired by the success of the revolutionaries in Vienna, which had succeeded in driving Metternich from power on the 13th of March. Metternich’s successor, Count Franz Anton von Kolowrat-Liebsteinsky was appointed a week later but was quickly forced to resign due to health problems, beginning a cycle of new Governments rising and then quickly falling in rapid succession from late March to late November, leaving the Imperial Government in utter chaos. The Venetians, as well as the other minorities of the Empire, took great advantage of this by ousting the Austrian authorities in Venice and declaring the establishment of the Republic of San Marco. As Metternich remains in charge, for now, the Venetians lack the same optimism they had in OTL following Metternich’s resignation, while the Austrians in contrast are on a much better footing, at least initially. As such, the Venetian Uprising fails to completely dislodge the Austrians.
[2] So, for various reasons I’ve decided to keep Marie Louise, second wife of Napoleon Bonaparte and mother of Napoleon II, alive a little longer. As a result, she still retains control of the Duchy of Parma at the time of the Revolutions of 1848, which in turn means that the OTL duke of Parma at this time, Charles Louis is still Duke of Lucca.
[3] Charles Albert had agreed to an alliance with the Austrian Empire following the July Revolution of 1830, believing that France would invade Sardinia as it had done after the 1793 French Revolution.
[4] Owing to the protracted Milan Uprising ITTL which was 12 days as opposed to the 5-day siege of OTL, the remaining Austrian forces in Italy are reduced compared to OTL.
[5] As the initial uprising is less successful in Venice ITTL, the Republic of San Marco has a much shorter lifespan here. In all honesty, the OTL Republic was aided immensely by the disfunction of the Austrian government in the wake of Metternich’s downfall. As that is not the case here, the Austrian response is swifter and more cohesive resulting in an early death for the Republic of San Marco. I've also chosen to spare Archduke Friedrich Ferdinand from his early death by jaundice as a means of balancing the more successful Italian offensive in Lombardy. His survival greatly helps the Austrian navy which was, apart from the problems of being manned almost exclusively by Italians and thus highly disloyal, it also struggled from a leadership standpoint IOTL, going through 4 different Commanders in Chief between Friedrich's OTL death in October 1847 to the beginning of the First Italian War of Independence in March 1848.
[6] Before he died in OTL, King Charles Albert suffered from liver disease and several heart attacks which left him bedridden and in terrible pain.
[7] Known to his men as the Hapsburg Tiger, Austrian General Julius Jacob von Haynau was a highly talented, yet incredibly aggressive commander who was renowned for his extreme brutality. He was personally responsible for the massacre of numerous Brescians following the 10 Days of Brescia and he ordered the execution of the 13 Rebel Hungarian Generals at Arad.
Charge of the Savoy Cavalry at the Second Battle of Goito
While it can be said that the Kingdom of Greece enjoyed a relatively tenuous peace in 1848 and 1849, the same cannot be said for the Austrian Empire which teetered on the edge of imminent catastrophe. Beginning in the Northern Italian city of Milan in early January 1848, unrest steadily built against the hated Austrian Chancellor Klemens von Metternich and his unpopular reactionary policies. Over time, demands for more autonomy for the Northern Italian Kingdom soon developed into mass protests and demonstrations against Austrian occupation of Lombardy-Venetia in general. After a failed putsch on the Governor's palace in Milan the city would descend into a bloody conflict by late March before quickly spreading to the rest of the country.
Despite being outnumbered and outgunned by the unruly mob and radical revolutionaries, the Austrian garrison was ordered by Vienna to hold their positions until reinforces from across the Alps could be sent to relieve them. Unfortunately for the Austrian soldiers, the promised reinforcements would not arrive in time as the Royal Sardinian Army promptly forced their way across the border on the 3rd of April; King Charles Albert of Sardinia-Piedmont had thrown in with the revolutionaries and was on his way to Milan with all haste. With the Sardinian Army charging across the border into Lombardy-Venetia and with their situation rapidly deteriorating in the city itself, Austrian Field Marshal Joseph Radetzky von Radetz was forced to order an immediate evacuation of the city and head for the Quadrilateral Fortresses, a series of defensive works centered on the fortresses of Legnano, Mantua, Peschiera del Garda, and Verona to the East where his army would regroup and await reinforcements from Austria.
Field Marshal Radetzky’s decision to withdrawal from Milan had not come a moment too soon, as the vanguard of the Sardinian Army quickly arrived on scene as the last beleaguered battalions of the Austrian Army made their escape. Cursory skirmishing would occur over the course of the next few hours and days, but by nightfall on the 6th of April 1848, the Austrian Army had escaped. Field Marshal Radetzky had managed to save his army, but his escape had come at a great cost. The loss of nearly 5,000 soldiers in the Milanese Uprising and another 1,600 in the escape to the Quadrilateral was a tragic blow to the 1st Army of Lombardy-Venetia, but the more damaging blow to the Austrian position in Italy would be the resulting political fallout that would soon follow.
The Fall of Milan and much of Lombardy to the Italians was a terrible humiliation for the prideful Austrian Empire and its’ embattled Chancellor Metternich as various liberal groups would quickly seize upon the news in Italy to muster in the streets of Vienna once more. Although he would weather this political storm just as he had the one prior in early March, it was clear that Metternich’s hold on the Austrian state was quickly loosening. Desperate to restore his credibility, Metternich looked to Radetzky for a scapegoat, blaming the old Field Marshal for the loss of Lombardy to the rebels and their Sardinian allies. For this “failure”, Field Marshal Radetsky was removed from command of the Austrian Army of Lombardy-Venetia. Radetzky, ever a loyal servant of Austria, accepted the decision without complaint and retired to his estates where he would live out the rest of his days in peace, dedicating himself to his family and his memoirs until the day he died. With Radetzky removed from command, Metternich would quickly move to replace him with his own man on the ground, Field Marshal Karl Ludwig von Ficquelmont.
Count Karl Ludwig von Ficquelmont, Field Marshal of the Austrian Empire
Count Ficquelmont was a man cut from the same cloth as Metternich; he was a nobleman, a conservative politician to his core, and a statesman renowned for his great skill as a diplomat. Unlike Metternich, Ficquelmont had served as a soldier during the Napoleonic Wars and was a gifted officer, providing him with a degree of military experience that Metternich lacked. However, he was by no means a young man by the start of 1848, having just celebrated his seventy-first birthday, and it had been many years since he had last seen the field of battle in 1814. Nevertheless, he was a trusted confidant and ally of Chancellor Metternich, one who could be relied upon to salvage the dire situation in Northern Italy for the Austrian Empire. However, while Count Ficquelmont was up to the task of reclaiming Lombardy, the army he had inherited from Field Marshal Radetzky was not.
Conditions in the Austrian Army of Lombardy-Venetia were abysmal. Much of their weaponry had been lost in the retreat from Milan, with the most significant loss being among the Army's cannons. 21 guns were lost at Milan, having been captured by the revolutionaries or spiked by their crews, while another 11 were lost in the ensuing escape to the Quadrilatero. Nearly two thousand soldiers had lost their rifles, and more than half of the men in the army were missing pieces of their uniforms. More concerning than the dearth of military equipment was the poor morale of the Army, which had reached an all-time low following Field Marshal Radetsky's removal from command.
Radetsky had been beloved by his men; he had lived among them, he listened to them, he cared for their concerns, and while he did drill his soldiers relentless, it was with the intent of making them the best soldiers that they could be. He was a quintessential gentleman whose stern, but fair judgement had earned him the respect and admiration of not only the men under his command, but the respect and admiration of his adversaries as well. Most importantly, he was the regular soldier’s patron in Vienna; a vocal proponent for increasing the soldiers’ salaries and military funding as a means of improving the Army’s quality in the face of mounting challengers. As such, his removal from command by Metternich, and the subsequent replacement with the aloof Count Ficquelmont was viewed as a betrayal by the men of the Army of Lombardy-Venetia. Because of this, the disastrous Milanese Uprising, and a host of other issues, desertions from the army would dramatically increase in the days and weeks ahead, depleting the Army of Lombardy-Venetia's already low numbers even further. Of the 70,000 Imperial soldiers stationed in Northern Italy at the start of the year, barely 40,000 remained under arms by mid-April 1848.
Most of the combat losses had been suffered at Milan, but rebellions across all of Lombardy-Venetia in the subsequent days would deplete Austrian manpower tremendously as isolated garrisons were attacked by Italian patriots with near impunity. While the casualties among the German, Czech, Croat, and Hungarian troops was certainly high and incredibly harmful to Ficquelmont’s efforts, the greatest blow to Austrian strength in Northern Italy was the near total desertion of the Italian contingent within their ranks. Of the 21 Italian Infantry battalions stationed in the Kingdom of Lombardy-Venetia, 18 battalions would defect in part or in full, joining with the revolutionaries, and providing them with a competent core of highly-disciplined and battle-hardened fighters. Moreover, these men were among the most capable and determined fighters on the Italians’ side, fighter longer and harder than their less skilled compatriots much to the dismay of their former allies in the Austrian Army.
Because of this betrayal, the Italian few units that did remain loyal to Vienna were distrusted so completely by Ficquelmont and Metternich, that they were relegated to menial posts far from the front where they could do little harm if they did turn traitor. Ficquelmont would also establish a state of martial law over the territories under his control; villages found to be supporting Italian Nationalist groups were burnt to the ground, civilians accused of supporting them were imprisoned indefinitely, and any armaments of war or beasts of burden were confiscated without payment. Finally, Count Ficquelmont had any man suspected of traitorous inclinations immediately arrested, while those soldiers who were caught attempting to desert his army were to be executed by firing squad without so much as a trial in their defense. While these initiatives would certainly curtail the flood of desertions by the Italians in his ranks to a small trickle, it did little to endear him to the local populace who grew to hate him.
Death of the Deserters
With the Austrian morale recovering, albeit slowly, Count Ficquelmont immediately began marshaling his forces in theater. At most, he had 40,000 to 46,000 men scattered North of the Appenines with most gathering in and around the Quadrilateral Fortresses of Legnano, Mantua, Peschiera del Garda, and Verona. Another 22,000 men had been gathered in Gorzia under the command of General Laval Nugent von Westmeath and were presently beginning their march through the Alps to reinforce him, but it would be some time before they finally arrived on scene. Ficquelmont would come to need every man he could get as the forces gathering against him numbered well over thrice his own.
Encouraged by the Austrians’ failures to subdue the revolt in Milan, other partisans and freedom fighters began to rise in rebellion across the entirety of the Italian Peninsula, stretching Austria’s already thin resources ever further. The most heated fighting outside of Milan would take place in the storied city of Venice as the people of the city rose in revolt against their Austrian occupiers. Their attempts to liberate Venice would run into an immediate problem when their raid on the Venetian Arsenal was discovered by the local authorities and crushed with ruthless brutality.[1] However, the massacre of the Arsenal rebels would prompt uprisings across the entire city, forcing the outnumbered Austrians to withdraw to the Castello where they would remain under siege by the Venetians for the next few months. Revolts elsewhere in Northern Italy would see more success for the Italians as Brescia, Cremona, Padua, and Treviso successfully managed to oust their Austrian occupiers, although Padua and Treviso would be quickly reoccupied by the Austrians later that Summer. By themselves, it was clear that the Lombards and Venetians stood little chance against the full might of the Imperial Army; it is fortunate then that they were not alone in this endeavor.
Soon after the initial outbreak of hostilities in Milan, the various armies of the Italian states began marching to their aid, first among them was the army of the Papal States. Despite his opposition to war and his reluctance to support Italian nationalism, Pope Pius IX could not resist the will of his people who cried out for freedom, nor could he abide by the evils committed on the part of the Austrian Empire which tyrannized the poor peoples of Italy for its own benefit. Metternich’s brazen occupation of various cities and lands lawfully belonging to the Papal States were an added motivation for the Pope and the Curia as well, prompting them to dispatch their own army in support of the Lombard rebels in late March. Led by the Liberal Sardinian expat, General Giovani Durrando, the Papal State’s Army, some 20,000 strong was mostly comprised of young volunteers and eager recruits with little fighting experience or martial discipline. Despite their relative inexperience, the Papal volunteers quickly proved their worth to the Italian cause, overwhelming the meager Austrian garrisons in Ferrara, Ravenna, and Bologna, before chasing the remaining Austrians across the Po in mid-April.
Next to declare against the Austrians were the Duchies of Modena and Lucca which had deposed their hated Dukes (Francis V of Modena and Reggio and Duke Charles of Lucca) in the days following the start of the Milanese Uprising. Comprised almost entirely of Italian nationalists and liberals, the new provisional governments of Modena and Lucca would immediately denounce the Austrian Empire’s occupation of Northern Italy before dispatching a thousand men each to join the Lombards in the fight against the Austrians. The neighboring duchy of Parma would see its ailing Hapsburg Duchess, Marie Louise coerced into issuing a more liberal constitution as well as permitting men and arms to be sent to the Lombards and Venetians.[2] Under pressure by popular sentiment, the Austrian-Este Grand Duke Leopold of Tuscany was also forced to issue a liberal constitution to appease the nationalists within his realm as liberal unrest threatened to dethrone him as well. Throwing his full support behind the Italian cause, Grand Duke Leopold would also dispatch a division of the Tuscan Army, some 7,600 strong into Northern Italy to aid the rebels. Even the conservative King Ferdinand II of the Two Sicilies was likewise compelled to send both men and munitions to the growing Anti-Austrian Alliance despite fighting his own war against the Sicilian Revolutionaries.
The Lombard Revolutionaries would also be aided by several thousand volunteers from abroad, with most coming from Germany, France, and Spain among a few other countries, but of all the bands of foreigners to fight in Italy, the most notable were the fighters of the so called “Greco Brigade”. Despite their name, the Greco Brigade was more akin to an understrength regiment, numbering around 1100 to 1400 men, many of whom were of various backgrounds and nationalities, although most were Greek. The “Greco Brigade” would prove to be a very potent fighting force who would serve admirably throughout the war to come, inflicting serious blows on their Austrian foes in the many battles ahead, earning high honors for their bravery and potency. More worrying than the Italian rebels or the diverse amalgamation of allies fighting alongside them, however, was the Royal Sardinian Army some 65,000 strong, which marched across the Ticino River into Lombardy-Venetia virtually unopposed on the 2nd of April.
The Royal Sardinian Army Crosses the Ticino
In what was an unabashed betrayal of the alliance between their two states and their two houses, King Charles Albert of the Kingdom of Sardinia-Piedmont threw himself headlong into the war against Austria.[3] Although he was very much a conservative man and he was himself married to an Austrian Archduchess; his personal relationship with the Austrian government had soured over the years owing to rising commercial competition between the two states in Switzerland and Lombardy-Venetia along with the constant interference of Chancellor Metternich into Sardinian affairs. Because of this, Charles Albert would undergo somewhat of a political metamorphosis over the course of the 1840’s, adopting more liberal views on Italian Nationalism and developing a highly negative view of the Austrian occupation of much of the Italian Peninsula. The Milanese Uprising and the apparent weakness of the Austrians would also provide Charles Albert with an ample opportunity to finally fulfill the House of Savoy’s long-standing ambition to acquire Lombardy. But perhaps the most important justification for Charles Albert’s betrayal of the Austrians lay in the politics of the day.
Sardinia-Piedmont, like much of Europe, was wracked with revolutionary activity and nationalistic fervor and to avoid the same sad fates that would befall King Otto of Belgium, King Ludwig of Bavaria, Duke Charles II of Lucca, and Duke Francis of Modena; Charles Albert, either willingly or reluctantly, played to the whims of the masses who desired war with Austria. Like his fellow Italian sovereigns, he would enact a liberal constitution establishing a popularly elected Chamber of Deputies, the right to vote, the right to assemble, freedom of the press, and a whole host other rights and liberties for the people of Sardinia-Piedmont. Finally, when the Milanese rose in revolt against the Austrians, Charles Albert readied his army for war. Assembling at the fortress town of Alessandria, the Royal Sardinian Army, comprised of 5 divisions of infantry and 2 brigades of cavalry, totaling 60,000 men and 64 artillery pieces, readied for war. Adopting the Italian tricolor as his own, King Charles Albert issued his orders and crossed the Ticino; the Milanese Uprising had become the Italian War for Independence.
The Sardinian advance towards Milan would be blisteringly fast as King Charles Albert hoped to capture the ancient city and the Austrian Army of Field Marshal Radetsky in one fell swoop. While they would ultimately fail to meet this objective as Radetzky would retreat from the city with time to spare, they would succeed in forcing the Austrian rearguard to battle north of the town of Crema where they bloodied it extensively forcing it to flight once again. In a bid to widen the gap between them, the retreating Austrians would destroy every bridge they came across in an effort to slow the Sardinian advance and to funnel them towards the mighty fortress of Peschiera del Garda.
Peschiera del Garda
Under normal circumstances, the Fortress of Peschiera del Garda could be expected to hold against adversaries for months on end, but it was not to be on this day. The Austrian soldiers within its walls were demoralized after a series of terrible defeats and exhausted from the nearly 80-mile chase from Milan. Seeking to push across the Mincio River as fast as possible, King Charles Albert ordered an immediate assault on the castle walls. While the Austrians would muster all their strength to successfully repel the first Sardinian assault, albeit with heavy casualties, when the Sardinians attempted a second assault the following day, the walls fell within minutes.[4]
The fall of Peschiera del Garda came as a shock to Field Marshal Radetzky and the Austrian General Staff, who had been relying upon a prolonged siege to occupy Sardinia’s army long enough for them to regroup. This turn of events would be quickly followed by an uprising at Mantua three days later which would successfully defeat the city's depleted garrison. Those poor soldiers unlucky enough to be captured alive would suffer a torturous fate as they were torn limb from limb by the frenzied Mantuan mob, others were drawn and quartered, while a few more were butchered beyond recognition in a terrible display of human barbarity that would come to define this conflict. With the loss of Mantua and Peschiera del Garda in rapid succession, Field Marshal Radetzky was forced to retreat even further to the East, behind the banks of the Adige in late April. It is here that King Charles Albert’s inexperience as a commander came to the fore.
Believing that the remaining fortresses at Verona and Legnano would be taken as easily as Mantua and Peschiera del Garda, King Charles Albert would order an assault on the walls of Verona. Despite achieving some success in securing parts of Verona's walls, the Austrians would swiftly counterattack, driving them back with horrific losses. Three more assaults would also be beaten back forcing the Sardinians to dig in for a protracted siege of the fortress. To the South, the Allied Italian Army of the Two Sicilies, the Papal States, Tuscany, Parma, Modena, and Lucca forced the surrender of the Austrians at Ostiglia, Rovigo, and Adira before marching on Legnano in late April. Progress would be slow at Legnano though, as the joint Central and Southern Italian Army would encounter many of the same problems which plagued the Sardinian Army had to the North, bringing the front along the Adige to a standstill.
As April came to an end and the stalemate continued, King Charles Albert’s interest in the day to day military affairs of the campaign began to wane, while his interest in other matters began to grow. Ultimately, on the 1st of May, he would choose to withdraw to Milan, leaving the continued prosecution of the war to his son Victor Emmanuel and his ablest generals Eusebio Bava and Ettore De Sonnaz who continued to fight with the Austrians in his stead. With management of the war no longer his chief concern, King Charles Albert immediately began consolidating his gains in the region, incorporating Lombardy into the Kingdom of Sardinia, appointing provincial governors over Lombardy, extending Sardinian laws to Lombardy, and planning his coronation in Milan among many other administrative things. Despite his best intentions, he would find a high amount of resistance to his efforts among the Milanese revolutionaries.
While all the Milanese were unanimous in the complete ouster of the hated Austrians, they remained incredibly divided over what should take its place. The Conservatives and Moderates under Count Gabrio Casati supported the ascension of Charles Albert as King of Lombardy as a precondition of his army’s support in the ongoing conflict against Austria, without which they would surely suffer defeat. Casati had even dispatched envoys to Turin back in March, hoping to turn the Sardinian King in favor of their cause. While Casati’s efforts appear altruistic and noble, they betray a disdain for the Milanese Liberals whose radical ideals he and many others opposed just as much as the Austrians. To that end, Charles Albert was a means of defeating the Austrians as well as the Liberals.
The Liberals, led by Carlo Cattaneo and Enricho Cernuschi opposed the coronation of Charles Albert, having come to despise him for his previous betrayals of the Carbonari and Young Italy in the 1822 and 1831 uprisings. In their eyes he was a wolf in a sheep’s clothing, pretending to be an avid supporter of Italian nationalism and liberalism, when in fact he was a loyal absolutist and conservative at heart. His past alliance with Austria also did little to ingratiate himself to the Milanese rebels which would succeed in souring many to the Sardinian King’s candidacy. Instead, the Milanese Liberals desired the creation of a Lombard Republic free from both Austrian and Sardinian tyranny.
Ultimately the decision to immediately and totally unite the lands of Lombardy with the Kingdom of Sardinia would be put to a vote by the people of Milan on the 15th of May. Of the nearly 530,000 men who voted in the referendum, more than 140,000 would vote against the measure, requesting more time to deliberate and debate alternative solutions to the initiative. They were to be massively outvoted however, by more than 390,000 of their compatriots who voted for union with Sardinia. While many Milanese Liberals and Republicans would continue to agitate for a republic government and autonomy from Sardinia, most would eventually come to accept the resolution, bringing the matter to a close. With his mandate to rule secured, King Charles Albert finally felt the need to return to the front in late May only to find that much had changed since he had last seen the front.
King Charles Albert Returns to War
Although a few skirmishes had taken place between the Sardinians and Austrians over the past two months, the Sardinians had repeatedly failed to draw out the Austrians from behind their walls. The Austrian Commander at Verona, General Heinrich von Rath would vigorously oppose any Sardinian assault on his ramparts, throwing back each attempt at great cost to the Italians. Ultimately, Prince Victor Emmanuel had decided to starve the fortress into submission, sending men to secure the east bank of the Adige and cut off their access to Trentino which was a vital artery for Austrian communication and resupply in the region. However, their attempts to seize the bridges over the Adige met with failure as the Austrians had destroyed all but three bridges in the area, which were heavily defended by General Rath’s men. The Italian attempt to force these crossings met with stern resistance and high casualties forcing Prince Victor Emmanuel to end the attack. Their attempts to cut the road to Trentino would also end in failure when a squadron of Hungarian hussars and Croatian skirmishers repelled a Sardinian incursion near the commune of Rovereto.
The Central and Southern Italian armies had little success against Legnano as well, although they would succeed in forcing the crossing at Badia Polesine, allowing them to encircle most of Legnano. Even still, progress remained slow for the Italians at Legnano as Count Ficquelmont vigorously opposed them with whatever men and resources he could muster. By mid-May though, the situation began to improve for the Austrians as General Laval Nugent von Westmeath arrived in Northern Italy with an additonal 21,000 men. These men were immediately put to work besieging the city of Treviso, which would fall two weeks later on the 29th of May, before moving to relieve the besieged garrison in Venice. Nugent’s men would quickly occupy the landward communes of Venice in early June, but their efforts to retake the Lagoon were harried by the Venetians whose galleys and ketchs ruled the lake with impunity. However, the arrival of the Imperial Austrian Navy on the 10th of June would aid immensely their efforts to retake the city.
The Imperial Austrian Navy was an organism which was thoroughly Italian in nature. Their ships were made in Italian ports, they bore Italian names on their hulls, and they were manned almost entirely by Italians, with over 4,000 of the 5,000 sailors in the Austrian Navy being of Italian origin. Upon hearing the news of the initial uprising in Milan, Archduke Friedrich-Ferdinand of Austria, Commander in Chief of the Austrian Navy, immediately moved the Navy out to sea from Venice and set for the small port of Pula to the east. The news from Milan was kept strictly confidential from his crew so as not to provoke a mutiny by the radicals among their ranks.
Once he had reached the safety of Pula's port, Archduke Friedrich had any sailor suspected of traitorous intent imprisoned, while rest were relieved of their duties. While this would deplete the strength of the Austrian Navy in the short term, it would prevent the Italians from mutinying and seizing their ships. Archduke Friedrich would soon bring in Croatians and Dalmatians, Germans and Hungarians, Slovenes and Slovacs to replace the Italians, and by early June they were ready for service once again. With the Navy secured, the Austrians would soon implement a blockade of the city before beginning a protracted reconquest of Venice, securing the Lagoon island by island.
The Blockade of Venice
The Austrians were also aided by the relative lack of cohesion and cooperation between the various Italian armies. King Charles Albert, as head of the largest Italian army in play, claimed overall authority in the war against Austria. However, this position was challenged by the various monarchs, generals, and diplomatic envoys of the Italian states who argued against his leadership for one reason or another. Some supported the candidacy of King Ferdinand II of the Two Sicilies, but his suppression of the revolution on Sicily, combined with his rather lukewarm support for the war against Austria turned many away from him. Only two other heads of states received any attention from their peers, but in spite of a vigorous campaign on the part of Grand Duke Leopold of Tuscany for the post, a majority of generals and politicians ignored him in favor of Pope Pius IX, whom they offered supreme leadership of the Italian Coalition as he had been first to declare against the Austrians.
While the election of the Pope as the Commander in Chief of the Provisional Italian Federation, helped unite the various states of Italy together, the Pope's growing opposition to continued hostilities proved problematic in many regards. The Venetians also did themselves no favors in winning support for their independence as they rejected King Charles Albert’s call for a united Northern Italian Kingdom, choosing instead to declare their independence as the Republic of San Marco with sovereignty over the whole of Veneto. However, their failure to extend much in the way of support to the cities of Treviso, Padua, and Chioggia when they came under assault by the Austrians did much to discredit the Republic in the eyes of the mainlanders of Venetia.
While the putative Republic of San Marco would continue to defy the Austrians for another month and a half, by mid-July 1848 the situation in the city had become untenable. Munitions were growing scarce, food was in short supply, and the Austrian noose was tightening around their necks both on land and at sea. With no other choice, the remaining defenders would attempt a final sortie on the 17th of July, cutting across the lagoon towards Chioggia where they would attempt to continue the fight. However, their escape would be short lived as the Austrians quickly discovered the Venetian breakout and fell upon them with fury and rage, forcing the beleaguered survivors to surrender.[5] With Venice secured, General Nugent turned his full attention to reducing the city of Chioggia which was subsumed a few days later and then Padua which would surrender by the end of the month, effectively bringing an end to the Republic of San Marco as every Italian city east of the Adige had fallen to the Austrians. Only the secluded townships of Este and Monselice would remain under Italian control, thanks to the difficult terrain of the Euganean Hills and the fierce resolve of their people.
So as not to lose their last foothold in Venetia, the Papal Army and Neapolitan Army, along with thousands of Lombard and Romagnan volunteers would immediately ford the Adige River near Badi Polesine before moving to relieve Este and Monselice which had been put under siege by the Austrians. Here they would not only find General Nugent and his men, but also Count Ficquelmont and the entire Army of Lombardy-Venetia which prepared to do battle against them. Despite being caught off guard by the assembled might of the Austrian Army, the Italians exhibited a youthful exuberance and eagerness for battle. As commander of the Papal Army, General Durando assumed control of the Italian forces, arranging his force into two wings; his left was to be composed of the Neapolitan soldiers and foreign volunteers under the command of General Guglielmo Pepe, his right would be comprised of his own troops and the Lombard and Romagnan volunteers. Ficquelmont arranged his forces in kind, taking up post on the Western end of the battlefield near Este, while Nugent was arraigned further East outside Monselice.
Despite fielding a slightly larger army than their Austrian adversaries, the Battle of Este-Monselice would be an unmitigated disaster for the Italians. Caught up in the excitement of it all, several young men from Ravenna on the Italian right wing would break ranks and recklessly charge the Austrian front line with great élan and vigor. Their jeers and jabs for blood and glory soon encouraged the boys of Ferrara, Bologna and Mantua to join them in their assault. Within minutes, thousands of their compatriots began to follow these brave patriots against the commands of their officers, pushing up the hill towards the Austrian lines with trumpets blaring, flags aflutter in the wind, and songs of victory on their lips.
Most of these young boys would be tragically cut down far short of the Austrian line in a ruthless massacre of smoke and lead. Their bright uniforms were soon stained with mud and blood, their flags ripped full of bullet holes, and their cheers of gallantry and bravado were replaced with cries of agony and despair. Those that survived the first volley were either cut down in the second and third volleys or fled the field in terror. Before long, the ad hoc Italian offensive had been gutted as the few remaining survivors ran back into the ranks of the more disciplined Papal soldiers, sparking a cascade of panic and fear throughout the ranks that come to consume it within seconds. With the Papal Army in retreat, the Neapolitan Army was left to fend for itself and soon came under the concentrated attack of both Ficquelmont and Nugent. Despite being outnumbered now 2 to 1, they would be spared complete destruction thanks to the heroic efforts of their commander General Pepe and the dogged resistance of the Greco Brigade and a few veteran units of the Neapolitan Army which fought a desperate rearguard action for several long hours before finally retreating to safety after nightfall.
The Battle of Este-Monselice
Nevertheless, the battle of Este-Monselice was a complete disaster for the Italians by every definition of the word. Of the roughly 60,000 men who took part in the battle, they would lose nearly a third, with most losses occurring in the opening assault and the horrific retreat that followed. The Austrians did much better for their part, only losing 4,900 men dead, wounded, missing, or captured out of their original 56,000. Following the battle, the remainder of the Central Italian Army would retreat southward across the Adige River where they had hoped to regroup. The Austrians would not allow this however, and immediately pushed across the river, breaking the siege of Legnano, and forcing the Italian Army would retreat across the Po River where it effectively disintegrated. The Neapolitan contingent would be recalled to Naples by King Ferdinand II soon after this defeat, while Pope Pius considered recalling his forces as well. Many of the foreigners discouraged by the results in Italy would depart for other battlefields where they might find greater success. Those that remained in camp on the 5th of August would make their way Northward to join with the Sardinian Army.
The collapse of the Republic of San Marco and the destruction of the Italian Army at Este-Monselice came as a shock to the Sardinian King and his Generals who had been confident in their total victory over the Austrians. Jolted out of their sense of complacency, the Sardinians now found themselves in a precarious position as Count Ficquelmont moved to face them with the full might of the Austrian Army of Lombardy-Venetia. Unwilling to be caught between the stone walls of Verona and the Imperial Austrian Army, King Charles Albert readied his forces for battle, leaving behind a screen to guard against an attack by the fortress’ defenders. While the situation for the Sardinians was dire, it was not irreparably so, as their scouts superbly followed the Austrian Army’s march up and down the length of the Adige. When it became clear that the Austrians were making for the bridge at Zevio, King Charles Albert moved his army to oppose them.
Despite their haste, Ficquelmont would arrive at the small riverside commune before the Sardinians, finding the town lightly defended by Lombard militiamen who were quickly driven from the town. Unable to prevent their crossing, King Charles Albert positioned his force opposite them, however in the midst of his preparations for battle, the king fell from his saddle. Nearly 5 months of constant campaigning, often in the oppressive heat of Summer and the torrential rains of Spring, the constant stress of political intrigue and subterfuge in Milan, as well as his own poor diet would all contribute to King suffering a heart attack that day. Although he would survive, the Sardinian King would be rendered bedridden for many days to come and would suffer from terrible coughing fits every so often.[6] With the King carried from the field of battle on a stretcher, command fell to his son Prince Victor Emmanuel who readied his men for battle against the Austrians at Zevio. However, seeing their King fall as he did devastated the Sardinian morale, with many believing God had struck him down for fighting against his fellow Christians. As such, their initial attack against the Austrians was slow and poorly executed, and when the Austrians counterattacked they were able to drive them from the field with relative ease bringing the battle to a quick and decisive end.
The battle of Zevio was a victory for Count Ficquelmont and the Austrians, but it was not the total victory which he desired as the Sardinian Army would manage to retreat in good order thanks to the efforts of the small Tuscan Army which held the Austrians at bay for several hours before escaping under the cover of darkness. With Prince Victor Emmanuel defeated at Zevio, the Sardinian force outside Verona was forced to abandon the siege of the fortress city and rejoin the main army as it retreated westward towards Milan. Over the next three days, Ficquelmont would chase Prince Victor Emmanuel and his men to the banks of the Mincio River, engaging in the occasional skirmish with the Piedmontese rearguard, but failing to bring the main army to battle. Finally, however, their chase would come to an end when he caught the Sardinians and their allies at the riverside town of Goito on the 10th of August.
Brushing aside the meager forces Prince victor Emmanuel had left to defend the bridgehead, the Austrians would discover the Sardinians stop their retreat and intended to fight, a fight which Ficquelmont readily accepted. The Sardinians assembled their forces in three columns, the 1st Corps under General Bava on the left flank, 2nd Corps under General de Sonnaz in the center, and the Italian and foreign volunteers comprising the right flank, while Prince Victor Emmanuel’s 5th Division was held in reserve. Ficquelmont in turn arranged his force in kind, with General Konstantin d'Aspre assuming command of the right column, General Laval Nugent von Westmeath commanding the center, and General Julius Jacob von Haynau commanding the Austrian left flank, while Ficquelmont, his reserves, and the Austrian artillery were positioned on the heights on the east bank of the Mincio. With his forces properly arranged, Ficquelmont ordered his men to advance, initiating the 2nd Battle of Goito.
The battle between the two armies would be evenly matched in the North and in the center were the fighting degenerated into a bloody melee, but the difference in quality of the Austrian soldiers and the irregulars of the Sardinian on the southern end of the battlefield would be especially stark. Most of these men were fresh conscripts from Milan, volunteers from Central and Southern Italy, or foreign adventurers like the fighting men of the Greco Brigade and while they were certainly brave and zealous to a fault, the fresh Milanese recruits proved to be no match for General von Haynau’s infamous “Tiger Corps” in open combat.[7] The ruthless commander honed his cannons on the Milanese position in particular, dealing them egregious casualties and before long they were broken underneath the weight of the Austrian cannonade. As had happened at Este-Monselice and again at Zevio, the Italian units fled the field in terror, prompting the rest of the Sardinian Right flank to collapse under the weight of the Austrian advance.
The Second Battle of Goito
With the Sardinian right flank routing from the field of battle, it appeared that victory was at hand for Count Ficquelmont who promptly ordered General von Haynau to continue driving the enemy from the field. The courier relaying Ficquelmont's commands to Haynau responded with vague directions rather than the precise strike that Ficquelmont had envisioned leading Haynau to misinterpret the commands for a pursuit of the fleeing men of the Sardinian Right Flank rather than an attack on the now exposed flank of the Sardinian center as originally intended. Haynau’s aggressive nature would get the better of him that day, as he would refrain from questioning his new orders and immediately set off with his men after the fleeing Milanese. Although Ficquelmont would quickly discover Haynau's mistake and dispatched another messenger to correct him, by this point in the battle it was too late.
General von Haynau's pursuit of the fleeing Milanese had extended the Austrian line well beyond its’ means, creating a small opening which the Sardinian Prince Victor Emmanuel immediately moved to exploit.
Throwing all his reserves, his cavalry, and his own personal guard into this one attack, Prince Victor Emmanuel’s men quickly crashed into the Austrian ranks with tremendous force and would successfully push their way through to the banks of the Mincio, effectively splitting the Austrian army in two. Now recognizing his mistake, General von Haynau would attempt to swing back and pin the Sardinian Prince between his soldiers and the Mincio river only to be confronted by the very same soldiers he had been pursuing only moments before. Having regrouped at a secondary position outside the range of the Austrian cannons, the Milanese, their foreign allies, and Italian compatriots now moved to block Haynau and his men for as long as they were able, preventing the Hapsburg Tiger from moving to assist Ficquelmont. With both sides now engaged in a brutal hand to hand melee, the discipline of the Austrians began to breakdown as the lines between each force began to blur.
Despite this setback, the Austrian Army remained confident in their chances for victory right until Prince Victor Emmanuel’s men seized control of the Goito Bridge. Dread soon engulfed the Austrian Army as it was now cut off from its line of retreat and soon discipline began to collapse in the Austrian ranks as well. Despite this Count Ficquelmont tried desperately to restore order in his ranks, but as he was on the other side of the river, there was very little he could do to save his army. Most immediately tried to force their way across the bridge in conjuncture with Ficquelmont's reserves, but Prince Victor Emmanuel’s men held firm, denying them this route of escape despite the desperate assault by the Austrians. By this point order had all but collapsed in the army as men began jumping into the river by the thousands in a desperate attempt to make their escape from the Sardinians. While most would succeed in escaping over the river, many had been forced to leave their kit and weaponry behind as several hundred poor souls were sadly dragged beneath the surface by the weight of their heavy loads, leaving them to die terrible deaths in its watery depths. By dusk, the battle was over, the Austrians were broken, the Second Battle of Goito was a total Sardinian victory.
Of the 62,000 Austrian soldiers to take part in the battle, over 19,000 would be captured, killed, missing, or wounded by day's end compared to 13,000 casualties for the Sardinians and their Allies. General Nugent's corps had been smashed to pieces in the battle, suffering nearly 10,000 losses alone, most of whom had been captured in the waning moments of the fight. While General A'spre's Corps managed better, having successfully managing to ford the river upstream, they had been involved in some of the toughest fighting of the day on the Northern edge of Goito and suffered upwards of 6,100 casualties, mostly dead and wounded. Surprisingly, it would be General Haynau's Corps which did the best that day, only suffering 2,900 casualties in the entire battle, with most being inflicted during their long fighting retreat eastward.
The successful retreat of General Haynau and his men would provide Count Ficquelmont and the Austrian Government with little comfort however, as valuable men and resources that could not be easily replaced were loss by the tens of thousands, while victory had provided the flagging Italian cause with new life. In the days ahead, the Austrian position in Northern Italy all but collapsed in the face of the Italian counteroffensive. By the end of the Summer campaigning season, the Sardinians and their allies would successfully drive the Austrians from Lombardy entirely, pushing them across the Adige and setting siege to the fortress cities of Verona and Legnano once more. While Ficquelmont would manage to hold the line at the Adige River, albeit barely, it was abundantly clear that he could do little else as Venetia threatened to fly into open revolt once again.
Desperate to fix the situation in Italy, Chancellor Metternich declared a state of emergency across the Empire and imposed new taxes on the Estates to help pay for the construction of a new army. In addition to these new taxes, Metternich also issued new draft laws that would raise another army by expanding conscription to all men age 18 to 36 from all the Empire's provinces, including Hungary despite the objection of their Diet. Rather than aid the embattled chancellor, the imposition of new war taxes and conscription plans would only worsen matters for Metternich and the Austrian Government as draft riots quickly emerged all across the Empire. Angered mobs resented seeing their young men and boys carted away to serve in Metternich’s war and would attack government officials and military recruiters where ever they could find them. By the end of August, rioters would come to rule the cities of Prague, Brno, Temeschwar, Lemberg, and Czernowitz, but by far the worst uprisings would take place in Hungary as the blatant disregard shown to their autonomy and the ongoing repression of their liberties would drive the people of Pest to rise in revolt against the Austrian authorities.
Next Time: Anarchy in Austria
[1] The OTL revolt in Venice was greatly inspired by the success of the revolutionaries in Vienna, which had succeeded in driving Metternich from power on the 13th of March. Metternich’s successor, Count Franz Anton von Kolowrat-Liebsteinsky was appointed a week later but was quickly forced to resign due to health problems, beginning a cycle of new Governments rising and then quickly falling in rapid succession from late March to late November, leaving the Imperial Government in utter chaos. The Venetians, as well as the other minorities of the Empire, took great advantage of this by ousting the Austrian authorities in Venice and declaring the establishment of the Republic of San Marco. As Metternich remains in charge, for now, the Venetians lack the same optimism they had in OTL following Metternich’s resignation, while the Austrians in contrast are on a much better footing, at least initially. As such, the Venetian Uprising fails to completely dislodge the Austrians.
[2] So, for various reasons I’ve decided to keep Marie Louise, second wife of Napoleon Bonaparte and mother of Napoleon II, alive a little longer. As a result, she still retains control of the Duchy of Parma at the time of the Revolutions of 1848, which in turn means that the OTL duke of Parma at this time, Charles Louis is still Duke of Lucca.
[3] Charles Albert had agreed to an alliance with the Austrian Empire following the July Revolution of 1830, believing that France would invade Sardinia as it had done after the 1793 French Revolution.
[4] Owing to the protracted Milan Uprising ITTL which was 12 days as opposed to the 5-day siege of OTL, the remaining Austrian forces in Italy are reduced compared to OTL.
[5] As the initial uprising is less successful in Venice ITTL, the Republic of San Marco has a much shorter lifespan here. In all honesty, the OTL Republic was aided immensely by the disfunction of the Austrian government in the wake of Metternich’s downfall. As that is not the case here, the Austrian response is swifter and more cohesive resulting in an early death for the Republic of San Marco. I've also chosen to spare Archduke Friedrich Ferdinand from his early death by jaundice as a means of balancing the more successful Italian offensive in Lombardy. His survival greatly helps the Austrian navy which was, apart from the problems of being manned almost exclusively by Italians and thus highly disloyal, it also struggled from a leadership standpoint IOTL, going through 4 different Commanders in Chief between Friedrich's OTL death in October 1847 to the beginning of the First Italian War of Independence in March 1848.
[6] Before he died in OTL, King Charles Albert suffered from liver disease and several heart attacks which left him bedridden and in terrible pain.
[7] Known to his men as the Hapsburg Tiger, Austrian General Julius Jacob von Haynau was a highly talented, yet incredibly aggressive commander who was renowned for his extreme brutality. He was personally responsible for the massacre of numerous Brescians following the 10 Days of Brescia and he ordered the execution of the 13 Rebel Hungarian Generals at Arad.
Last edited:
I can understand why these two cities were able to resist the Austrians...Only the secluded townships of Este and Monselice would remain under Italian control, thanks to the difficult terrain of the Euganean Hills and the fierce resolve of their people.
Anyway I hope to hear more about the Venetians in the future!
Sardinia, more than likely.sorry to ask mets who has control of the Savoy and Nice?
The situation in 1848 was actually rather dire for the Austrian Empire as they were embattled on almost every front at one point or another. Here the situation is somewhat better for them as the uprisings in Prague, Vienna, and Hungary haven't occurred yet, but at the same time they are worse as Metternich is still in charge and becoming increasingly detached from the situation on the ground and they suffered heavier losses in the first few days of the War owing to a prolonged stay in Milan and more desertions by the Italian soldiers in the Austrian Army. If the Italians remain united, which there is no guarantee that they will, they have a good chance of beating Austria here and now by themselves.Well, it still went much better for the Northern Italians than expected, so I am still glad for the outcome so far. Maybe there is still hope after all. But Charles Albert was very unlucky.
Victor Emmanuel II's performance really surprised me!
Charles Albert's situation is similar to OTL's, albeit a year earlier. He won't die, but the next few weeks and months will be quite unpleasant for him.
Victor Emmanuel simply got lucky as Austrian General Julius Jacob von Haynau effectively went in the wrong direction chasing after the routing Sardinian Right Flank rather than going where he was intended to go. If he hadn't made this mistake, then Haynau would have fallen on the exposed flank of the Sardinian Center column, likely spelling disaster for the Italians.
They still belong to the Kingdom of Sardinia ITTL as there has been no secret treaty with France handing them over in return for military aid.sorry to ask mets who has control of the Savoy and Nice?
Thank you very much! I took inspiration from a few different sources in this update, like the Battle of Friedland for the Second Battle of Goito as a whole, but you are right that Haynau's charge is certainly inspired by the Charge of the Light Brigade at Balaclava. He was an incredibly aggressive and extremely ruthless commander of unquestioned loyalty and rigidity in OTL. If he received an order, however vague it may have been, he would have attempted to carry it out to the best of his ability. Ficquelmont's detachment from the main battle also muddied the waters a bit as well, resulting in the ensuing debacle.I think Haynau's charge is inspired by the Charge of the Light Brigade in the OTL Crimean War. Also, good job on this update @EarlMarshal, I really like the prose, It feels like it's from a really well written history book.
This is going to have some major impacts upon the Catholic Church and its perception in the United States, Britain and elsewhere. In OTL, the ascension of Pius was actually lauded within liberal circles throughout the Anglophone world - he was viewed as a modernizer, moderate liberal and pro-Italian nationalism. His early years saw a number of important reforms in the Papal States which led some credence to this view. Then came 1848, Pius' perceived betrayal of the cause of Italian unity, the uprising in Rome, Pius' fleeing and being forced to rely upon French and Austrian support to maintain control of the city after the Roman Republic had been put down. The result was that, by the time of the unification wars, Italian liberal nationalists were opposed to the Pope and you saw them seizing the papal states and Rome from him.
Following the fall of Rome to the Liberal Italian state, successive Popes spent the next half century portraying themselves as besieged and under constant threat from an immoral horde. They constantly urged their Catholic followers to undermine the Italian government and this did immeasurable harm for the standing of the Papacy within liberal circles.
In a timeline where Pius - albeit reluctantly - joins the side of the rebels you are unlikely to see the backlash against the papacy to the extent of OTL (there will always be a certain anti-clerical current to some Liberal thought, of course). Also, it puts Pius or his successors in a better position to negotiate with the resulting Italian state as to the Pope's place and relationship with the new state.
On an interesting side note, have you looked into the Neoguelfs? They were a fairly prominent faction which saw the Pope as the natural leader of a united federal Italian state. With the Papal States taking the lead as Commander in Chief, this could certainly lead to the strengthening of this faction. Especially, I would say, in case the Revolution actually fails and Pius is forced to flee Rome to escape Austrian troops.
That was more or less what I was going for, an Italian Federation with the Pope at its head.This is going to have some major impacts upon the Catholic Church and its perception in the United States, Britain and elsewhere. In OTL, the ascension of Pius was actually lauded within liberal circles throughout the Anglophone world - he was viewed as a modernizer, moderate liberal and pro-Italian nationalism. His early years saw a number of important reforms in the Papal States which led some credence to this view. Then came 1848, Pius' perceived betrayal of the cause of Italian unity, the uprising in Rome, Pius' fleeing and being forced to rely upon French and Austrian support to maintain control of the city after the Roman Republic had been put down. The result was that, by the time of the unification wars, Italian liberal nationalists were opposed to the Pope and you saw them seizing the papal states and Rome from him.
Following the fall of Rome to the Liberal Italian state, successive Popes spent the next half century portraying themselves as besieged and under constant threat from an immoral horde. They constantly urged their Catholic followers to undermine the Italian government and this did immeasurable harm for the standing of the Papacy within liberal circles.
In a timeline where Pius - albeit reluctantly - joins the side of the rebels you are unlikely to see the backlash against the papacy to the extent of OTL (there will always be a certain anti-clerical current to some Liberal thought, of course). Also, it puts Pius or his successors in a better position to negotiate with the resulting Italian state as to the Pope's place and relationship with the new state.
On an interesting side note, have you looked into the Neoguelfs? They were a fairly prominent faction which saw the Pope as the natural leader of a united federal Italian state. With the Papal States taking the lead as Commander in Chief, this could certainly lead to the strengthening of this faction. Especially, I would say, in case the Revolution actually fails and Pius is forced to flee Rome to escape Austrian troops.
if he doesn't I am swearing of this storyWaiting for Giuseppe Garibaldi to show up... which he will.
Last edited:
Threadmarks
View all 100 threadmarks
Reader mode
Reader mode
Recent threadmarks
Chapter 93: Mr. Smith goes to Athens Part 94: Twilight of the Lion King Part 95: The Coburg Love Affair Chapter 96: The End of the Beginning Chapter 97: A King of Marble Chapter 98: Kleptocracy Chapter 99: Captains of Industry Chapter 100: The Balkan League
Share: