You are using an out of date browser. It may not display this or other websites correctly.
You should upgrade or use an alternative browser.
You should upgrade or use an alternative browser.
Malaya What If
- Thread starter Fatboy Coxy
- Start date
Threadmarks
View all 264 threadmarks
Reader mode
Reader mode
Recent threadmarks
MWI 41120514d Royal Navy Eastern Fleet OOB MWI 41120618 Shuffling The Pack MWI 41120617 The Ongoing Development Of The Airfields MWI 41120617a RAF Far East Command MWI 41120618 Rommel Retreats To The Gazala Line MWI 41120619 Kondo’s Dilemma MWI 41120620 Matador Is On MWI 41120702 The Race BeginsYou have to have certain tanks to have them carry Bunker C on the tankers. They have to have some form of heating coils in the tanks and insulated/heated piping to transfer the Bunker C between tanks or through the pipes on ship to transfer to ship or shore. Because the Bunker C can be at a tar or thicker consistency you have to heat it to be able to pump the POL product.Hi JWilly48519, I don't know what oil she carried, or if it was a mix of cargo, if she had several tanks, but she delayed fleeing Manila, still at pier 7 pumping oil to storage tanks on 12th December. However her history prior to this is one of refuelling ships at anchor, or storage tanks, and having left Manila on the 14th, I believe, she filled her tanks with bunker oil at Balikpapan on the 20th. I've held the understanding that you couldn't just fill up the tanks with whatever oil took your fancy, unless you were able to then clean the tanks, thus avoiding contamination of oils. So my presumption is she was simply a carrier of fuel (bunker) oil, but I may be wrong.
Though somewhat less so in the ambient conditions of the near-equatorial Pacific.Because the Bunker C can be at a tar or thicker consistency you have to heat it to be able to pump the POL product.
Bunker C oil, the most common grade for large ship boilers, generally is solid at 40F, barely flowing at 80F to 120F, and pumpable/burnable at 200 to 240F.
Crude oil of course is a mix of viscosities and therefore has the same viscosity characteristics at its heavy end, but the intermixing of light fractions tends to make crude a much more consistently handleable product. The significance of that is that a fleet oiler or other tanker designed to transport bunker C alternately can handle crude, but not the other way around.
Last edited:
I believe the type fuel available at Tarakan and Balikpapan is the type oil that can be used directly as bunker fuel.Though somewhat less so in the ambient conditions of the near-equatorial Pacific.
Bunker C oil, the most common grade for large ship boilers, generally is solid at 40F, barely flowing at 80F to 120F, and pumpable/burnable at 200 to 240F.
Crude oil of course is a mix of viscosities and therefore has the same viscosity characteristics at its heavy end, but the intermixing of light fractions tends to make crude a much more consistently handleable product. The significance of that is that a fleet oiler or other tanker designed to transport bunker C alternately can handle crude, but not the other way around.
BrieflyI believe the type fuel available at Tarakan and Balikpapan is the type oil that can be used directly as bunker fuel.
") . Yes it can be used unrefined but it will cause maintenance issues and degraded performance unless refined.
. Yes it can be used unrefined but it will cause maintenance issues and degraded performance unless refined.From my readings the IJN had the largest and best night vision optics available at this time, as well as having specific crewmen assigned and trained as night lookouts, based on their night vision, and the ability to find and define objects at long range at night. These men's only duty was night lookout , even in combat.Interesting. I've done a lot of long ocean races in yachts and noticed that there's a very wide variation in the ability of people to see and have situational awareness at night. Some people can tell one yacht from another just from the relative motion of the nav lights as the different boats move through the seaway, but most have no idea. This variation seems to exist irrespective of relative experience.
It's also nice to see a post that is clearly not biased by nationalism.
Station CAST at Cavite would have also picked these transmissions up and Hart's staff would have also passed this info on.Hmm if the British intercept service is listening could they pick up indications that somthing is going on. They already have a war warning but getting an idea that ships and boats are moving would be a plus.
Ramp-Rat
Monthly Donor
So while we await further updates from our author, I propose to continue looking at the boring subject of refuelling at sea while underway, and the reasons for the different approaches taken by the various navies, prior to and during WWII. The navies of the world can be divided into three basic groups, major, minor and also rans. The three major navies were the British Empire, United States and Japanese Empire, while the minor are the Germans, French, Italian and Dutch, the remainder including the Soviet Union which only became a significant naval force post WWII, were also rans. That while potentially powerful within their own territorial waters, such as the South American ABC Nations or Sweden in the Baltic, weren’t in any position to effect events outside their territorial waters. The French were in a unique situation, in that due to their ‘friendship’ with the British they and to an extent the Dutch could make use of the extensive world wide British facilities, in a way that others were excluded from. The Italians despite having a powerful navy, far more powerful than the Germans, were restricted to the Mediterranean, their presence in the Red Sea was only there by sufferance of the British, and was swiftly eliminated once they entered into WWII. While the Germans, as a result of the restrictions imposed by the Treaty of Versailles, and having limited funds in the inter war years, didn’t have the resources to experiment that the big boys had, or the need to develop an extensive at sea underway replenishment ability. Off the three dominant naval powers the British with the world wide access to bases, and no great interest in the central and northern pacific, while they did conduct experiments in underway replenishment, didn’t need to make this a priority. And so while they were able to do this, they hadn’t spent the time or resources to take their ability from the basic level, up to the advanced level that the Americans and Japanese had.
The problem for both the Japanese and Americans was a combination of their geographical location and their lack of the extensive overseas bases that the British had. America if it wanted to intervene beyond its own territory had very limited options, its only overseas bases were in Cuba, China and the Philippines, and if it wanted to intervene in Europe, Africa, South America and the Middle and Far East, it had to arrange basing rights with typically France or Britain . The inter war American Navy would have been hard pushed to conduct the operation against the Barbary pirates that the Sailing Navy of 1805, was able too. The Japanese had much the same problem, while they had gained over time bases in Korea, China and a number of islands like Taiwan and Okinawa, along with post WWI, the former German colonies in the Pacific, the Caroline and Marshal islands which included Turk, the so called Japanese Gibraltar. They too were reliant on arranging basing privileges if they wanted to operate any where else, or using commercial port facilities, where available. Both nations came to see that they were going to have to develop a system of at sea underway replenishment if they wanted to be able to use their naval power outside of a limited area. So while this wasn’t a major priority, they did spend time and money on improving their RAS ability, so that by the outbreak of the war, both nations navies were capable of conducting out of area operations. However the disparity between the industrial might of the Americans and their access to resources especially oil, meant that the Japanese only had a short window when they could match the Americans in this ability. At the end of the day, once the Americans were committed to the war, and had turned on the taps of their industrial potential, it was only going to be down hill for the Japanese. By the last year of the war the Americans were able not only to support their own massive navy in the pacific, but also the large British Pacific fleet, at the same time. A fleet that had thanks to American generosity, with equipment and training, had moved from the basic to the advanced level itself.
RR.
Addendum to the George Henry, the USN Dictionary of Naval vessels history of the George Henry/Victoria, makes reference of her offloading her hoses and transfer fittings prior to entering dockyard for overhaul and arming, and renaming. It appears that she had alongside fueling hoses and fittings fitted when she left Manila.Most American civilian tankers did not have the capability to refuel underway or broadside, until the advent of the T3 class of oilers,which the USN Cimmaron class fast fleet oilers were part of. After late 1943 all tankers in the Pacific were equipped to transfer u derway. All USN oilers with AO designations had some type of broadside underway fueling ability. Though those sold into civilian service during the interwar years, had the booms and hoses removed. Those brought back into Navy service had that capacity restored when the had yard time and AAA also installed.
Remember tankers job was to move POL from point A to Point B, and there transfer to barges, shore tanks or Fleet Oilers. Fleet Oilers, AKA Oilers, job was to transport POL from point B to ships of the fleet, either at anchorages or underway.
I'm not necessarily thinking that unrep capabilities aboard the George Henry existed before the Yard period at Sydney.Addendum to the George Henry, the USN Dictionary of Naval vessels history of the George Henry/Victoria, makes reference of her offloading her hoses and transfer fittings prior to entering dockyard for overhaul and arming, and renaming. It appears that she had alongside fueling hoses and fittings fitted when she left Manila.
Fueling hoses and transfer fittings may have been for onboarding and off boarding fuel. Where's a Boatswain's Mate?!?
The first reference to an at sea refueling is when USS Victoria refueling RAN Shropshire at sea on 25 JAN 44.
That was after the yard refit (25 APR 42) period. This is mentioned:
Wikiwand - USS Victoria (AO-46)
USS Victoria (AO-46) was an oiler for the United States Navy in World War II, and the second ship to bear the name. She was built in 1917 as SS George G. Henry in San Francisco for the Los Angeles Petroleum Company. During World War I, the ship was requisitioned by the U.S. Navy and employed as...
Nevarinmx,I'm not necessarily thinking that unrep capabilities aboard the George Henry existed before the Yard period at Sydney.
Fueling hoses and transfer fittings may have been for onboarding and off boarding fuel. Where's a Boatswain's Mate?!?
The first reference to an at sea refueling is when USS Victoria refueling RAN Shropshire at sea on 25 JAN 44.
That was after the yard refit (25 APR 42) period. This is mentioned:
Wikiwand - USS Victoria (AO-46)
USS Victoria (AO-46) was an oiler for the United States Navy in World War II, and the second ship to bear the name. She was built in 1917 as SS George G. Henry in San Francisco for the Los Angeles Petroleum Company. During World War I, the ship was requisitioned by the U.S. Navy and employed as...www.wikiwand.com
I was not sure either, that's why I made reference to alongside fueling rather then underway. Part of the reason she probably could not do underway, was that she didn't have a full USN Crew, only her Master/ CO( USNR officer) and some USN passengers.
While certainly this occurred, it had to involve risks of blowing up engine rooms, and the likelihood of carboning. Marine boiler fireboxes are built with high pressure oil pumps that push the heated bunker oil through spray nozzles, immediately below the water tube array and the superheater.I believe the type fuel available at Tarakan and Balikpapan is the type oil that can be used directly as bunker fuel.
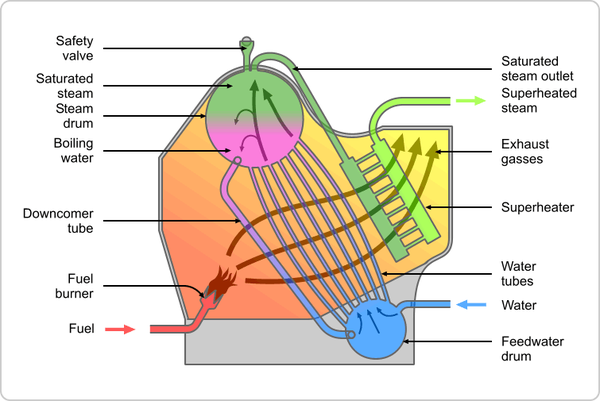
But if the fuel is crude, even at ambient temperature its percentage makeup of volatiles is significant. And, volatiles in an unstable firebox environment can explode. Crude is inconsistent. If the fireman adjusts the boiler to be stable at time X, then an hour later the supply feed is coming from a greater-volatiles region of the current tank...not good. More-volatiles oil contains more hydrogen and burns at a significantly lower temperature, which results in less steam, less superheat, and more carboning. Carboning insulates the water tubes and cuts the boiler's maximum steam output, even if the fuel is optimal thereafter.
(Note that marine boilers are built other-way-around from steam locomotives. A marine boiler is built for maximum superheat and maximum efficiency. It works best with a steady state operating point. A steam locomotive OTOH is built for rapid, even constant, power output changes. It must produce maximum steam pressure and volume to accelerate the train and for climbing hills, then nearly zero steam while decelerating and descending. Water tube designs work best for the marine design goals; the fuel and firing are adjusted to optimal, and the water supply is constant. Fire tube designs work best for locomotive design goals; if the firebox air feed is cut off, the firetube outer temperature rapidly drops to produce little steam.)
Last edited:
The crude oil of Tarakan was of exceptional light quality. There for it was easy to refine.I believe the type fuel available at Tarakan and Balikpapan is the type oil that can be used directly as bunker fuel.
It was used as bunker fuel, unrefined, by the Imperial Japanese Navy at the last months of the war. The refining capacities was bombed in tatters and oil tankers were shot to blaze by the US navy submarines. At a last resort they bunkered there surface war ships with this crude oil. With all dangers as described by JWilly48519
Well, it was just an zero sum problem for the IJN.. They could stay put in an harbour and be sunk or they could use the crude and be sunk doing something. The end result would be the same, but they would go down fighting and that was the most important fact.The crude oil of Tarakan was of exceptional light quality. There for it was easy to refine.
It was used as bunker fuel, unrefined, by the Imperial Japanese Navy at the last months of the war. The refining capacities was bombed in tatters and oil tankers were shot to blaze by the US navy submarines. At a last resort they bunkered there surface war ships with this crude oil. With all dangers as described by JWilly48519
Ramp-Rat
Monthly Donor
Can the Japanese or Allies fire their boilers with crude oil, to which the answer is yes, but as with most mid twentieth century equipment, it would work much better with the fuel it was designed to use. And using crude oil will have a detrimental effect on the boilers, both in their ability to produce steam and their service life, and it’s much the same across the board. As the various technologies have become more sophisticated, they have increasingly required the use of more refined fuels and water. The first steam engines that were used in ships could basically use seawater and be fuelled by anything that would burn. Were as the boilers and engines on a newest generation ship in the nineteen forties, require specific fuels and water. And remember it didn’t matter if the fuel was solid or liquid, if you were using coal, it better be best Welsh steam coal, and if oil you wanted the right grade of fuel oil. It was very much the same with motor vehicles, it wasn’t just that the Anglo Americans had all the petroleum that they wanted, they also had access to the highest grades available, while the majority of their land vehicles were set up to run on 86 octane. They also had 100, 110, and higher for their aircraft, which provided a significant increase in proformance, and reduced wear and tear on their engines. This was just another advantage that the Allies had, in their pursuit of victory, and yet another example of why the Axis powers were foolish to start the war.
RR.
RR.
I have often wondered how things would have turned out historically, had James Brooke been allowed to co-lease the Labuan Island facilities to the USN in the 1850's. The Pacific ocean might have been turned into an Anglo-American lake by 1900. We might have a What If the US didn't play a role in the South China Sea from 1850 on!The French were in a unique situation, in that due to their ‘friendship’ with the British they and to an extent the Dutch could make use of the extensive world wide British facilities, in a way that others were excluded from.
Is it American generosity or the sensibilities of PACCOM, the 3rd and 5th Fleet and the BPF Commander? I see it as the latter. ADMs Nimitz, Halsey, Spruance and Fraser saw the potential for cooperation with each other as being the most beneficial. There were other options satisfying Sovereignty issues. The Australians apparently were not all that pleased with supporting the BPF.By the last year of the war the Americans were able not only to support their own massive navy in the pacific, but also the large British Pacific fleet, at the same time. A fleet that had thanks to American generosity, with equipment and training, had moved from the basic to the advanced level itself.
RR.
Most of what the British received were journal entries to COMNAVSUP. It would make little sense to not keeping a TF supplied due sovereignty issues. After all, we are all in the same predicament. Besides, Cumshaw existed before ADM King and long afterwards...

British Pacific Fleet - Wikipedia
Last edited:
MWI 41120119 The New Zealanders Slip Away
Fatboy Coxy
Monthly Donor
1941, Monday 01 December;
While Rommel and the Afrika Korps had been making their ‘dash to the wire’ the New Zealand Division, with its 5th Brigade left behind besieging Bardia, had made slow but steady progress along the Trigh Capuzzo and northern escarpment, so much so that by the afternoon of the 26th, they had captured Sidi Rezegh, and threatened El Adam. It was this alarming news which caused Rommel to cease his quest for a spectacular victory and hurry back in an effort to stop a breakout at Tobruk. But he was much too late, General Scobie’s 70th Division attacked, and by early morning, had captured El Duda, linking up with the New Zealanders.
The Panzer Divisions headed west, 15th along the Trigh Capuzzo, coming up behind the New Zealanders, and the 21st, somewhat slower, more northerly, along the Via Balbia coastal road. Aware of this movement, Lt Gen Norrie, CO of XXX Corps, ordered 22nd Armoured Bde to block the advance of the 15th Panzer Division, while the 4th Armoured would hit it in its southern flank. Early afternoon on the 27th, the fighting began, the usual characteristics of tank battles, swirling dust clouds, confusing movement on both sides, until after dark, when the British withdrew a few miles south to leaguer and resupply, both sides inflicting appreciable casualties.
Major General Neumann-Silkow was quick to take this opportunity of a lull in the fighting, and after refuelling, moved the Division forward another 12 Kms, using a pass to climb up on to the escarpment. However, a good bit of fortune favoured the New Zealanders when Lt General Johann Ravenstein, CO of the 21st Panzer Division, was captured near Point 175, travelling to liaise with Neumann-Silkow, his division effectively paralysed the following day while they reorganised the command structure.
Saturday 29th, both British brigades continued to spar with the 15th, as it moved westward, passing south of Sidi Rezegh, but their efforts were weak, as they were also screening the advance north of the 1st South African Bde, which had been ordered to Point 175 to help the New Zealanders. Unfortunalty, the South Africans prevaricated for reasons only known to their commander, Brigadier Pienaar, and never joined the battle, sitting it out in the south, much to the general annoyance of the whole Eighth Army.
At the same time, brushing aside a weak armoured screen, the Italian Ariete armoured division which had followed the Afrika Korps eastward in a much shallower sweep, now advanced on Point 175, capturing it, and overrunning the 21st New Zealand battalion, which mistakenly identifying their tanks as British. For Freyberg and his New Zealanders, things were becoming desperate, cut off from their supply dump, food, fuel and ammo levels were low.
Overnight, informed of British reinforcements arriving on the Frontier, Rommel planned a decisive battle to smash the New Zealanders, with Ariete attacking west from Pt 175, 15th Panzer attacking Sidi Rezegh from the south, and 21st Panzer, now commanded by Major Gen Bottcher swinging south towards El Duda. The attack didn’t go as planned, 21st Panzer couldn’t get pass the New Zealand 4th Bde defences at Zaafran, and the Ariete was distracted by the advance of the 1st South African Bde, which was being led by Lt Gen Norrie in person, in a desperate effort to get the South Africans to engage. They didn’t, Pienaar still finding reasons not to fully attack.
But the 15th Panzers did very well, the NZ 6th Brigade, its four battalions now reduced to about 200 men each, wasn’t able to hold them, both the 24th and 26th battalions being completely overrun, Sidi Rezegh in German hands by dusk, the rest of the brigade falling back to Zaafran. Freyberg, increasingly concerned about the fate of his division, suggested he withdraw part of it into Tobruk, XIII Corps commander Heath refused, wanting them to hold, pending the arrival of 1st South African Bde, which would recapture Pt 175 in the east and reopen the supply lines.
Monday, first day of December, the 15th Panzer continued attacking to separate Tobruk from XIII Corps, this time at the New Zealand positions at Belhamed, on the edge of the northern escarpment. The attack smashed 20th Battalion, driving its remnants and the 19th Battalion into the Tobruk garrison to avoid annihilation. The Panzers swung east, bent on finishing off the New Zealanders, and were briefly thwarted by the intervention of 4th Armoured Bde, but it was only a matter of time, and Freyberg knew it, his only option was to withdraw the Division east to Egypt, where they would rest and regroup.
The single superior officer he had contact with was Norrie of XXX Corps, who concurred. Quickly Freyberg withdrew his division east, leaving a few troops in the Tobruk Garrison which were now besieged again, as the German and Italian troops reoccupied the escarpment, and the 5th Bde screening the Bardia garrison. The pendulum had swung again.
OK, is any of this different from OTL?1941, Monday 01 December;
Fatboy Coxy
Monthly Donor
Hi Anarch King of Dipsodes, Hopefully, apart from Lewis Heath in command of XIII Corps, no, although I may have got a few facts slightly wrong. But I have to have this for context, so we all understand why Britain simply didn't send more to Malaya. Here we have our first eleven batting away, and the outcome of the great offensive, is on a knife's edge, what might our second, no make that third eleven bat like?OK, is any of this different from OTL?
Threadmarks
View all 264 threadmarks
Reader mode
Reader mode
Recent threadmarks
MWI 41120514d Royal Navy Eastern Fleet OOB MWI 41120618 Shuffling The Pack MWI 41120617 The Ongoing Development Of The Airfields MWI 41120617a RAF Far East Command MWI 41120618 Rommel Retreats To The Gazala Line MWI 41120619 Kondo’s Dilemma MWI 41120620 Matador Is On MWI 41120702 The Race Begins
Share: