You are using an out of date browser. It may not display this or other websites correctly.
You should upgrade or use an alternative browser.
You should upgrade or use an alternative browser.
April 1942 Alternate Indian Ocean
- Thread starter Zheng He
- Start date
- Status
- Not open for further replies.
Thanks for the new update and the extra background information of what happens in the future of TTL. Having a better cooperation between the US and the British/Imperial forces in the Indian Ocean is a good thing and can only lead the way for future operations against the Japanese forces in SE Asia. The loss of three cruisers will also have repercussions down the road as Japan tries to combat surface forces and escorting carries in the later War years.

There were four Dutch submarines at Ceylon - K-XI, K-XIV, K-XV, and O-20.
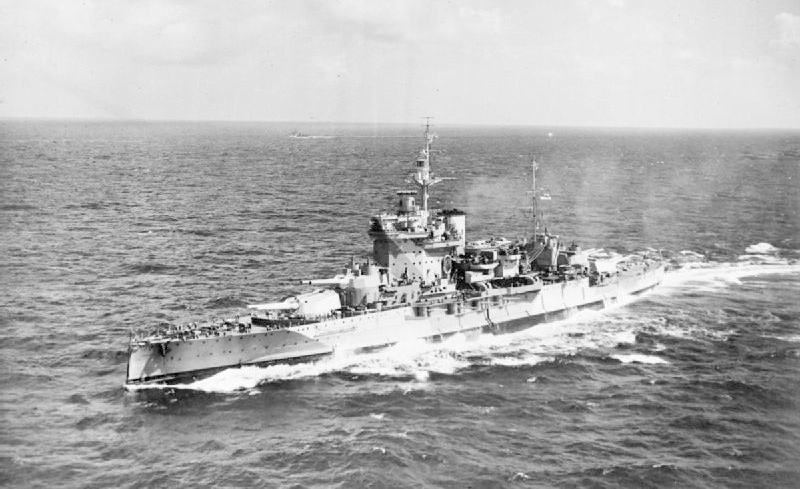
HMS WARSPITE - Operation Pedestal robbed Somerville of HMS Indomitable, Operation Torch robbed him of HMS Formidable, and HMS Illustrious which he inherited after Operation Ironclad went to home waters in January 1943. Somerville also told the Admiralty that it was preferable to lose Ceylon to a Japanese invasion if it meant preserving the fleet because keeping the SLOCs to the Middle East open was paramount so I agree that he would not risk the carriers in a foolish operation.
That is quite true, as the original posting refered just to British shubs, not those of the other allies.
Is there any evidence if Sommerville considered this proposed strategy?
Well, not realy, as Sommerville actually was deeply concerned about hist fleet's capabilities, consisting of a quite ill ballanced collection of very different types of warships, with a less well trained crew for most of the ships as well. His primary concern was his serious lack of destroyers, as he had to devide these few available ones to both his fast and his slow forces. As such Sommerville had developped a cautious plan to retreat his main forces out of harms way, as soon as possible, just to retain a fleet in beeing for more political purposes. In his mind, which was quite logical, a fleet, numbering a certain amount of ships, theoretically would force the opposing force to allocate its own forces to watch over them, with the consequence that these forces could not be used somewhere else.
Is there any evidence if Sommerville considered this proposed strategy?
Nope as HMS Warspite pointed out and as I said in the Disclaimer in my first post, I came up with this on my own after I tried it while playing the "Trincomalee" scenario in Complete Carriers at War.
Probably the last update for a couple of days:
Strategy and Goal, Japan and Britain – Japan's goals for Operation C, the Kido Butai's raid into the Indian Ocean were limited and ultimately defensive. The conquest of Malaya, Burma, Sumatra, and the Andaman Islands turned the Andaman Sea into a Japanese lake and put the Japanese into position for a more ambitious course of action in the Indian Ocean, possibly even invading Ceylon. However, Admiral Yamamoto Isoroku, commander of the Japanese Combined Fleet favored a return to offensive action in the Central Pacific against the primary enemy, the United States. The Japanese Army wanted nothing to do with operations against Ceylon or India as it was already stretched thin and the Naval General Staff preferred operations geared toward isolating Australia from the United States. With no hope of involvement from the Army and larger priorities looming to the east, the Imperial Japanese Navy's leadership to include Yamamoto did support a hit-and-run raid in the Indian Ocean designed to cripple the Royal Navy's Eastern Fleet, possibly instill some panic in the local population of India in order to secure an exposed flank of Japan's newly won empire.
The British suffered from a similar level of strategic dysfunction. Churchill believed that holding Ceylon was crucial and even stated that risks should be taken in order to defend the island. However, the Somerville and Vice Admiral Geoffrey Layton, the Commander-in-Chief Ceylon determined with the concurrence of the Admiralty that maintaining the Eastern Fleet as a "fleet in being" was more important than holding Ceylon because the lines of communication to the Middle East could still be defended, albeit at higher cost, if the fleet survived but Ceylon was lost, but the lines of communication could not be defended without a fleet. General Sir Archibald Wavell, the Commander-in-Chief of India became deeply concerned about the large of number air and ground formations send to defend Ceylon, given the deteriorating situation in Burma and since he did not believe Ceylon could be defended in the face of a serious Japanese assault. He stated that the with regard to Ceylon, the British could not, "afford to over insure." Wavell was also not happy about the Royal Navy's attitude with regard to defending Ceylon and Eastern India given the large number of warships deployed to the Eastern Fleet. Somerville and Wavell both expressed displeasure at the large number of RAF bombers attacking German cities while they were forced to make do with small numbers of obsolete bombers to defend India, Burma, Ceylon, and the Bay of Bengal. Given the grim situation facing the British in India and Bay of Bengal in April 1942, it is not surprising that many expected that a serious Japanese effort that would include a sustained operation aimed at capturing Ceylon was in the offing.
Introduction
Sorry for the delay, I have been busy but I have started to reorganize and consolidate. Here are the introductory parts combined. Note, most quotes are OTL although a few have had the context changed a little:
Introduction, the Battle of the Bay of Bengal – In the eastern Indian Ocean in early April 1942, two powerful task forces of the Imperial Japanese Navy led by five aircraft carriers of Vice Admiral Nagumo Chuichi’s Kido Butai, conducted Operation C, a raid against the Royal Navy’s Eastern Fleet under the command of Admiral Sir James F. Somerville, its bases, and Allied merchant shipping in the region. The result was the Battle of the Bay of Bengal, an engagement that neither side planned for at the outset of Operation C but would nevertheless result in the first significant Allied victory against the Imperial Japanese Navy. Despite the success of the Eastern Fleet in April 1942, this battle does not receive the level of attention as the later battles of Coral Sea and Midway as a large scale victory for the Allies in the early months of the Pacific War, particularly from American historians who tend to view the Pacific War as a US only show. Many historians are also quick to point out that the battle was different from Coral Sea and Midway it did not involve action between the two opposing aircraft carrier fleets. In fact, it was Admiral Somerville’s refusal to engage the Kido Butai, the Japanese carrier force, that ensured an unexpected by still welcome victory by the Royal Navy’s Eastern Fleet.
However, despite the lack of combat between the main fleets, the importance of the battle should not be diminished. It was after all, the first substantial reverse suffered by the Imperial Japanese Navy up to that point in the war and it was also the first in a series of defeats for Japan that occurred over the next two months that ultimately put the Allies in position to begin limited offensive action on several fronts. Additionally, while not recognized in the early histories it has since been acknowledged that the inexorable attrition of Japan’s elite corps of naval aviators began with this action.
The battle’s impact on Allied morale should not be underestimated either. While the US Navy’s carriers made a nuisance of themselves with raids on Japan’s outposts in February and March of 1942, the material damage caused by these raids was minor. In the Bay of Bengal, Somerville’s forces managed to sink a light aircraft carrier, four of Japan’s most modern heavy cruisers, as well as a number of lighter ships in exchange for relatively light losses in surface ships. The Battle of the Bay of Bengal combined with Lieutenant Colonel Jimmy Doolittle's raid on Tokyo two weeks later acted as a shot of adrenaline for sagging Allied morale, devastated by four months of reverses at the hands of the Japanese. The victory also gave the Admiralty the confidence to permit Somerville to keep the main strength of his fleet based at Colombo in Ceylon and at Addu Atoll in the Maldives instead of ordering Somerville to retreat to bases in East Africa as some contingency plans called for. This in turn boosted the morale of Imperial troops and Royal Air Force units tasked with defending India and Ceylon because it demonstrated that the Royal Navy had not abandoned them.
The impact of the Eastern Fleet’s victory was also felt thousands of miles to the east in Hawaii. US Pacific Fleet Commander Admiral Chester W. Nimitz praised Somerville’s tactical agility and his ability to make do with what he had in order to bring about a victory. After the Battle of Midway, Nimitz stated that Somerville’s actions influenced his decision to commit his precious carriers at Coral Sea and Midway in May and June 1942 because the Royal Navy demonstrated that the Japanese could be outmaneuvered. Even the Anglo-phobic and acerbic Admiral Ernest J. King publicly stated that he was rather impressed with the performance of Somerville and the Eastern Fleet. For the longer term, the success of the Eastern Fleet in this action impressed Nimitz enough that he made assisting Somerville a priority, sending small by not insignificant US forces to operate with the Eastern Fleet. While US forces never played a large role in the Indian Ocean, Somerville did appreciate what Nimitz was able to send him, particularly since operations in the Mediterranean and North Africa were a drain on Somerville’s fleet in the second half of 1942 and early 1943. More important, Nimitz’s willingness to assist Somerville also led to the building of a great deal of trust between the two admirals that laid the groundwork for future Anglo-American cooperation in the later years of the Pacific War.
The Battle of the Bay of Bengal did have one significant similarity with the later battles of Coral Sea and Midway in that all three victories were enabled by superior Allied intelligence work. Diligent code breaking and traffic analysis by the HYPO team at Pearl Harbor provided Nimitz with enough knowledge of enemy plans and intentions that he was able to confidently put his carriers in position at Coral Sea and Midway where they had a reasonable chance of engaging the enemy with success. In March and early April 1942, similar work from the code breakers and analysts at the Far East Combined Bureau (FECB) at Colombo provided Somerville and British commanders on land with enough information that they were able to take advantage of dispersed enemy forces and devise a plan that engaged the Japanese where they were weak while avoiding them where they were strong. The result was the first significant Allied victory against the Japanese in World War II and the first in a string of victories that put the Japanese on the defensive.
Strategy and Goal, Japan and Britain – In March 1942, neither Great Britain nor Japan had particularly ambitious strategic goals for the Eastern Indian Ocean. In fact, the primary aim of both sides was to secure an exposed flank in order prevent the enemy from posing a threat to lines of communication vital to more important theaters of the war. The buildup of the Royal Navy’s Eastern Fleet under the command of Admiral Somerville and the April 1942 raid by powerful units of the Imperial Japanese Navy centered on Nagumo’s carriers were both in response to a perceived threat that in fact did not exist as neither nation was planning to take significant offensive action in the area.
Japanese goals for Operation C were limited and ultimately defensive. The conquest of Malaya, Burma, Sumatra, and the Andaman Islands turned the Andaman Sea into a Japanese lake and put the Japanese into position for a more ambitious course of action in the Indian Ocean, possibly even invading Ceylon. However, Admiral Yamamoto Isoroku, commander of the Japanese Combined Fleet favored a return to offensive action in the Central Pacific against the primary enemy, the United States. The Japanese Army wanted nothing to do with operations against Ceylon or India as it was already stretched thin and the Naval General Staff preferred operations geared toward isolating Australia from the United States. With no hope of involvement from the Army and larger priorities looming to the east, the Imperial Japanese Navy's leadership to include Yamamoto did support a hit-and-run raid in the Indian Ocean designed to cripple the Royal Navy's Eastern Fleet, possibly instill some panic in the local population of India in order to secure an exposed flank of Japan's newly won empire and ensure that convoys could sail unimpeded from Singapore to Rangoon in Burma.
The British suffered from a similar level of strategic dysfunction. Churchill believed that holding Ceylon was crucial and he viewed Colombo as vital for the sustainment of the Eastern Fleet. He even stated that risks should be taken in order to defend the island. The War Office agreed, signaling India Command on 13 March 1942 that the defense of India depended on secure sea lanes which were dependent on secure naval bases, and therefore the defense of Ceylon took priority over the defense of northeastern Indian. The high priority given to Ceylon meant that one British, one East African, and two Australian brigades arrived to reinforce the garrison of two Indian brigades and one brigade of local volunteers.
However, Somerville and Vice Admiral Geoffrey Layton, the Commander-in-Chief Ceylon determined with the concurrence of the Admiralty that maintaining the Eastern Fleet as a "fleet in being" was more important than holding Ceylon because the lines of communication to the Middle East could still be defended, albeit at higher cost, if the fleet survived but Ceylon was lost, but the lines of communication could not be defended without a fleet. General Sir Archibald Wavell, the Commander-in-Chief of India became deeply concerned about the large of number air and ground formations sent to defend Ceylon given the deteriorating situation in Burma and the fact that he did not believe Ceylon could be defended in the face of a serious Japanese assault. He stated that the with regard to Ceylon, the British could not, "afford to over insure." Wavell was also not happy about the Royal Navy's attitude with regard to defending Ceylon and Eastern India given the large number of warships deployed to the Eastern Fleet. Somerville and Wavell both expressed displeasure at the large number of RAF bombers attacking German cities while they were forced to make do with small numbers of obsolete bombers to defend India, Burma, Ceylon, and the Bay of Bengal. Somerville wrote the Admiralty, “The majority of the senior officers of the Eastern Fleet are skeptical of the results achieved by these attacks on Germany, who can presumably take it as well as the United Kingdom.” Wavell sent a similar message to the Chiefs of Staff stating, "It certainly gives us fury to think that after trying with less than 20 light bombers to meet attacks, we see that over 200 heavy bombers attacked one town in Germany." Given the grim situation facing the British in India and Bay of Bengal in April 1942, it is not surprising that many expected a serious Japanese effort that would include a sustained operation aimed at capturing Ceylon was in the offing.
24 March 1942, Colombo, Ceylon - As the new commander of the Eastern Fleet, Somerville was a man with a great deal to do and not enough time to do it, in fact he had much less time than even he initially believed. After a long voyage around the Cape of Good Hope on the aircraft carrier HMS Formidable, Admiral Sir James F. Somerville flew into Ceylon on 24 March 1942. Two days later he formally took command of the Royal Navy's Eastern Fleet while his friend Vice Admiral Geoffrey Layton stepped aside to assume duties as CinC Ceylon which included authority over the governor and the civil administration of the colony.
In the preceding weeks, despite significant commitments elsewhere, the Admiralty had managed to order a large number of ships to the Indian Ocean to reinforce the Eastern Fleet. In fact, by the time Somerville arrived in Ceylon, the Eastern Fleet comprised three aircraft carriers, five battleships, two heavy cruisers, five light cruisers including the Dutch light cruiser Heemskerk, sixteen destroyers, and assorted auxiliaries making it the largest battle fleet deployed by the Royal Navy up to that point in World War II. Making matters worse, the Japanese had occupied Port Blair in the Andaman Islands the day before on 23 March, the small British and Indian garrison there surrendered without firing a shot. Control of the Andaman Islands gave the Japanese a useful base from which to conduct operations in the Bay of Bengal as well as secure sea lanes from Singapore to Rangoon in Burma.
However, the fleet was stronger on paper than in reality. While the Eastern Fleet did possess two new fleet carriers, the HMS Formidable and HMS Indomitable as well as the modernized battleship HMS Warspite, four of the battleships were barely modernized Great War era R-Class battlewagons that had trouble sustaining speeds greater than 18 knots, the third aircraft carrier was the elderly and tiny HMS Hermes, and most of the cruisers dated from the Great War or the 1920s. Somerville wrote to his wife, "My old battleboats are in various states of disrepair and I've not a ship at present that approaches what I should call a proper standard of fighting efficiency. That fact is that until I get this odd collection of ship together and train them up, they aren't worth much." He was further dismayed by the fact that while HMS Indomitable and HMS Formidable were two of the newest fleet carriers in the Royal Navy, neither ship was up the standards of his old carrier the HMS Ark Royal that he had led as part of the Royal Navy's famed Force H.
During the voyage to Ceylon Somerville informed the Admiralty that he did not believe the Eastern Fleet could stop a serious Japanese attempt to invade Ceylon but that he could oppose minor hit-and-run raids. He also argued that it was important to maintain the Eastern Fleet as a "fleet in being" in order to influence enemy decisions while maintaining the ability to protect the lines of communication to the Middle East, something he stated he could not do if a significant portion of his fleet was destroyed. Layton concurred with Somerville's assessment and on 18 March the Admiralty signaled that the Eastern Fleet was not to be sacrificed to save Ceylon.
On the same day that Somerville formally took command of the Eastern Fleet, the Kido Butai with the aircraft carriers Akagi, Soryu, Hiryu, Shokaku, and Zuikaku as well as four battleships, two heavy cruisers, one light cruiser, and eleven destroyers under the command of Vice Admiral Nagumo weighed anchor at Staring Bay in the Celebes and headed south for the Sunda Strait to execute Operation C - a raid by the Kido Butai against Ceylon and the Royal Navy's Eastern Fleet. The plan was to approach Ceylon from the southeast and raid Colombo on the 5 April. Nagumo had every intention of doing to the British at Ceylon what he had already done to the Americans at Pearl Harbor.
As the Kido Butai was departing Staring Bay, the Malay Force under the command of Vice Admiral Ozawa centered on the light carrier Ryujo along with five heavy cruisers including the four powerful Mogami class ships of Rear Admiral Kurita Takeo's 7th Cruiser Division along with a light cruiser and four destroyers entered port at Mergui, Burma to replenish after covering the seizure of the Andaman Islands. With the Andaman Islands and Rangoon secure, the Japanese now controlled the Eastern Bay of Bengal and it was time to push their advantage further west. In conjunction with the Kido Butai's raid, the Malay Force along with five submarines would proceed into the Bay of Bengal via the 10 Degree Channel and attack British merchant shipping sailing along India's east coast. It was also planned for Ryujo's small air group to conduct harassment raids on cities on India's east coast in order to induce panic and possibly undermine the British Empire's position in South Asia.
As the hard working code breakers and analysts of the FECB at Colombo pieced together clues gleaned from codes and radio traffic a picture began to form of a large scale enemy operation in the Indian Ocean. The first big break came on 28 March when a Japanese radio operator spelled out one of the operation's primary targets phonetically as KO-RO-N-BO. It also became clear to the code breakers that the operation involved a large number of enemy ships organized in disparate task forces over thousands of miles of ocean.
29 March 1942, Colombo Harbor - While Admiral Somerville took stock of his new command, he and his staff began working on a plan to engage the Japanese fleet expected to attack Colombo. Based on initial intelligence provided by the FECB, Somerville and his staff assessed the Japanese planned to conduct a "cut and run operation" with a task force of two or three battleships, two aircraft carriers, and escorting cruisers and destroyers. Somerville believed that his fleet, despite its weaknesses, could engage a force of this size with a reasonable expectation of success despite his fleet's weaknesses.
In preparation for combat, disparate elements of the Eastern Fleet were ordered to proceed to Colombo and arrive no later than 31 March in order to conduct last minute preparations as Somerville wanted the fleet back at sea on 1 April. Already present at Colombo were HMS Formidable, the heavy cruisers HMS Cornwall and Dorsetshire, the light cruisers HMS Enterprise, Dragon, and Caledon as well as six destroyers and numerous auxiliaries. HMS Indomitable flying the flag of Rear Admiral Denis Boyd Commanding Officer Aircraft Carriers, the four R-Class battleships HMS Ramillies, Royal Sovereign, Resolution, and Revenge and eight destroyers under the overall command of Somerville's deputy, Vice Admiral A.U. Willis flying his flag on HMS Resolution departed Port T, the Eastern Fleet's new base at Addu Atoll in the Maldives late in the morning on 29 April. Departing Trincomalee were HMS Warspite, HMS Hermes, the light cruisers HMS Emerald and HNLMS Heemskerk, and one destroyer. Somerville knew he was taking a risk bringing the entire fleet into Colombo, even for only one day, but he wanted to brief his senior deputies and warship captains on the plan for the upcoming battle and he wanted all ships topped off with fuel and provisions, particularly fresh water for the R-Class battleships which were limited in range due to poor water generation capacity.
Once at sea, Somerville planned to maneuver his fleet in an area southeast of Colombo where he could rely on land based aerial reconnaissance to find the Japanese fleet. Then the carriers would launch a night strike employing their ASV equipped torpedo bombers to sink or cripple as many enemy capital ships as possible and the battleships would close to finish off the survivors.
However, late in the afternoon on the 29 April, Somerville received startling intelligence from the FECB that essentially pulled the rug out from underneath his hastily developed plan. According to the latest traffic analysis and decrypts, the enemy was coming with a much larger force than was originally anticipated. Instead of two carriers and two or three battleships, the enemy was sending the main strength of the Kido Butai, led by Vice Admiral Nagumo and centered around five of the six veteran flattops that had drubbed the Americans at Pearl Harbor. These same carriers had gone on to leave an indelible impression on the Allies at Wake Island, Rabaul, the Dutch East Indies, and at Port Darwin. It went without saying that these carriers were escorted by battleships, cruisers, and destroyers that were among the Imperial Japanese Navy's top of the line. While Somerville was not entirely sure how to proceed after receiving the latest intelligence, he knew immediately that he could not proceed as planned. With new intelligence in hand, he needed time to re-think the problem so he ordered his staff to see to preparations for the arrival of the remainder of the fleet over the next two days while he took time to reconsider his options.
During the last week of March, Somerville was not the only senior British officer working to prepare Ceylon for the upcoming assault. Vice Admiral Layton, the erstwhile Eastern Fleet commander and now the CinC for Ceylon employed the broad powers of his authority to prepare the island's land based defenses. Layton impressed upon Air Vice-Marshall J.H. D'Albiac, commander of the RAF's No. 222 Group the need to concentrate all RAF fighters at airfields around Colombo instead of splitting them between Colombo and Trincomalee pointing out that he who tries to be strong in two places is in fact strong in neither. Once D'Albiac agreed, orders were issued to transfer the RAF Hurricanes of No. 261 Squadron and No. 273 Squadron equipped with Fairey Fulmars at Trincomalee to Colombo to join the Hurricane equipped No. 30 and No. 258 squadrons already there. A small number of FAA Fulmars with 803 and 806 squadrons were combined with No. 273 Squadron for ease of administration. The fighters were in place at Colombo by 30 March and the city was now defended by 54 Hurricanes in three squadrons and 20 Fulmars in another. While the fighters concentrated at Colombo, four Dutch and four RCAF PBY Catalina flying boats from 321 and 413 Squadrons flew patrols over the Indian Ocean from the seaplane base at Koggala on Ceylon's southern tip. Rounding out Ceylon's land based airpower was No. 11 Squadron of fourteen RAF Blenheim bombers and No. 788 Squadron of twelve FAA Swordfish torpedo plans. For the time being, Layton kept both squadrons at China Bay airfield near Trincomalee since the fighters were crowding Colombo's two main airfields.
Layton also worked with civil officials to set up networks of civilian coast watchers to supplement Colombo's one small radar station that had just been hastily setup at Layton's insistence. Additionally, anti-aircraft defenses were reinforced as much as possible although most guns were still fairly small caliber and all ships in port were ordered to be ready to repel an attack. Layton told every unit he spoke with that the enemy was expected to attack in the early morning of 5 April 1942, Easter Sunday. He made it clear that the Japanese would not find Colombo asleep and unprepared the way they found Pearl Harbor. As Somerville prepared his fleet for action, his land based counterparts ensured that Colombo was as well defended as it could be with the forces available.
1800 Hours, 30 March 1942, HMS Warspite in Colombo Harbor - Admiral Somerville sat in his quarters on his new flagship that had just arrived in Colombo that morning and re-read the rather detailed and precise intelligence estimate of the forces his staff assessed the enemy was bringing into the Indian Ocean. While Somerville was in command of the largest battle force the Royal Navy had assembled up to this point in the war, he understood better than anyone the weaknesses of his new command. Two days earlier he had sent a message of greetings to his counterpart in Hawaii, Admiral Chester W. Nimitz, Commander of the US Pacific Fleet, "My fleet consists for the greater part of ships that have be n employed almost exclusively on independent duties or are newly commissioned. I am engaged in giving them intensive fleet training and hope before long to report them as fit for offensive operations."
Making matters worse, while Somerville found little to cheer about in his own fleet, there was no question that the force the enemy was sending him represented Japan's first team. This was even true of the four Kongo class battleships sailing with Nagumo's carriers which were great war veterans just like Somerville's battlewagons. However, the Japanese ships had been heavily modernized whereas Somerville could only say the same of his flagship the HMS Warspite. Somerville's four R-Class battleships were veritable antiques and at least ten knots slower than Nagumo's battleships. Churchill simply called these ships, "floating coffins." The more Somerville studied the problem before him, the more he reached a very uncomfortable conclusion - he was in command of the weaker fleet, in fact, a much weaker fleet. This meant that in order to have any hope of success he would have to act in a way that was completely contradictory to his training, his education, and to the proud traditions of the Royal Navy.
As Somerville continued to look at the forces that would be arrayed against him, he began to see opportunity. The Kido Butai was not the only force the Japanese were sending into the Indian Ocean. They were also sending a second force built around a single light carrier and several of the IJN's most modern and powerful heavy cruisers into the Bay of Bengal. While this force was powerful, it was one that his fleet could handle and more important, at least according to the intelligence estimate, it would operate far to the north of Nagumo's carriers, well beyond the range of mutual support. Later in the war while serving in Washington DC, Somerville told a group of American journalists that formulating his plan for the upcoming operation was in fact quite easy. The hard part was admitting to himself that his fleet could not go to head to head with Nagumo with a reasonable expectation of success. Once he came to the painful but in hindsight obvious conclusion, everything else came together. Somerville called his chief-of-staff Commodore Ralph Edwards to his cabin to help him draft a contingency plan. The rest of his fleet was scheduled to arrive in Colombo the next morning after a run north from Port T at Addu Atoll in the Maldives. Somerville wanted to present an alternative plan to his senior commanders. If things went well, the Japanese were going to get a very bloody nose.
1500 Hours, 31 March 1942, HMS Warspite in Colombo Harbor - Colombo Harbor was filled to capacity. While it is an excellent natural deep water anchorage, in early 1942 Colombo was not yet developed as a major fleet base. With no berths large enough to handle the battleships and fleet aircraft carriers, the larger ships swung at anchor in the harbor and the smaller ships crowded the berths. With the Eastern Fleet gathered in Colombo, Somerville called a meeting with his second in command Vice Admiral Willis commander of the 3rd Battle Squadron, his aircraft carrier commander Rear Admiral Boyd, his chief-of-staff Commodore Edwards, and the captains of his five battleships and three aircraft carriers. Also in attendance were Vice Admiral Layton, Ceylon's governor Sir Andrew Caldecot, and the army commander Lieutenant General Sir Andrew Pownall. Not in attendance was Air Vice-Marshall D'Albiac of No. 222 Group. Layton had dispatched D'Albiac to New Delhi two days earlier to meet with Lieutenant General Lewis H. Brereton, commander of the fledgling US 10th Air Force. While Brereton's command existed more on paper than in reality, he had brought with him a small number of B-17 Flying Fortresses and LB-30 Liberators from the Dutch East Indies and Layton was interested in securing support for the upcoming operations from Brereton's small number of heavy bombers. Somerville had Edwards provide the group with a short briefing on the enemy's upcoming operation in the Bay of Bengal. Edwards summarized it as follows:
· An enemy task force under the command of Vice Admiral Nagumo composed of five aircraft carriers, four battleships, and their escorts would enter the Indian Ocean through the Sunda Strait and attack Colombo on the morning of 5 April - Easter Sunday.
· A second enemy force under the command of Vice Admiral Ozawa composed of one aircraft carrier and five or six cruisers with escorts would enter the Bay of Bengal near the Andaman Islands and along with several submarines would attack British shipping along India's east coast near Visakhapatnam, probably beginning on 6 April.
· Land based aircraft based at Port Blair in the Andaman Islands and from Rangoon in Burma would support the operation.
According to Edwards, after his presentation the tension in the room was so thick it was almost visible. He said that once the gravity of the situation had sunk in Somerville stood up and simply said, "Gentlemen, we cannot defeat the main enemy carrier force. Therefore we are not going to try." Edwards recalled that Somerville's simple admission of the obvious relieved all of the tension in the room as everyone there now knew that nobody was going to be asked to make vain sacrifices in the name of honor and tradition. Vice Admiral Willis wrote in his memoirs, "Being no seeker of glory I viewed the prospect of facing the Japanese Navy with the old out of date R-Class battleships quite unsuited for service in the tropics, with gloom to put it mildly."
After his brief but welcome statement, Somerville proceeded with the briefing. He told the men under his command that while they were not going to engage the enemy’s main force, the Kido Butai and its escorts, he believed the enemy’s force dispositions opened up an opportunity to take on Ozawa’s forces and do some substantial damage. Using a large map of the Bay of Bengal, Eastern India, and Ceylon, Somerville pointed that the expected operations area for Nagumo’s carriers south of Dondra Head and the expected operations area of Ozawa’s carrier/cruiser force north of Madras near Visakhapatnam were over 1000 miles apart. Somerville proposed to take the fleet out to sea the next morning and instead of lying in wait for Nagumo’s carriers, they would proceed north around the east coast of Ceylon to a maneuver area east of Madras where they would lie in wait for Ozawa’s forces. Once Ozawa’s forces were detected by reconnaissance aircraft, Boyd’s carriers would launch a strike to sink the light carrier operating with Ozawa’s forces along with as many surface ships as they could while Somerville and Willis would head north with their battleships and engage Ozawa’s remaining surface ships. After Ozawa’s forces were destroyed or chased off, the Eastern Fleet would proceed north toward Calcutta to put as much distance between it and Nagumo’s carriers and where it could also take advantage of land based fighter cover.
Somerville admitted to his commanders that he was basing this plan on two calculated risks. First, that the Eastern Fleet could take advantage of a seam in Japanese aerial reconnaissance. Somerville surmised that Ozawa’s cruiser based floatplanes and any search aircraft at Port Blair would concentrate their efforts against merchant shipping near Visakhapatnam. He also assessed that Nagumo’s search aircraft would look for him south of Colombo. In other words, Somerville planned to operate in an area where he believed/hoped the enemy would not think to look for him until it was too late. Second, the plan to run north toward Calcutta after engaging Ozawa’s ships was based on an assessment that Nagumo’s destroyers would not have enough fuel to permit a pursuit of the Eastern Fleet into the northern reaches of the Bay of Bengal.
In order to further confuse the Japanese, Somerville planned to deploy a deception force built around the heavy cruiser HMS Dorsetshire, then undergoing repairs and unable to make full speed, the destroyer HMS Tenedos, the corvette HMS Hollyhock, the armed merchant cruiser HMS Hector, and the old monitor HMS Erebrus. The ships of this group were to be manned by skeleton crews of volunteers and their job was to maneuver southwest of Dondra Head and transmit simulated radio traffic of aircraft carriers conducting flight operations. Based on the assessed course of Nagumo’s carriers provided by the FECB it was hoped that they would be sighted late in the day on 4 April and would fix Nagumo’s attention in that area. Once sighted, the ships were to head back to Colombo at the best possible speed. Hopefully Nagumo would take the bait and waste a good part of 5 April trying to find a carrier force that did not exist. In addition to the decoy force, Somerville planned to deploy the Eastern Fleet’s two British and four Dutch submarines against Nagumo’s carriers. The British submarines HMS Truant and HMS Trusty were to operate in the area south of Dondra Head where Nagumo’s carriers were expected to operate while the four Dutch submarines K-XI, K-XIV, K-XV,and O-19 would deploy on an east-west patrol line extending out from Koggala, Ceylon to act as a trip wire should the Kido Butai head north into the Bay of Bengal. Rounding out the forces responsible for defending Ceylon against the carriers of the Kido Butai were the four squadrons of 74 fighter aircraft based around Colombo. With proper warning, Layton and D’Albiac believed they could give a hot reception to Nagumo’s pilots.
It was to the north in the Bay of Bengal where the Eastern Fleet would commit itself. The Eastern Fleet was organized into three forces, a fast force built around HMS Warspite, a slow force built around Willis’ four R-Class battleships, and a carrier force built around Boyd’s three aircraft carriers. Somerville told Layton that he wanted the Blenheims of No. 11 Squadron and the Swordfish of No. 788 Squadron at China Bay near Trincomalee to re-deploy to Madras and Visakhapatnam respectively to complement the TBR squadrons on Boyd’s carriers. Deploying with the Swordfish were No. 273 Squadron's last four airworthy Vickers Vildebeest torpedo bombers. He also ordered the Dutch manned PBY Catalina No. 321 Squadron at Koggala to re-deploy to China Bay in order to provide better reconnaissance coverage of the Bay of Bengal. No. 273 Squadron's four remaining obsolete Fairey Seal biplane reconnaissance aircraft would supplement the Dutch PBYs at China Bay. The Canadian PBYs of No. 413 Squadron would remain at Koggala to keep an eye out for Nagumo’s carriers. Finally, if D’Albiac’s efforts to secure heavy bomber support from the Americans succeeded, the plan called for at least one and possibly two raids against the new Japanese seaplane base at Port Blair by the 10th Air Force prior to 5 April. The intent of these attacks was to destroy some of the H6K long range flying boats operating out of Port Blair. For the upcoming operation, the Eastern Fleet was organized as follows:
· Force A - HMS Warspite (Flagship Admiral Sir James Somerville, Commander Eastern Fleet), HMS Cornwall, HMS Emerald, HMS Enterprise, HMAS Napier, HMAS Nestor, HMS Hotspur, HMS Foxhound, HMS Fortune
· Force B - HMS Resolution (Flagship Vice Admiral A.U. Willis, Deputy Commander Eastern Fleet, Commander Third Battle Squadron), HMS Ramilles, HMS Royal Sovereign, HMS Revenge, HMS Caledon, HMS Dragon, HMS Griffin, HMS Decoy, HMAS Vampire, HMS Scout, HMS Arrow
· Force C - HMS Indomitable (Flagship Rear Admiral Denis Boyd, Commanding Officer Aircraft Carriers), HMS Formidable, HMS Hermes, HNLMS Heemskerck, HMS Paladin, HMS Panther, HNLMS Isaac Sweers, HMAS Norman
· Force D - HMS Dorsetshire, HMS Tenedos, HMS Hector, HMS Hollyhock, HMS Erebrus
· Force E - HMS Truant, HMS Trusty, K-XI, K-XIV, K-XV, O-19
In addition to the deployed naval forces, the British could count on over 100 land based aircraft of all types under the overall command of Vice Admiral Layton as CinC Ceylon. It was possible that RAF and US 10th Air Force units based in India would also be able to support the operation although to what extent was unknown. Land based air units, most from No. 222 Group were deployed as follows:
· Ratmalana Airfield, Colombo – RAF No. 30 Squadron, 20 Hurricane Mark IIB
· Ratmalana Airfield, Colombo – RAF No. 273 Squadron, 20 Fulmar Mark II (includes FAA Fulmars of No. 803 Squadron and No. 806 Squadron)
· Race Track Airfield, Colombo – RAF No. 258 Squadron, 18 Hurricane Mark IIB
· Race Track Airfield, Colombo – RAF No. 261 Squadron, 16 Hurricane Mark IIB
· China Bay, Trincomalee – RAF No. 321 Squadron (Dutch), 4 PBY Catalina
· China Bay, Trincomalee – RAF No. 273 Squadron, 4 Seal Biplanes
· Koggala Lake, Koggala – RCAF No. 413 Squadron, 4 PBY Catalina
· St. Thomas Mount Airfield, Madras – RAF No. 11 Squadron, 14 Blenheim Mark IV
· Visakhapatnam Airfield, Visakhapatnam – FAA No. 788 Squadron, 12 Swordfish
· Visakhapatnam Airfield, Visakhapatnam – RAF No. 273 Squadron, 4 Vildebeests
Somerville admitted to the men in the room that this plan had been put together by he and his staff rather hastily and that to a certain extent they were, “making things up as they went along.” However, he also honestly believed that they had a real opportunity to give the Japanese their first significant setback of the war and therefore he felt this was a chance worth taking. The sailing time for the fleet was set at 0800 the next morning so Somerville released his commanders to see to the final preparations for their units. Layton hurried off to issue additional orders to the air units that needed to re-deploy.
As Somerville walked out on the deck of HMS Warspite with Willis, Boyd, and Edwards, he surveyed the ships in the harbor and turned to his subordinates and said, “So this is the Eastern Fleet. Never mind, there is many a good tune played on an old fiddle.” Edwards later noted in his journal, “It is difficult to believe that any British force has been less drilled and well equipped to meet an enemy.” Similar thoughts to those Edwards expressed on paper were in the minds of the many of the officers and sailors in the fleet. Of the few officers briefed on the entirety of Somerville’s plan and the enemy threat they faced at least half believed privately that Somerville was taking a terrible risk based on the assumption that the FECB’s intelligence estimates were accurate and that main strength of the Eastern Fleet could remain undetected until it was ready to engage Ozawa’s forces. While Somerville never said so (he passed away in 1949), Willis suspected criticism from Churchill and some in the Admiralty of Somerville’s performance at Cape Spartivento in November 1940 when he chose to break off an engagement with the Italian Fleet in order to the ensure protection of a convoy weighed heavily on his superior’s mind. According to Willis, “The Court of Inquiry upheld Somerville’s actions to the hilt, but the Admiralty’s suspicions obviously rankled and I think he must have been very averse to laying himself open to an accusation of this sort again.”
Somerville took the precise nature of his motivations to the grave and Willis’ statement aside, most historians agree that he simply saw an opportunity to deal a heavy blow to an enemy that had known nothing but victory up to that point in the war. Regardless, the wheels were now in motion for one of the most significant naval battles of the first half of 1942.
Last edited:


I think your aircraft deployment is a little off. The RAF did not employ Fulmars at Ratmalana, 6 of which were operated by 803 and 806 squadrons, FAA. Only 30 sqn RAF operated Hurris from Ratmalana. RAF 258 sqn was at the racetrack, while 261 sqn was based at China Bay on the Trincomalee side, along with 873 sqn FAA and RAF 273 sqn Fulmars I won't even mention the 814 sqn FAA Stringbags located at China Bay, since they may still be on Hermes. You seem to have deleted RCAF 413 sqn Catalinas based at Koggala, which takes Birchall out of the picture. It was a confusing battle, made worse by conflicting histories. Have fun.
Last edited:
. Second, the plan to run north toward Calcutta after engaging Ozawa’s ships was based on an assessment that Nagumo’s destroyers would not have enough fuel to permit a pursuit of the Eastern Fleet into the northern reaches of the Bay of Bengal.
That's a formula for disaster.
For which side? The Commonwealth would have both land and carrier plane support and closer to their supplies and refueling.
For which side?
The British, obviously. If the carriers retreat to Calcutta with Nagumo at the entrance of the Bay of Bengal, they are in a cul de sac with no way out. If the assumption that Nagumo can't refuel his destroyers isn't correct, (and I would point out that Nagumo had nine capital ships all capable of fueling destroyers underway), then two RN fleet carriers would be trapped against five IJN carriers with nowhere to flee.
Had the same thought in the back of my mind. Second questions is what were the raw numbers for Brit air strength in India, and the actual capability vs a naval force. How many bomber squadrons could do more than just harrass a enemy fleet?
- Status
- Not open for further replies.
Share: