Cool I hope to be posting stuff there soon.Photo's of Turtledove's World War/Colonization/Homeward Bound Series.
So the 191 threads have become popluar and there has been talk about making a thread for this series so here we go.www.alternatehistory.com
You are using an out of date browser. It may not display this or other websites correctly.
You should upgrade or use an alternative browser.
You should upgrade or use an alternative browser.
Photos from Featherston's Confederacy/ TL-191
- Thread starter Alternatehistoryguy47
- Start date
-
- Tags
- the rising sun
and are you planning to create the Alien Fighter planes and Interceptors. on the Race. like imagine human air forces vs Race Aircraft unless the Germans bringing in ME262 Jet Fighters to play.Sure.
View attachment 665456
Land Cruiser of the Race and a T-34 for size comparison.
I based the pic on Heinrich Jäger's description of the land cruiser captured by Otto Skorzeney, small and cramped for a human but very sleek and refined.
I used sections from several modern MBT'S.
View attachment 665459
Assault rifle of the Race.
Always meant to do some improved versions of the L.C. and rifle as well as a "Killercraft" but never got around to it, if someone starts a World War thread I'd like to post some more pics of weapons of the Race there but I don't want to derail this thread.
I am surprised at the appearance of Race weapons.Sure.
View attachment 665456
Land Cruiser of the Race and a T-34 for size comparison.
I based the pic on Heinrich Jäger's description of the land cruiser captured by Otto Skorzeney, small and cramped for a human but very sleek and refined.
I used sections from several modern MBT'S.
View attachment 665459
Assault rifle of the Race.
Always meant to do some improved versions of the L.C. and rifle as well as a "Killercraft" but never got around to it, if someone starts a World War thread I'd like to post some more pics of weapons of the Race there but I don't want to derail this thread.
Now let's get back to the subject of this thread then...,
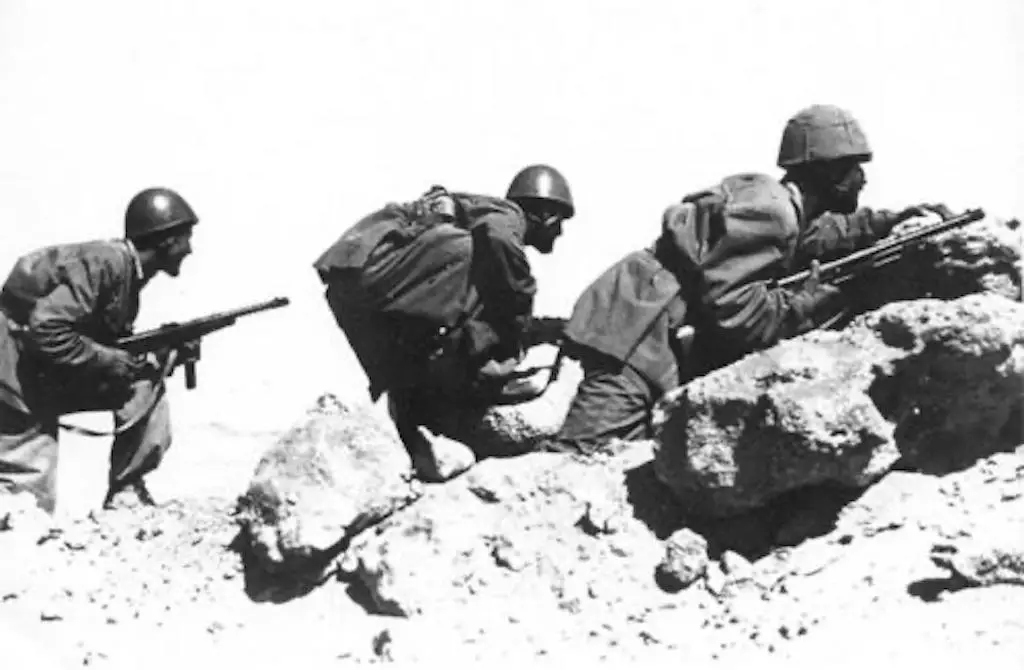
Confederate Paratroopers from the CS Army's 10th Parachute Division fighting near Pritchett, Colorado, circa 1942. Formed in 1939, the 10th Parachute Division was one of 2 of the Confederacy's Airborne divisions (the other 25th Parachute Divisions.) These divisions were intended to be dropped ahead of large-scale armored offensives, thus forming the spearhead of said offensives. However, neither of these units would ever be dropped into battle and were instead use in more like a light infantry division. The men of this unit were largely equipped with submachine-guns, pack howitzers, mortars, and light anti-barrel weapons, which largely owed to their status of being an airborne division. The 10th Division would first see action on the New Mexico/Colorado front in the spring of 1942 where they primary saw service in attacking fortified and entrenched Union Army positions. They would remain on the front until they were heavily depleted during their pyrrhic victory over the Yankee 38th Infantry Division during the Battle of Gonzales Ranch on the 2nd-11th March, 1943, after which, they were pulled off the line for R&R for a few months. Then in August of 1943, the newly reconstituted division was then thrown into action ad-hoc to reinforce the Confederate forces during the Battle of Chattanooga, where they once again saw heavy action during the battle's intense close-quarter fighting within the city. Following the battle, the 10th Division was pulled off the line once more to reconstitute at Fort Bragg, where it also unofficially become a motorized division when it would receive some trucks and T-5 kegs to its arsenal. In October, the division would be deployed to the Rhappahonack Line, which was established to defend Richmond from an impending attack against the Confederate Capital. The unit would subsequently take part in the Battle of Richmond in the Spring of 1944 where they were eventually wiped out during the intense fighting there.
Confederate Paratroopers from the CS Army's 10th Parachute Division fighting near Pritchett, Colorado, circa 1942. Formed in 1939, the 10th Parachute Division was one of 2 of the Confederacy's Airborne divisions (the other 25th Parachute Divisions.) These divisions were intended to be dropped ahead of large-scale armored offensives, thus forming the spearhead of said offensives. However, neither of these units would ever be dropped into battle and were instead use in more like a light infantry division. The men of this unit were largely equipped with submachine-guns, pack howitzers, mortars, and light anti-barrel weapons, which largely owed to their status of being an airborne division. The 10th Division would first see action on the New Mexico/Colorado front in the spring of 1942 where they primary saw service in attacking fortified and entrenched Union Army positions. They would remain on the front until they were heavily depleted during their pyrrhic victory over the Yankee 38th Infantry Division during the Battle of Gonzales Ranch on the 2nd-11th March, 1943, after which, they were pulled off the line for R&R for a few months. Then in August of 1943, the newly reconstituted division was then thrown into action ad-hoc to reinforce the Confederate forces during the Battle of Chattanooga, where they once again saw heavy action during the battle's intense close-quarter fighting within the city. Following the battle, the 10th Division was pulled off the line once more to reconstitute at Fort Bragg, where it also unofficially become a motorized division when it would receive some trucks and T-5 kegs to its arsenal. In October, the division would be deployed to the Rhappahonack Line, which was established to defend Richmond from an impending attack against the Confederate Capital. The unit would subsequently take part in the Battle of Richmond in the Spring of 1944 where they were eventually wiped out during the intense fighting there.
Yes the Race called their jet fighters "killercraft" (cool name IMO)and I plan to make one, I'll use sections from modern jet fighters and some sci-fi ships like the X-Wing from Star Wars or maybe something from BSG or both.and are you planning to create the Alien Fighter planes and Interceptors. on the Race. like imagine human air forces vs Race Aircraft unless the Germans bringing in ME262 Jet Fighters to play.
Suggestions welcomed over at the thread.
Well they're just products if my imaginations plus our own OTL tech.I am surprised at the appearance of Race weapons.
What was the target for the Confederacy in Pritchett?Now let's get back to the subject of this thread then...,
Confederate Paratroopers from the CS Army's 10th Parachute Division fighting near Pritchett, Colorado, circa 1942. Formed in 1939, the 10th Parachute Division was one of 2 of the Confederacy's Airborne divisions (the other 25th Parachute Divisions.) These divisions were intended to be dropped ahead of large-scale armored offensives, thus forming the spearhead of said offensives. However, neither of these units would ever be dropped into battle and were instead use in more like a light infantry division. The men of this unit were largely equipped with submachine-guns, pack howitzers, mortars, and light anti-barrel weapons, which largely owed to their status of being an airborne division. The 10th Division would first see action on the New Mexico/Colorado front in the spring of 1942 where they primary saw service in attacking fortified and entrenched Union Army positions. They would remain on the front until they were heavily depleted during their pyrrhic victory over the Yankee 38th Infantry Division during the Battle of Gonzales Ranch on the 2nd-11th March, 1943, after which, they were pulled off the line for R&R for a few months. Then in August of 1943, the newly reconstituted division was then thrown into action ad-hoc to reinforce the Confederate forces during the Battle of Chattanooga, where they once again saw heavy action during the battle's intense close-quarter fighting within the city. Following the battle, the 10th Division was pulled off the line once more to reconstitute at Fort Bragg, where it also unofficially become a motorized division when it would receive some trucks and T-5 kegs to its arsenal. In October, the division would be deployed to the Rhappahonack Line, which was established to defend Richmond from an impending attack against the Confederate Capital. The unit would subsequently take part in the Battle of Richmond in the Spring of 1944 where they were eventually wiped out during the intense fighting there.
Last edited:
Do they have the shitty parachutes the falschemjager ( spelling) had lolNow let's get back to the subject of this thread then...,
Confederate Paratroopers from the CS Army's 10th Parachute Division fighting near Pritchett, Colorado, circa 1942. Formed in 1939, the 10th Parachute Division was one of 2 of the Confederacy's Airborne divisions (the other 25th Parachute Divisions.) These divisions were intended to be dropped ahead of large-scale armored offensives, thus forming the spearhead of said offensives. However, neither of these units would ever be dropped into battle and were instead use in more like a light infantry division. The men of this unit were largely equipped with submachine-guns, pack howitzers, mortars, and light anti-barrel weapons, which largely owed to their status of being an airborne division. The 10th Division would first see action on the New Mexico/Colorado front in the spring of 1942 where they primary saw service in attacking fortified and entrenched Union Army positions. They would remain on the front until they were heavily depleted during their pyrrhic victory over the Yankee 38th Infantry Division during the Battle of Gonzales Ranch on the 2nd-11th March, 1943, after which, they were pulled off the line for R&R for a few months. Then in August of 1943, the newly reconstituted division was then thrown into action ad-hoc to reinforce the Confederate forces during the Battle of Chattanooga, where they once again saw heavy action during the battle's intense close-quarter fighting within the city. Following the battle, the 10th Division was pulled off the line once more to reconstitute at Fort Bragg, where it also unofficially become a motorized division when it would receive some trucks and T-5 kegs to its arsenal. In October, the division would be deployed to the Rhappahonack Line, which was established to defend Richmond from an impending attack against the Confederate Capital. The unit would subsequently take part in the Battle of Richmond in the Spring of 1944 where they were eventually wiped out during the intense fighting there.
No, they would be using something more of what the British would've been using.Do they have the shitty parachutes the falschemjager ( spelling) had lol
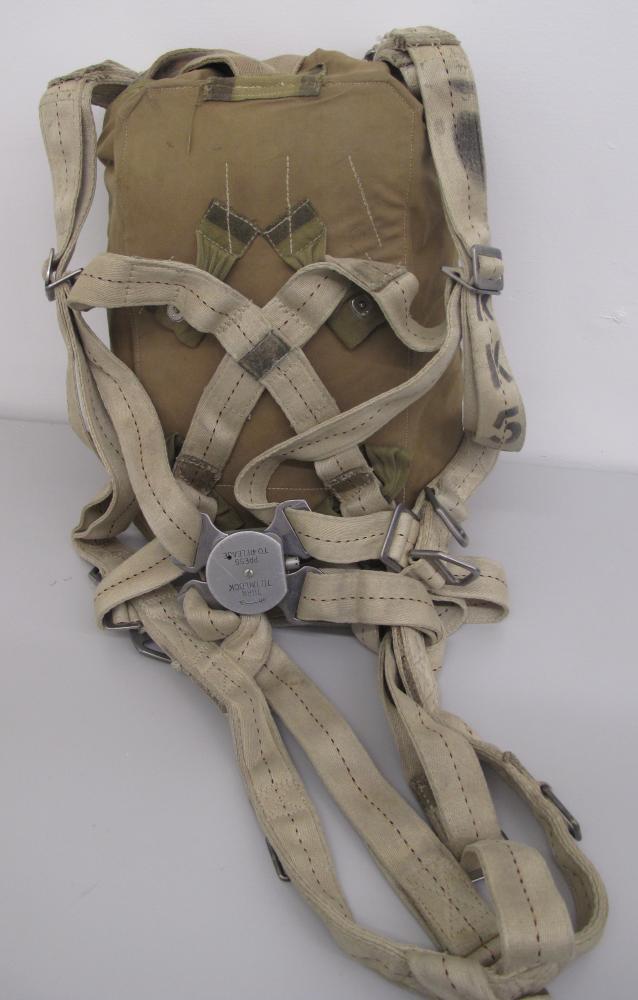
Thank god I feel so bad for the German parachutists . TUCK AND ROLL MEIN FRIENDSNo, they would be using something more of what the British would've been using.
Operation MI, The Battle of Midway
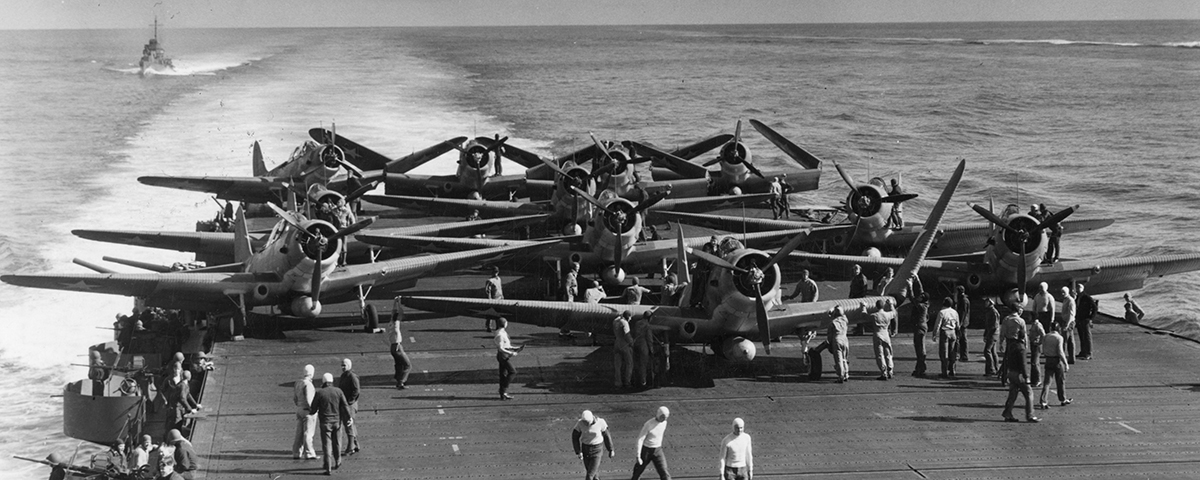
A flight of TBD Devastator torpedo bombers preparing for take-off from the deck of the aircraft carrier USS Hornet, circa 1941.
Following the declaration of war by the Empire of Japan against the United States of America on September 2, 1941, only a small number of engagements between the navies of the two countries would ever occur. But in October of that year, the Japanese Naval High Command under Admiral Yamamoto would start to draw up plans for a major naval offensive against the Americans at the island of Midway. The initial plan for what would become known as Operation MI would call for a force of carriers, capital ships, and their support units to bombard the Union garrison before launching an amphibious assault against to capture it. Within weeks of the Operation being drawn up, the American Office of Naval Intelligence would receive word about this plan thru decrypted messages (which was referred to as JN-25 by the Yankees.) They would also learn that the Japanese were planning to attack sometime in the early part of December, in which, the US Navy would begin to fortify their garrison and creating an ad-hoc naval force to defend the atoll.
A photo of the USS Remembrance taken from the heavy cruiser USS Manchester sailing toward Midway with her battlegroup, early December 1941.

A pre-war photo of the commander of Task Force 17, Admiral Frank J. Fletcher. Fletcher was a veteran of the First Great War, having commanded the destroyer, USS Gridley, during the First and Second Battles of the Virginia Capes against the Confederate Navy.
When the war broke out, the garrison at Midway Atoll initially comprised of 450 marines, 4 coastal defense guns, 8 AA machine-guns, 2 anti-aircraft artillery pieces, 12 F2B Buffalo fighter planes, 14 SB2U Vindicator scout bombers, 21 Catalina Flying Boats, 2 patrol boats, and a single minesweeper. But in the months leading up to the battle, the garrison would be bumped up to 530 marines, 9 coastal defense guns, 19 AA machine-guns, 6 larger caliber AA guns, 20 F2B fighters, 20 SB2U scout bombers, 16 SBD Dauntless dive bombers, 6 TBD Devastator torpedo bombers, 32 PBY Catalina flying boats, and 10 B-17 bombers. The American Naval forces in the fight were part of the ad-hoc Task Force 17, which would comprise of the recently refitted USS Remembrance as well as the USS Hornet, the battlecruiser USS Lexington (which was the half-sister to Remembrance), the battleships USS Kansas and New Mexico, 4 heavy cruisers, 5 light cruisers, 14 destroyers, and 8 submarines. Between the carriers and the airfields at Midway, the two would wield a total of 251 aircraft of all types.
:max_bytes(150000):strip_icc()/akagi-large-56a61c395f9b58b7d0dff70b.jpg)
An aerial photograph of the Japanese aircraft carrier Akagi, circa 1939.
The Japanese Order of Battle was comprised of the main vanguard forces which comprised the First Fleet under Admiral Yamamoto, which would be comprised of the aircraft carriers Akagi, Kaga, Soryu, Hiryu, Shokaku, and Zuikaku of the Kido Butai formation, the fast battleships Kii and Owari, the battlecruisers Kongo, Hiei, Takao, and Atago, 7 heavy cruisers, 5 light cruisers, 16 destroyers, and 7 submarines. A second force called the Second Fleet under Vice-Admiral Kondo, would serve as the invasion force, being comprised of the battleships Ise and Hyuga, the light aircraft carrier Ryujo, 4 heavy cruisers, 4 light cruisers, 16 destroyers, and 9 troopships all carrying 2,100 SNLF marines. The total combat aircraft strength for the Japanese would 451 aircraft from all of the carriers that they have at their disposal.

A structure aflame following an air attack by Japanese dive bombers.
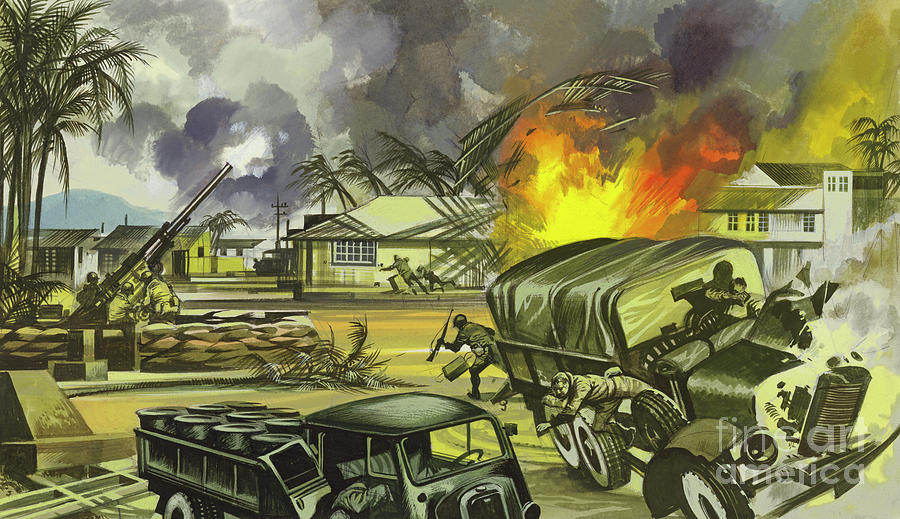
A post-war artist's rendition of Midway coming under Japanese air attack.
On November 29, 1941, the Japanese Fleet that was to take part in the operation would depart from their home base at Yokosuka and make their way toward Midway Atoll. By December 5, the fleet's planes would be within striking distance from the American base, in which a force consisting of A6M Zeros and D3A1 dive bombers would take off to make their strike against the enemy garrison. Above Midway Island, they would be greeted by intense anti-aircraft ground fire and the USMC F2B fighters that got quickly scrambled to engage them. Despite their best efforts, the Americans were unable to stop the Japanese assault on their holding, which saw the destruction of many of the island's fortifications and other infrastructure on the island. For loss of 15 F2B's, the Flying Leathernecks shot down 6 D3A1s and a single Zero, in addition to three D3A1s being shot down by the ground-based AA guns. Hours later, a PBY Catalina that was doing reconnaissance would spot the Japanese fleet, and a large airstrike against that fleet would be mounted using the strike aircraft remaining on the island. However, none of them would cause any significant damage to the Japanese warships and would suffer heavy casualties to both AA fire from the ships and to the Zeros patrolling the skies. On the following day, the Japanese would launch yet another airstrike which would cause more damage to the island's facilities and to its defenses while losing seven more aircraft in the process. Later that night, Task Force 17 would be within range of the Atoll, where they would drop off supplies and reinforcements to the island in the form of 10 F3A fighters and more Marines.
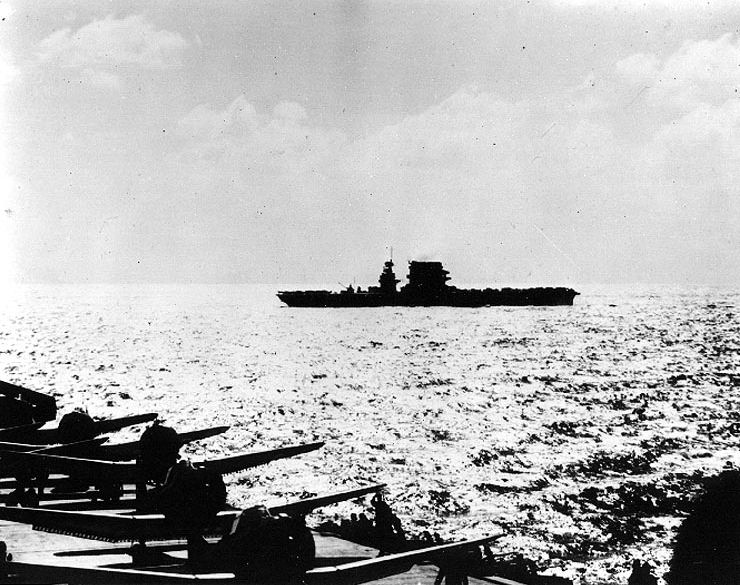
USS Remembrance as seen from the decks of USS Hornet on the morning of December 7, 1941.
In the early morning hours of December 7, the aircraft from both Remembrance and Hornet would both be launched from their respective carriers to attack the Japanese fleet. Within two hours, the aircraft would reach the Japanese fleet and would immediately commence their assault. Greeting them were the intense anti-aircraft fire from both the carriers and their escorts, and the patrolling A6M Zero fighters. The TBD Devastator torpedo bombers would get slaughtered by the Japanese defenders as their slow speed made them easy targets for the Japanese gunners. On the other hand, the SBD Dauntless dive bombers had more luck as the Japanese gunners were more focused on the torpedo bombers, and thus, would largely avoid casualties until they reach their targets. At that point, the Dauntlesses dive toward their targets, drop their bombs, and turn in the direction of their carriers, in which two aircraft carriers would be left burning, which was the Akagi and Soryu along with taking out a light cruiser. Within hours, the Soryu would slip beneath the waves, while the Akagi, though surviving the ordeal, would be out of action for 6 months. The aircraft aboard the carriers Kaga, Hiryu, Shokaku, and Zuikaku would be readied for a counter-attack against the Americans, and within an hour, would be launched (by that time, scout aircraft from the cruiser Mikuma would spot the Union fleet.)
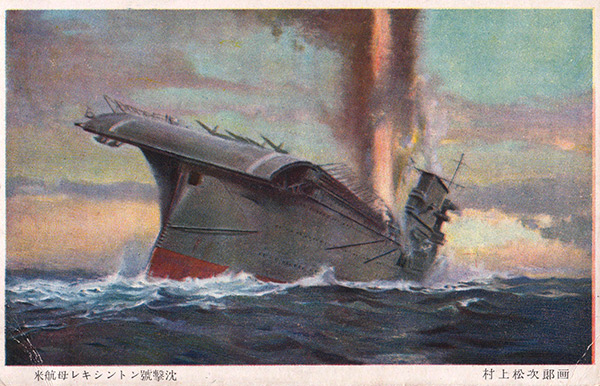
A Japanese propaganda postcard depicting the sinking of the USS Remembrance.
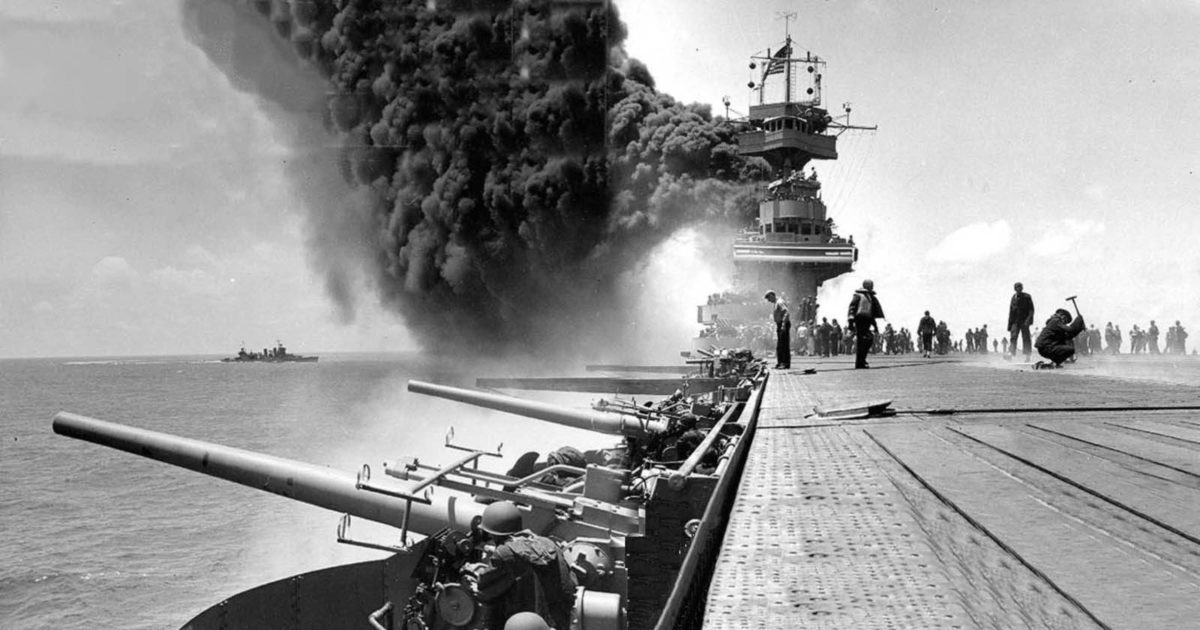
The USS Hornet on fire following a bomb strike.
At around 11:45 hours, the first elements of the Japanese air armada would reach Task Force 17, where the fighters from both Hornet and Remembrance would be scrambled and the anti-air defenses from them and their escorts would open fire. Despite suffering losses, several of the Japanese bombers would slip past the defensive screen and would initiate their attacks on the American carriers. First, two aerial bombs would penetrate the flight deck of the Remembrance, which would cause some catastrophic explosions below decks. Next, a formation of B5N bombers would drop their torpedoes, in which two would strike the Remembrance with another hitting the escorting destroyer USS Sims. Several D3A1 dive bombers would also make an attack run on the Hornet, where they would score several hits on her, and causing severe damage to her flight deck. In addition, the destroyer USS Hamman would suffer a direct hit and would sink with heavy loss of life, and the light cruiser USS Topeka would be hit by a torpedo and would be disabled. Not long after the Japanese attackers left, the damage control parties aboard the two carriers would work hard to put out fires and to patch up holes. At 14:22 however, the Japanese planes would return and began their attack, in which a third torpedo would strike the Remembrance, in which she started to list heavily to port, which prompted her captain to order an abandon ship. Within minutes, the carrier would capsize and then would sink into the depths of the Pacific. Likewise, USS Hornet would suffer damage but would survive this attack, albeit now out of action, and her remaining aircraft together with Remembrance's forced to fly to Midway Atoll. At this point, Admiral Fletcher (now aboard the battlecruiser Lexington) would order the Hornet along with the battleship New Mexico, the cruisers Indianapolis, Topeka, and 5 destroyers to withdraw back to the Sandwich Islands. When nighttime fell, Admiral Yamamoto would order a detachment with the capital ships Kii, Takao, and Atago, the heavy cruisers Rakko, Chokai, Maya, Mikuma, and Mogami, the light cruisers Kitakami, Oi, and Sendai, and 8 destroyers to prepare for a night action and move to finish off Task Force 17.

A post-war painting of US Navy warships engagement during the Night Engagement of December 8th.
At 3:38 in the morning on December 8, the Japanese forces would be the first to spot their enemies (in spite of some of the American ships being equipped with primitive search radar.) In which, flares would be fired from the cruiser Sendai, which would illuminate the battlefield, thus beginning the night action and catching the Americans by surprise. The battleship Kii and the battlecruisers Takao and Atago would open fire on USS Kansas and Lexington while the cruisers and destroyers started launching their Type 93 "Long Lance" torpedoes at the Union ships. This engagement would be fought over a period of several hours until at dawn, the surviving Union vessels would withdraw from the area. During this engagement, the battleship Kansas would suffer heavy damage from the Japanese capital ships, and if not for the gallant efforts of her damage control probably would've been sunk. Other ships such as the cruisers Northampton, Quincy, and Fort Wayne have not been as fortunate as they either been sunk by heavy Japanese gunfire and/or at the hands of the Japanese torpedoes. With the withdrawal of the American forces, it was only a matter of hours before the Japanese would commence their naval and air bombardment of Midway Island. And by December 10th, the Japanese would commit their marines into the fight by landing them on the islands and within hours, the island would fall.

A Japanese propaganda poster depicting SNLF Marines capturing Midway.
The Battle of Midway would prove to be the US Navy's worst defeat since the War of 1812, with the loss of the aircraft USS Remembrance, 2 heavy cruisers, 1 light cruiser, 5 destroyers, 2 submarines, 217 aircraft shot down, and 158 Marines dead. In addition, the aircraft carrier Hornet, the Battleship Kansas, the cruisers Topeka* and Detriot, and 3 destroyers were badly damaged. Likewise, the Japanese would lose the aircraft carrier Soryu, the light cruiser Yura, 3 destroyers, 153 planes shot down, and 52 SNLF marines dead. In addition, the battlecruiser Atago, the aircraft carrier Akagi, 2 heavy cruisers, and 1 destroyer would be left badly damaged from the engagement.
* = USS Topeka was sunk by the Japanese submarine I-58 off the Sandwich Islands on December 11, 1941.
A flight of TBD Devastator torpedo bombers preparing for take-off from the deck of the aircraft carrier USS Hornet, circa 1941.
Following the declaration of war by the Empire of Japan against the United States of America on September 2, 1941, only a small number of engagements between the navies of the two countries would ever occur. But in October of that year, the Japanese Naval High Command under Admiral Yamamoto would start to draw up plans for a major naval offensive against the Americans at the island of Midway. The initial plan for what would become known as Operation MI would call for a force of carriers, capital ships, and their support units to bombard the Union garrison before launching an amphibious assault against to capture it. Within weeks of the Operation being drawn up, the American Office of Naval Intelligence would receive word about this plan thru decrypted messages (which was referred to as JN-25 by the Yankees.) They would also learn that the Japanese were planning to attack sometime in the early part of December, in which, the US Navy would begin to fortify their garrison and creating an ad-hoc naval force to defend the atoll.
A photo of the USS Remembrance taken from the heavy cruiser USS Manchester sailing toward Midway with her battlegroup, early December 1941.
A pre-war photo of the commander of Task Force 17, Admiral Frank J. Fletcher. Fletcher was a veteran of the First Great War, having commanded the destroyer, USS Gridley, during the First and Second Battles of the Virginia Capes against the Confederate Navy.
When the war broke out, the garrison at Midway Atoll initially comprised of 450 marines, 4 coastal defense guns, 8 AA machine-guns, 2 anti-aircraft artillery pieces, 12 F2B Buffalo fighter planes, 14 SB2U Vindicator scout bombers, 21 Catalina Flying Boats, 2 patrol boats, and a single minesweeper. But in the months leading up to the battle, the garrison would be bumped up to 530 marines, 9 coastal defense guns, 19 AA machine-guns, 6 larger caliber AA guns, 20 F2B fighters, 20 SB2U scout bombers, 16 SBD Dauntless dive bombers, 6 TBD Devastator torpedo bombers, 32 PBY Catalina flying boats, and 10 B-17 bombers. The American Naval forces in the fight were part of the ad-hoc Task Force 17, which would comprise of the recently refitted USS Remembrance as well as the USS Hornet, the battlecruiser USS Lexington (which was the half-sister to Remembrance), the battleships USS Kansas and New Mexico, 4 heavy cruisers, 5 light cruisers, 14 destroyers, and 8 submarines. Between the carriers and the airfields at Midway, the two would wield a total of 251 aircraft of all types.
An aerial photograph of the Japanese aircraft carrier Akagi, circa 1939.
The Japanese Order of Battle was comprised of the main vanguard forces which comprised the First Fleet under Admiral Yamamoto, which would be comprised of the aircraft carriers Akagi, Kaga, Soryu, Hiryu, Shokaku, and Zuikaku of the Kido Butai formation, the fast battleships Kii and Owari, the battlecruisers Kongo, Hiei, Takao, and Atago, 7 heavy cruisers, 5 light cruisers, 16 destroyers, and 7 submarines. A second force called the Second Fleet under Vice-Admiral Kondo, would serve as the invasion force, being comprised of the battleships Ise and Hyuga, the light aircraft carrier Ryujo, 4 heavy cruisers, 4 light cruisers, 16 destroyers, and 9 troopships all carrying 2,100 SNLF marines. The total combat aircraft strength for the Japanese would 451 aircraft from all of the carriers that they have at their disposal.
A structure aflame following an air attack by Japanese dive bombers.
A post-war artist's rendition of Midway coming under Japanese air attack.
On November 29, 1941, the Japanese Fleet that was to take part in the operation would depart from their home base at Yokosuka and make their way toward Midway Atoll. By December 5, the fleet's planes would be within striking distance from the American base, in which a force consisting of A6M Zeros and D3A1 dive bombers would take off to make their strike against the enemy garrison. Above Midway Island, they would be greeted by intense anti-aircraft ground fire and the USMC F2B fighters that got quickly scrambled to engage them. Despite their best efforts, the Americans were unable to stop the Japanese assault on their holding, which saw the destruction of many of the island's fortifications and other infrastructure on the island. For loss of 15 F2B's, the Flying Leathernecks shot down 6 D3A1s and a single Zero, in addition to three D3A1s being shot down by the ground-based AA guns. Hours later, a PBY Catalina that was doing reconnaissance would spot the Japanese fleet, and a large airstrike against that fleet would be mounted using the strike aircraft remaining on the island. However, none of them would cause any significant damage to the Japanese warships and would suffer heavy casualties to both AA fire from the ships and to the Zeros patrolling the skies. On the following day, the Japanese would launch yet another airstrike which would cause more damage to the island's facilities and to its defenses while losing seven more aircraft in the process. Later that night, Task Force 17 would be within range of the Atoll, where they would drop off supplies and reinforcements to the island in the form of 10 F3A fighters and more Marines.
USS Remembrance as seen from the decks of USS Hornet on the morning of December 7, 1941.
In the early morning hours of December 7, the aircraft from both Remembrance and Hornet would both be launched from their respective carriers to attack the Japanese fleet. Within two hours, the aircraft would reach the Japanese fleet and would immediately commence their assault. Greeting them were the intense anti-aircraft fire from both the carriers and their escorts, and the patrolling A6M Zero fighters. The TBD Devastator torpedo bombers would get slaughtered by the Japanese defenders as their slow speed made them easy targets for the Japanese gunners. On the other hand, the SBD Dauntless dive bombers had more luck as the Japanese gunners were more focused on the torpedo bombers, and thus, would largely avoid casualties until they reach their targets. At that point, the Dauntlesses dive toward their targets, drop their bombs, and turn in the direction of their carriers, in which two aircraft carriers would be left burning, which was the Akagi and Soryu along with taking out a light cruiser. Within hours, the Soryu would slip beneath the waves, while the Akagi, though surviving the ordeal, would be out of action for 6 months. The aircraft aboard the carriers Kaga, Hiryu, Shokaku, and Zuikaku would be readied for a counter-attack against the Americans, and within an hour, would be launched (by that time, scout aircraft from the cruiser Mikuma would spot the Union fleet.)
A Japanese propaganda postcard depicting the sinking of the USS Remembrance.
The USS Hornet on fire following a bomb strike.
At around 11:45 hours, the first elements of the Japanese air armada would reach Task Force 17, where the fighters from both Hornet and Remembrance would be scrambled and the anti-air defenses from them and their escorts would open fire. Despite suffering losses, several of the Japanese bombers would slip past the defensive screen and would initiate their attacks on the American carriers. First, two aerial bombs would penetrate the flight deck of the Remembrance, which would cause some catastrophic explosions below decks. Next, a formation of B5N bombers would drop their torpedoes, in which two would strike the Remembrance with another hitting the escorting destroyer USS Sims. Several D3A1 dive bombers would also make an attack run on the Hornet, where they would score several hits on her, and causing severe damage to her flight deck. In addition, the destroyer USS Hamman would suffer a direct hit and would sink with heavy loss of life, and the light cruiser USS Topeka would be hit by a torpedo and would be disabled. Not long after the Japanese attackers left, the damage control parties aboard the two carriers would work hard to put out fires and to patch up holes. At 14:22 however, the Japanese planes would return and began their attack, in which a third torpedo would strike the Remembrance, in which she started to list heavily to port, which prompted her captain to order an abandon ship. Within minutes, the carrier would capsize and then would sink into the depths of the Pacific. Likewise, USS Hornet would suffer damage but would survive this attack, albeit now out of action, and her remaining aircraft together with Remembrance's forced to fly to Midway Atoll. At this point, Admiral Fletcher (now aboard the battlecruiser Lexington) would order the Hornet along with the battleship New Mexico, the cruisers Indianapolis, Topeka, and 5 destroyers to withdraw back to the Sandwich Islands. When nighttime fell, Admiral Yamamoto would order a detachment with the capital ships Kii, Takao, and Atago, the heavy cruisers Rakko, Chokai, Maya, Mikuma, and Mogami, the light cruisers Kitakami, Oi, and Sendai, and 8 destroyers to prepare for a night action and move to finish off Task Force 17.
A post-war painting of US Navy warships engagement during the Night Engagement of December 8th.
At 3:38 in the morning on December 8, the Japanese forces would be the first to spot their enemies (in spite of some of the American ships being equipped with primitive search radar.) In which, flares would be fired from the cruiser Sendai, which would illuminate the battlefield, thus beginning the night action and catching the Americans by surprise. The battleship Kii and the battlecruisers Takao and Atago would open fire on USS Kansas and Lexington while the cruisers and destroyers started launching their Type 93 "Long Lance" torpedoes at the Union ships. This engagement would be fought over a period of several hours until at dawn, the surviving Union vessels would withdraw from the area. During this engagement, the battleship Kansas would suffer heavy damage from the Japanese capital ships, and if not for the gallant efforts of her damage control probably would've been sunk. Other ships such as the cruisers Northampton, Quincy, and Fort Wayne have not been as fortunate as they either been sunk by heavy Japanese gunfire and/or at the hands of the Japanese torpedoes. With the withdrawal of the American forces, it was only a matter of hours before the Japanese would commence their naval and air bombardment of Midway Island. And by December 10th, the Japanese would commit their marines into the fight by landing them on the islands and within hours, the island would fall.
A Japanese propaganda poster depicting SNLF Marines capturing Midway.
The Battle of Midway would prove to be the US Navy's worst defeat since the War of 1812, with the loss of the aircraft USS Remembrance, 2 heavy cruisers, 1 light cruiser, 5 destroyers, 2 submarines, 217 aircraft shot down, and 158 Marines dead. In addition, the aircraft carrier Hornet, the Battleship Kansas, the cruisers Topeka* and Detriot, and 3 destroyers were badly damaged. Likewise, the Japanese would lose the aircraft carrier Soryu, the light cruiser Yura, 3 destroyers, 153 planes shot down, and 52 SNLF marines dead. In addition, the battlecruiser Atago, the aircraft carrier Akagi, 2 heavy cruisers, and 1 destroyer would be left badly damaged from the engagement.
* = USS Topeka was sunk by the Japanese submarine I-58 off the Sandwich Islands on December 11, 1941.
Last edited:
Soldier 1: "Wait, it's all Ohio?"now imagine the Confederates disguised as US Troops by wearing captured US Army Equipment vehicles tanks and weapons to infiltrate behind American Lines and doing sabotage and assassinations until the US Army realized that the Confederate Army in US Uniforms had to ask questions about the capitol of united states and who is the president of united states if they didnt comply they knew there Confederate Troops in US Uniforms been caught and executed for Perfidy.
Soldier 2: "Always has been."

King Edward VIII meets with President Richard Nixon at the Executive Mansion, June 1973. The king's visit was the first time a British sovereign visited the United States and is often hailed as a turning point in Anglo-American relations, marking the beginning of their special relationship. This would be the king's only state visit to the United States, as he succumbed to complications from a stroke in 1974. He was succeeded by his only child, Queen Victoria II, and his wife, Queen Olga, would live until 1989.
The Republicans became a minor centrist, agrarian party. Democrats are the OTL Republicans with libertarianism replaced by statism.So the OTL parties, but without the political shift?
German Kaiser Wilhelm IV
Banned
The 8th (and last) president of the Republic of Texas, Lyndon B. Johnson, signing the Reunification Act of 1961, 04/12/1961 (the anniversary of the attack on Fort Sumter). The signing of this act marked the reunification of all the pre-1860 United States.
The Reunification Act readmitted Texas to the United States, reunited Houston with Texas, and promised Texas autonomy within the USA (the feds don't interfere that much, and they can call their legislature a "national assembly", among other things). LBJ became governor of Texas immediately after reunification.

The Reunification Act readmitted Texas to the United States, reunited Houston with Texas, and promised Texas autonomy within the USA (the feds don't interfere that much, and they can call their legislature a "national assembly", among other things). LBJ became governor of Texas immediately after reunification.
Last edited:
German Kaiser Wilhelm IV
Banned
A British Reunification protest in London, England, circa. 1960. After the SGW, the UK was divided into its constituent parts to ensure they could never threaten Germany or the USA ever again. Instead of pacifying the British for good, it only created millions of angry people demanding reunification.

German Kaiser Wilhelm IV
Banned
U.S. troops hauling supplies in Russian America, circa. 1945. After the onset of the Second Russian Civil War, the Americans invaded (and later annexed) Russian America, to keep it from falling to the Bolsheviks.

Last edited:
Share: