Here is a link to the NavSource page on USS Chicago. http://www.navsource.org/archives/04/029/04029.htm Chicago was IOTL carrying Radar on the mainmast by 10 September 1940. Also instead of her aft quad 1.1's she mounts what appears to be a 3"/50 cal between the upper and lower pair of starboard 5" 25/ Cal. Also in the 1940 photo set it confirms that Houston had all 8 of hr 5"/25 cal mounted.
You are using an out of date browser. It may not display this or other websites correctly.
You should upgrade or use an alternative browser.
You should upgrade or use an alternative browser.
...Those Marvelous Tin Fish: The Great Torpedo Scandal Avoided
- Thread starter DaveJ576
- Start date
Threadmarks
View all 11 threadmarks
Reader mode
Reader mode
Recent threadmarks
Post 4 - Testing Efforts And The Search For A Bigger Boom, 1923 Post 5 - Developing Alternatives and Live Testing, 1923 Post 6 - The Fish Has Wings and Some Unpleasant Truths, 1925-1930 Post 7 - Frustration and Progress, 1930-1935 Post 8 - New Paths, "One Hell of a Wallop", And Some Fortunate Angina, 1935-1940 Post 9 - Gearing Up For War, 1941 Post 10 - Side Bar: A Discussion of Submarine Tactics - 1941-1942 Post 11 - Initial Action in the Philippines - 1941-1942While I appreciate this time line and McPhersons depth of work, he is honest enough to not conceal in the least his strong and tendentious opinions. If you're reading him to reflect on OTL then look up his sources and equivalent works. I know from my own work the temptations of putting your thesis more strongly than the evidence supports, and how readily a tentative thought can be misrecollected as a certainty in the primary source data.
So treat McPherson the same as any other historian: read alongside others, especially of the alternate view point.
I hope he reads this as praise, great praise,
Sam R.
So treat McPherson the same as any other historian: read alongside others, especially of the alternate view point.
I hope he reads this as praise, great praise,
Sam R.
That's not quite the biggest- there's one Browning M1917 family member that's bigger, and it's the closest match to the shell weight and muzzle energy of the 1.1."Ho-155, the biggest Browning
- Caliber: 30 mm (1.2 in)
- Ammunition: 30 x 114
- Projectile weight 8.3 ounce(235 g)
- Weight: 50 kg (110 lb)
- Rate of fire: 450 rounds/min
- Muzzle velocity: 700 m/s (2,300 ft/s)
1.1" from the wiki
HE-Tracer
Caliber 1.1-inch (28 mm) x 199
Rate of fire 150 rpm
Muzzle velocity 2,700 feet per second (820 m/s)
The round as finally adopted weighed 2 pounds and employed a 14.72 ounce percussion-fuzed projectile.
The German Mk-103 cartridge was 30 x 184, 12 ounce 330g 860 m/s (2,800 ft/s) with 380rpm
So the 1.1" was pretty close to the Mk-103 as far as terminal performance went, but rate of fire far worse.
Part of the reason for the abysmal ROF on the 1.1 was the round itself, it was sensitive enough that contact with doped fabric was enough to set it off.
as it was,rounds would pop during loading or even going down the barrel.
That meant controlled feed of the cartridge, and for it to have worked at a higher ROF, would have needed a revolver feed setup.
wasn't new tech, Hiram Maxim had a patent on that from one of his prototype guns in the 1880s.
Ho-204 (source)
- Caliber: 37 mm (1.45 in)
- Ammunition: 37 x 144
- Projectile weight 1.04 lb (475 g)
- Weight: 130 kg (285 lb)
- Rate of fire: 400 rounds/min
- Muzzle velocity: 710 m/s (2,330 ft/s)
- Muzzle energy: 119723.75 J (88303.7 foot-lbs)
- Caliber: 28 mm (1.1 in)
- Ammunition: 28 x 199
- Projectile weight 0.917 lb (416 g)
- Weight: 252 kg (556 lb)- without breech
- Rate of fire: 150 rounds/min
- Muzzle velocity: 823 m/s (2,700 ft/s)
- Muzzle energy: 140884.432 J (103911 foot-lbs)
Hotchkiss didn't create that, all Gatlings (and all other pre-Maxim machine guns) had that:Or one could chute feed the projectile into a Gatling gun revolver cannon... And that was possible thanks to an 1890s personage named Benjamin Hotchkiss.
It was probably a good decision. The tactics and positions where a torpedo salvo is effective don't coincide with the tactics and positions where guns are effective, so a cruiser will be forced to choose whether to maneuver to use their guns or their torpedoes effectively. Whichever one they choose, the other usually ends up being deadweight that compromises the ships' primary function. In the case of cruisers, the torpedoes on Japanese cruisers were probably the deciding factor in their weak armor and overweight design. The Brooklyn class had all the firepower and more armor than the Mogami class and wasn't overweight, proving that the IJN could have had all the firepower and armor they wanted in such a displacement if they just didn't insist on torpedoes. Destroyers are the best platform for those, and by the same token, they should not have sacrifice torpedoes for more gun power. No amount of gun power on what is fundamentally a destroyer is going to make it a substitute for a light cruiser (which is what the navy should be building if there's a perceived lack of gun power in the fleet).Notes: Another “fleet battle destroyer” used as a picket ship. One supposes that the USN wanted to maximize its destroyer torpedo tubes, once the decision (1935 onward) was made to dismount the torpedo tubes as a fire and explosion hazard from most USN cruisers. It is a decision, naval historians still debate. I come down on the side of the argument that it makes sense in terms of WW II technology if you have the aircraft available in quantity nearby to serve as the ASS (torpedo) weapon launch platforms replacements for the torpedoes needed, to then dismount the tubes from the cruisers for the safety reasons specified. But if you do not have the tubes, as the USN clearly did not in 1942 and much of 1943, then the destroyer force had better be numerous enough and the navy had better accept the numerous crew and ship losses from that service to be expected as they are slaughtered in the kind of naval brawls seen during CARTWHEEL. The American cruiser forces should not be rushed pell-mell into any surface battle where Japanese torpedo-happy captains can wheel and deal. Cruiser guns, alone, usually do not sink “modern” WW II warships as easily as a Type 93 torpedo does.
McPherson
Banned
While I appreciate this time line and McPhersons depth of work, he is honest enough to not conceal in the least his strong and tendentious opinions. If you're reading him to reflect on OTL then look up his sources and equivalent works. I know from my own work the temptations of putting your thesis more strongly than the evidence supports, and how readily a tentative thought can be misrecollected as a certainty in the primary source data.
So treat McPherson the same as any other historian: read alongside others, especially of the alternate view point.
I hope he reads this as praise, great praise,
Sam R.
Very well stated.
I often include YMMV in some of my postings (Your mileage may vary.) for this very reason. (^^^). The fact is that I have gone out on a limb several times in this ATL with some opinion work, that is often at variant with "mainstream historian" consensus.
First of all, I have been rather harsh on the British in India and in Southeast Asia, whenever I brushed across them. This is not due to any prejudice, I hope, for I have tried to keep the same acerbic eye turned to the Americans in the Southwest Pacific as I describe some of their own follies in RTL and ATL on display.
Second of all, I never bought into the IJN as this superb war machine that flawlessly executed a war plan and then all suddenly turns to mushy on them at and after Midway idea is doomed to defeat, that seems to be what so many persons in general remember from their Hollywood version of Pacific War history, primarily because of the Americans broke the Japanese codes consensus. There were a lot of players in the game, who did as much as the Americans, to down the Japanese. One tends to forget the Chinese who tied down anywhere from 1/3 to 1/2 of Japan's airpower in 1941 and 1942, and most of the Imperial Japanese Army for the three crucial years the Allies needed to retake what they lost in 1942.
I think, at least, that with ABDA, I showed how incredibly lucky the Japanese were on several occasions to not become derailed operationally. Their successes in March and April 1942 were razor thin margined, at times narrower then their initial operations in Burma, Malaysia and against Hawaii. Certainly the logistics mistakes MacArthur made in the defense of Luzon, and the Japanese capture of those supplies, saved the Japanese critical shipping that allowed them to meet their timetables for the Balikpapan and Java invasions. I can make that argument and case easily, just from the source research (LCDR Oiei) I provided on Japanese escort forces and their anti-submarine war effort. How else can one explain the lunacy of IGHQ being prepared to lose between 1.3 and 2.7 million tonnes of shipping to allied submarine attack as they prepared to fight and win what they thought would be a three year long naval war?
And finally I am prepared to tackle the Japanese side of those Marvelous Tin Fish.
The Japanese WW II Torpedoes (Briefly, as I have described this before in the Battle of the Java Sea section.).
The Japanese torpedoes were mechanically reliable. They ran long and when they hit, their contact pistols worked. A robust test program of live warshots at expendable hulks proofed the torpedoes tested. When the Japanese opened their equivalent to Goat Island at Nagasaki IN 1918, they spared no expense and suffered little interference with the scientific and manufacturing testing of their various torpedoes which started in earnest in 1921 and really took off in 1932. What they did not do, was post shot analysis of the hulks which cost them. (More on this in a bit.)
One might be interested to note what the USN learned postwar about the "super" Type 93 torpedo. By 1946, the USN was well aware of what weapon proofing and testing means. So they applied it to the Type 93 to find out what they could about this 'terror" weapon that had the Allies flummoxed in the Solomon Islands campaign.
From Japanese records and their own testing of the few working models they could find (1946) the Americans quickly discovered that the Type 93 was a finicky beast, which needed intensive care and handling by intensively trained specialist handlers to store, maintain, and use properly, that far exceeded what the Americans would find tolerable (in the 1930s) though the WW II USN had accepted many of the same kinds of personnel trade-offs to get the Mark XVIII electric torpedo to work. The Type 93 torpedo was a fish that sine curved in two directions as opposed to an allied torpedo's usual one and it had a bad wander tendency off pendulum roll control that had to be constantly corrected. That oddity means, the Type 93 during its run, the "Long Lance, tended to half roll to the left and correct roll back to the right, producing a tail control side slip and a drift error that was like a step ladder segmentation to its run. The first time the Americans even suspected that this combined nose wander and sideslip tendency was a Japanese problem was at the Second Battle of Guadalcanal when ADM Kondo's cruisers fired three separate salvoes combined of 37 torpedoes against the helpless USS South Dakota at murderously close ranges and perfect setups (for the Type 93) and ALL of them missed to the left. USS Washington had at least one torpedo salvo launched at her under similar tactical conditions and again none of the at least five torpedoes, sent her way, hit. It was only sand sharking as end of run beachings and a post battle analysis that led the USN to this shocking initial conclusion, and after war Japanese testimony from battle survivors that confirmed it.
It should have been obvious from USN reports as early as the Battle of the Java Sea, that Japanese torpedoes had these guidance problems, but ONI was slow to get the word out to the fleet.
Does one know how many Long Lances the Japanese used to sink the 23 allied warships sunk in battle that are credited to that torpedo? About 300. This is no better than the Mark XV which has a similar record against the Japanese in battle or a PH of ~11% and a PK of 9%.
THAT is something to remark upon.
Last edited:
I hope, for I have tried to keep the same acerbic eye turned to the Americans
You have! Which is why I have qualified your well read opinion as tendentious, not as nationalist or celebratory of a service. You have an edge to grind, but it isn't an axe of X, Y or ABDA's persuasion.
I showed how incredibly lucky the Japanese were on several occasions
And this has been most enjoyable. Your tendentiousness isn't towards the Nihon empire or these United States, but towards a military historical perspective on testing, conformance, confirming and certainty. A "bias" which makes all organisations look badly in retrospect.
I am so glad you took my compliment the right way
")
yours,
Sam R.
McPherson
Banned
==========================
a. AFAIUI, Hotchkiss figured out how to safely feed large explosive shells into the revolver barrel. Until he did, the Gatling gun, and its competitors, was mostly restricted to rifle caliber ammunition.
b. Lightweight revolver cannons had metallurgical and power issues to overcome. I really don't see these issues as solvable during WW II, though the Germans develop and deploy at least one working example for aircraft by 1944.
c. The guns versus torpedoes argument has that merit, granted. Broadside (torpedo) versus crossing the T (guns), but consider the usual WW II situation when the surface action fighting will and does take place to avoid that pest, Mister Airplane? It will be at night. Almost, but not quite, every WW II naval battle in this discussion, so far, has become a close-ranged brawl, whether RTL or ATL where fleet linear tactics has gone flittering over the horizon and neat gunnery solutions evaporate as ships shoot and torpedo each other successfully almost simultaneously at ridiculous Spanish American War combat ranges. The arguments that the ship designers of the USN and the IJN used for the Northamptons and the Chokais were both mistaken and both based on a Dogger Bank / Jutland understanding of how things would work in their projected naval wars. Neither navy HAD that actual combat experience. Both the Japanese and the Americans had instead fought close quarters brawls in their seminal fleet actions and studied these battles, but did not, I think, draw the correct lessons. Granted Manila Bay was target practice against a static shooting gallery of sitting ducks and Tsushima was more a Cuisinart exercise where the enemy obligingly sailed into a pre-arranged kill-box, but the actions at the Yalu River and at Port Arthur and the running gunfight at Santiago de Cuba were most definitely what the two navies should have expected in their Pacific War.
Of all the ships above (^^^); which one even comes closest to what was needed to fight those kinds of WW II melee battles? Might I suggest the HMAS Hobart and the USS San Juan are possible? Not too big, not too small, but about the right size to function as expendable cruiser attrition units. NONE of the heavies employed had armor that could stop a six inch shell from punching through it, and none was nimble enough to really shell dance or do the torpedo two-step. I would have liked a better AAA fit on Hobart and better torpedoes for the San Juan and losing those two useless waist 5 inch mounts to save topweight and clear after arcs on the American, but that is hindsight.
There I go again... making extrapolations.
That's not quite the biggest- there's one Browning M1917 family member that's bigger, and it's the closest match to the shell weight and muzzle energy of the 1.1."
Ho-204 (source)
1.1"/75 (28 mm) (source)
- Caliber: 37 mm (1.45 in)
- Ammunition: 37 x 144
- Projectile weight 1.04 lb (475 g)
- Weight: 130 kg (285 lb)
- Rate of fire: 400 rounds/min
- Muzzle velocity: 710 m/s (2,330 ft/s)
- Muzzle energy: 119723.75 J (88303.7 foot-lbs)
The Ho-204 has a somewhat lower muzzle velocity (due to a shorter barrel as well as a smaller cartridge), and is only air-cooled. But with its rate of fire being over 2.5 times greater and its complete weight being slightly over half that of a 1.1" gun without a receiver, it could probably be further modified to match the water-cooling and muzzle velocity of the 1.1" while still keeping much of its rate of fire and weight advantage. It doesn't represent the full potential of the Browning M1917 action since it's still an M1921 design, but it's good enough.
- Caliber: 28 mm (1.1 in)
- Ammunition: 28 x 199
- Projectile weight 0.917 lb (416 g)
- Weight: 252 kg (556 lb)- without breech
- Rate of fire: 150 rounds/min
- Muzzle velocity: 823 m/s (2,700 ft/s)
- Muzzle energy: 140884.432 J (103911 foot-lbs)
Hotchkiss didn't create that, all Gatlings (and all other pre-Maxim machine guns) had that:
The revolver cannon may have been his creation, though (inferior to linear-action guns IMO, but still a good design).
McPherson said: ↑
Notes: Another “fleet battle destroyer” used as a picket ship. One supposes that the USN wanted to maximize its destroyer torpedo tubes, once the decision (1935 onward) was made to dismount the torpedo tubes as a fire and explosion hazard from most USN cruisers. It is a decision, naval historians still debate. I come down on the side of the argument that it makes sense in terms of WW II technology if you have the aircraft available in quantity nearby to serve as the ASS (torpedo) weapon launch platforms replacements for the torpedoes needed, to then dismount the tubes from the cruisers for the safety reasons specified. But if you do not have the tubes, as the USN clearly did not in 1942 and much of 1943, then the destroyer force had better be numerous enough and the navy had better accept the numerous crew and ship losses from that service to be expected as they are slaughtered in the kind of naval brawls seen during CARTWHEEL. The American cruiser forces should not be rushed pell-mell into any surface battle where Japanese torpedo-happy captains can wheel and deal. Cruiser guns, alone, usually do not sink “modern” WW II warships as easily as a Type 93 torpedo does.
It was probably a good decision. The tactics and positions where a torpedo salvo is effective don't coincide with the tactics and positions where guns are effective, so a cruiser will be forced to choose whether to maneuver to use their guns or their torpedoes effectively. Whichever one they choose, the other usually ends up being deadweight that compromises the ships' primary function. In the case of cruisers, the torpedoes on Japanese cruisers were probably the deciding factor in their weak armor and overweight design. The Brooklyn class had all the firepower and more armor than the Mogami class and wasn't overweight, proving that the IJN could have had all the firepower and armor they wanted in such a displacement if they just didn't insist on torpedoes. Destroyers are the best platform for those, and by the same token, they should not have sacrifice torpedoes for more gun power. No amount of gun power on what is fundamentally a destroyer is going to make it a substitute for a light cruiser (which is what the navy should be building if there's a perceived lack of gun power in the fleet).
a. AFAIUI, Hotchkiss figured out how to safely feed large explosive shells into the revolver barrel. Until he did, the Gatling gun, and its competitors, was mostly restricted to rifle caliber ammunition.
b. Lightweight revolver cannons had metallurgical and power issues to overcome. I really don't see these issues as solvable during WW II, though the Germans develop and deploy at least one working example for aircraft by 1944.
c. The guns versus torpedoes argument has that merit, granted. Broadside (torpedo) versus crossing the T (guns), but consider the usual WW II situation when the surface action fighting will and does take place to avoid that pest, Mister Airplane? It will be at night. Almost, but not quite, every WW II naval battle in this discussion, so far, has become a close-ranged brawl, whether RTL or ATL where fleet linear tactics has gone flittering over the horizon and neat gunnery solutions evaporate as ships shoot and torpedo each other successfully almost simultaneously at ridiculous Spanish American War combat ranges. The arguments that the ship designers of the USN and the IJN used for the Northamptons and the Chokais were both mistaken and both based on a Dogger Bank / Jutland understanding of how things would work in their projected naval wars. Neither navy HAD that actual combat experience. Both the Japanese and the Americans had instead fought close quarters brawls in their seminal fleet actions and studied these battles, but did not, I think, draw the correct lessons. Granted Manila Bay was target practice against a static shooting gallery of sitting ducks and Tsushima was more a Cuisinart exercise where the enemy obligingly sailed into a pre-arranged kill-box, but the actions at the Yalu River and at Port Arthur and the running gunfight at Santiago de Cuba were most definitely what the two navies should have expected in their Pacific War.
Of all the ships above (^^^); which one even comes closest to what was needed to fight those kinds of WW II melee battles? Might I suggest the HMAS Hobart and the USS San Juan are possible? Not too big, not too small, but about the right size to function as expendable cruiser attrition units. NONE of the heavies employed had armor that could stop a six inch shell from punching through it, and none was nimble enough to really shell dance or do the torpedo two-step. I would have liked a better AAA fit on Hobart and better torpedoes for the San Juan and losing those two useless waist 5 inch mounts to save topweight and clear after arcs on the American, but that is hindsight.
There I go again... making extrapolations.
Last edited:
That should be true to a certain extent of any gyroscopic control system except the Type 91's PID controller back then. The pendulum and hydrostat depth-keeping system can minimize this as it is a type of PD controller, but in azimuth and roll the oscillations would be present in all torpedoes of the war, Japanese and allied (except the aforementioned Type 91), as they are fundamentally impossible to eliminate without a PID controller, and thus had to be accepted. Only in Japanese aerial torpedoes where oscillations in roll prevented high-speed drops in shallow water were they forced to develop and implement a controller. The Type 93 wouldn't have the Type 91's stability, but it shouldn't be any less accurate than allied torpedoes.The Type 93 torpedo was a fish that sine curved in two directions as opposed to an allied torpedo's usual one and it had a bad wander tendency off pendulum roll control that had to be constantly corrected. That oddity means, the Type 93 during its run, the "Long Lance, tended to half roll to the left and correct roll back to the right, producing a tail control side slip and a drift error that was like a step ladder segmentation to its run. The first time the Americans even suspected that this combined nose wander and sideslip tendency was a Japanese problem was at the Second Battle of Guadalcanal when ADM Kondo's cruisers fired three separate salvoes combined of 37 torpedoes against the helpless USS South Dakota at murderously close ranges and perfect setups (for the Type 93) and ALL of them missed to the left. USS Washington had at least one torpedo salvo launched at her under similar tactical conditions and again none of the at least five torpedoes, sent her way, hit. It was only sand sharking as end of run beachings and a post battle analysis that led the USN to this shocking initial conclusion, and after war Japanese testimony from battle survivors that confirmed it.
The whole point of the longer-ranged guns and fire control that ended the pre-dreadnought era was that torpedo ranges became too long to have brawls like that. With the speed of torpedoes the ships at that kind of close-in range would have an almost 100% chance of being hit by a well-aimed torpedo salvo. It would be mutual suicide, much like modern WVR air combat with all-aspect IR missiles. At that range the armor and defenses of a ship mean nothing against the inevitable torpedoes, a heavy cruiser may as well be as survivable as the smallest boat, and will probably last no longer (assuming the enemy's torpedoes work). If a fight has to occur at that range without air power (i.e. at night) there's no point in even sending big ships, every ship will be destroyed in minutes as long as an enemy can still fire torpedoes at it, so flooding the enemy in enough numbers to make them run out of ships before you do is the main determinant. In such scenarios use the smallest, cheapest, most disposable ships that can carry enough torpedoes to sink enemy ships and spam the area with them. This usually means PT boats, if they're not seaworthy or long-ranged enough then small torpedo-oriented destroyers would be used in their place. They can destroy ships as easily as anything else in closed environments like that and don't represent the biggest loss. If the enemy chooses to send large powerful forces into the region they can only lose, as there are no individually valuable targets for them to destroy, but the PT boats or destroyers can sink their forces.c. The guns versus torpedoes argument has that merit, granted. Broadside (torpedo) versus crossing the T (guns), but consider the usual WW II situation when the surface action fighting will and does take place to avoid that pest, Mister Airplane? it will be at night. Almost, but not quite, every WW II naval battle in this discussion, so far, has become a close-ranged brawl, whether RTL or ATL where fleet linear tactics has gone flittering over the horizon and neat gunnery solutions evaporate as ships shoot and torpedo each other successfully almost simultaneously at ridiculous Spanish American War combat ranges. The arguments that the ship designers of the USN and the IJN used for the Northamptons and the Chokais were both mistaken and both based on a Dogger Bank / Jutland understanding of how things would work in their projected naval wars. Neither navy HAD that actual combat experience. Both the Japanese and the Americans had instead fought close quarters brawls in their seminal fleet actions and studied these battles, but did not, I think, draw the correct lessons. Granted Manila Bay was target practice against a static shooting gallery of sitting ducks and Tsushima was more a Cuisinart exercise where the enemy obligingly sailed into a pre-arranged kill-box, but the actions at the Yalu River and at Port Arthur and the running gunfight at Santiago de Cuba were most definitely what the two navies should have expected in their Pacific War.
Of all the ships above (^^^); which one even comes closest to what was needed to fight those kinds of WW II melee battles? Might I suggest the HMAS Hobart and the USS San Juan are possible? Not too big, not too small, but about the right size to function as expendable cruiser attrition units. NONE of the heavies employed had armor that could stop a six inch shell from punching through it, and none was nimble enough to really shell dance or do the torpedo two-step. I would have liked a better AAA fit on Hobart and better torpedoes for the San Juan and losing those two useless waist 5 inch mounts to save topweight and clear after arcs on the American, but that is hindsight.
So don't send cruisers or big ships into that kind of close-range brawl at all; if that was some close-range coastal area in the Mediterranean instead of a channel in a Pacific island chain, and the Royal Navy sent cruisers into there at night, they would get ambushed and sunk by MAS boats (as often happened OTL).
McPherson
Banned
That should be true to a certain extent of any gyroscopic control system except the Type 91's PID controller back then. The pendulum and hydrostat depth-keeping system can minimize this as it is a type of PD controller, but in azimuth and roll the oscillations would be present in all torpedoes of the war, Japanese and allied (except the aforementioned Type 91), as they are fundamentally impossible to eliminate without a PID controller, and thus had to be accepted. Only in Japanese aerial torpedoes where oscillations in roll prevented high-speed drops in shallow water were they forced to develop and implement a controller. The Type 93 wouldn't have the Type 91's stability, but it shouldn't be any less accurate than allied torpedoes.
The problem with the Japanese Type 93 and to a lesser extent, the Type 96 was the run time and the failure to balance the tail control to handle the oscillations imparted which periodically grew over time of run.
This also afflicted mid war and to a lesser extent late war new US torpedo designs for a different reason (Single screw to make the acoustic seekers work, as opposed to conventional contra-rotator setup to balance the roll tendency and suddenly roll becomes an issue.) as well. There is a simple solution to the roll problem as seen the Westinghouse designed Mark 26, Mark 28, Mark 29, or Mark 30, that shows up as late as late as the Mark 43 torpedoes developed by Brush Development Co. post war as helicopter launched weapons. That is to extend the faring of the 6 o clock position vane ahead of the lower rudder forward and provide a larger vane surface control to and attendant flow pressure forces for counteracting the torpedo roll tendency much as the same side wing of single engine mono-plane fighters to the direction of torque was made longer than the wing of the opposite side to use Bernoulli effect to compensate for the torque load the engines imparted to the fuselage.
The Japanese could have done this, should have done this, but they did not. Fortunately for the allies, the wander problem remained.
Gunfire and the hazards of brawling in the dark:
The whole point of the longer-ranged guns and fire control that ended the pre-dreadnought era was that torpedo ranges became too long to have brawls like that. With the speed of torpedoes the ships at that kind of close-in range would have an almost 100% chance of being hit by a well-aimed torpedo salvo. It would be mutual suicide, much like modern WVR air combat with all-aspect IR missiles. At that range the armor and defenses of a ship mean nothing against the inevitable torpedoes, a heavy cruiser may as well be as survivable as the smallest boat, and will probably last no longer (assuming the enemy's torpedoes work). If a fight has to occur at that range without air power (i.e. at night) there's no point in even sending big ships, every ship will be destroyed in minutes as long as an enemy can still fire torpedoes at it, so flooding the enemy in enough numbers to make them run out of ships before you do is the main determinant. In such scenarios use the smallest, cheapest, most disposable ships that can carry enough torpedoes to sink enemy ships and spam the area with them. This usually means PT boats, if they're not seaworthy or long-ranged enough then small torpedo-oriented destroyers would be used in their place. They can destroy ships as easily as anything else in closed environments like that and don't represent the biggest loss. If the enemy chooses to send large powerful forces into the region they can only lose, as there are no individually valuable targets for them to destroy, but the PT boats or destroyers can sink their forces.
Well... I cannot argue that RTL line logic since that is what has happened in our real world history, but it was not obvious until as late as the Israeli destroyer Eilat (ex HMS Zealous) was sunk in 1967 that this would be the end result; that surface combat in the age of guided missiles has doomed the concept of larger is better as a gun platform, unless that platform has one heck of an ail weather air force overhead and has powerful AAA and acoustic warning defenses and countermeasures for air and underwater guided missiles aimed at it. However, in an era when navies had not yet learned radar blind-fire gunnery, where optical directed fire control still meant a PH of 1-4 % beyond 10,000 meters in broad daylight, and when even massed torpedo salvoes (see above ^^^) of 30 + fish can miss a non-evasive slow battleship sized target at less than 6,000 meters, the situation was not that apparent to the practitioners then.
So don't send cruisers or big ships into that kind of close-range brawl at all; if that was some close-range coastal area in the Mediterranean instead of a channel in a Pacific island chain, and the Royal Navy sent cruisers into there at night, they would get ambushed and sunk by MAS boats (as often happened OTL).
Like First and Second Guadalcanal? The Marines needed protection and Savo Island was a stain upon the American navy's honor (USS Chicago). If the Japanese came, the USN would have to meet them head-on. It might have been far more sensible to have swarms of destroyers and PT boats in Iron Bottom Sound (12 to 15 November 1942), but in our real time line the torpedo boats were not ready and as for destroyers; there were none left in the larder. And the Japanese did bring their heavies to the party. One can only postulate the situation and fight with the navy one has / had built to meet it. I can observe what might have worked a bit better, but I have to work with what was possible and what was knowable to the people in this ATL, even if I "might" butterfly it a bit. There were good reasons for why the people of the time, Japanese, British, American and Australian turned out the hardware they did, and tried to use the products the way they used them. I have to honor those reasons in the tweaks, because as I have found on more than one occasion, even if the result was suboptimal, the decisions that led to the result were the best possible for the people at the time who made the choices.
One will perhaps understand a bit better, when I introduce the minelayer, Alchiba, to the Savo Island birthday party.
And with that written, First and Second Guadalcanal jumps us too far ahead of our alternate time line narrative. In other words expect big butterflies if alternate Savo Island and Cape Esperance butterflies out the way I hope when war-gamed.
Last edited:
McPherson
Banned
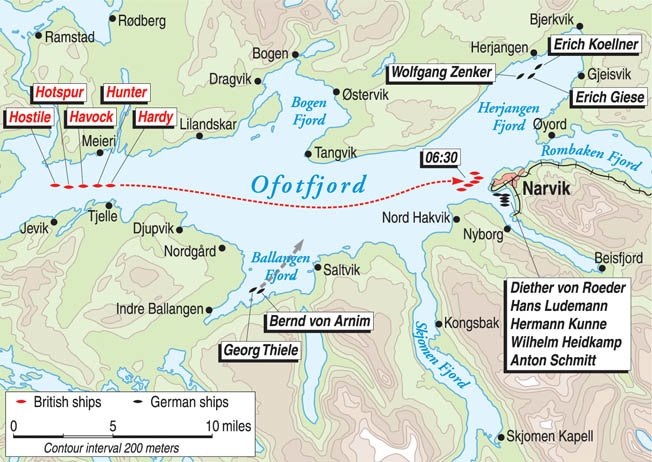
What Can We Know About The Battle of NARVIK?
When discussing the battle of Narvik, one refers to two separate battles that were fought between 9 April and the 8 June 1940. The battles comprised of a naval battle and an air battle in the Norwegian city of Narvik. The battles of Narvik were part of the Norwegian Campaign.
The city of Narvik was used for the end-port transportation of iron ore from Sweden as the harbor was generally ice free due to wind and wave conditions which locally impeded the formation of ice floes. The supply of Swedish iron ore was very important to both sides in the war, with the interest sparking one of the largest scale naval surface battles fought in World War II between the British RN and the German Kriegsmarine. Britain considered Narvik as a landing point for an expedition to aid Finland in the winter war, the opportunity to seize the port also being seen as the opening move to take control of the Swedish iron mines and divert their use to the British war effort. Not being an expert on Scandinavian weather and geography, I did a quick map look at the local terrain and road networks and tried to come up with a force estimate for how the British could pull off such an operation. Taking the port of Narvik and then following the iron ore line to its termini at Kiruna and Luleå, would at least be a corps level exercise from the start.
The Swedes began the track network in 1888 and AFAICD established it what in the United States is known as a United States standard gauge line from the start (1435 mm) which marks it as unusual in a country where the previous standard gauge (narrow) had been the three Swedish foot rail gauge or 891 mm. This was ideal for the Germans who had the right railroad equipment for the "German gauge" Iron Ore Line and could use the existing infrastructure of it to supply troops in and around Narvik by rail from “neutral” Sweden, which despite postwar Swedish denials to the contrary was one of the reasons the Germans could hang on during the Anglo-French land operations during the land battle, when the Alpenkorps were getting their hides skinned despite initial allied land forces bungling. Cut off from the rest of their brethren to the south, with no usable air resupply route, it has often bugged me how Dietl was able to carry on. Surreptitious help across the Swedish frontier was one answer, treason by the Norwegian Colonel Konrad Sundlo was another, and two gentlemen who could not agree on which way was north, Gen Pierse J. Mackesy; a drunk and a security risk according to Alanbrooke; and ADM (Flt) Lord Cork, who was obviously insane, was the other answer.
Long miserable land story short, the French were first on the north shore and south shore of the Ofotsfjord, moved everybody French north, then finally moved them all south. The British were on the south from the beginning. The Polish brigade was always with the French, though it was British equipped. and the Norwegians (6th Division) headed for Bjørnfjell on their own hook. Mackesy, through a series of operations that reminds me a lot of the American civil war General Henry Halleck’s advance on Corinth, Mississippi; crawled forward at a snail’s pace. These various forces were going nowhere. The French had their own problems with a command dislocation between the general in charge and the BGEN commanding the Foreign Legion troops. (They hated each other's guts, McPherson.). Meanwhile the Norwegians were making good progress in their own cockamamie advance toward Bjørnfjel. The allies finally staged an amphibious landing at Bjerkvik. The Norwegians and the French then bungled the closing the jaws of the trap on Dietl. Despite this mistake the route through Bjerkvik lay open to take Narvik around 12 May. By this time, somebody at London who could read a map, noticed that the Germans could come up the road from Bode and put the British south of Ofotfjord in a tight nutcracker and squeeze hard. Exit Mackesy. Enter Gen Claude Auchinleck to fix that problem, which he does. Auchinleck gives BGEN Antoine Béthouart (The French Foreign Legion guy, McPherson.). the job to take Narvik. This makes sense since he was the guy who pulled off the amphibious attack at Bjerkvik. The allies are cooking with gas, just in time for a little emergency named the Battle of France to cause the Allies to shift gears and pull out, just as Dietl was about to retreat into Sweden.
BGEN Antoine Béthouart (France) and MGEN Zygmunt Bohusz-Szyszko (Polish Independent Brigade) seemed to have been the ONLY Allied generals to have known what they were doing.
Anyway, assuming that that the British government had not lost its nerve on 10 June 1940, and the French had not needed the troops home toute suite, the Narvik campaign on land might actually have worked. There were now just enough allied resources (24,000 men with equipment) and enough airpower (about a squadron and a half at Bardufoss) to hold the place and choke off that Swedish iron ore from Narvik. Of course there was the other terminus on the Baltic Sea at Luleå, with Kiruna in between and unless that whole country was taken, the whole campaign was a waste of time, troops and resources. At a quick guess, to take northern Sweden, that would be 100,000 troops trained for mountain warfare operations, 400 aircraft, and 270,000 tonnes of shipping to support the whole shebang for three months, and it would have to be increased to TRIPLE that amount once the Germans and Swedes organized to take it all back. This is the kind of incomplete peripheral operations strategic thinking and planning that was going to get Britain in trouble, again and again and again, in her naval campaigns. (See maps. McPherson.).


First Naval Battle of Narvik
Remember that the purpose of a navy is to allow one to use the sea and to deny the sea to the other fellow in time of war. Insofar as land operations are concerned (Mahan) seapower is either minimized or maximized by land geography. A peninsula is a particular case, (Mahan), because while the sea-power can attack anywhere along the coasts, it will always be a race between the land-power operating on the interior, inside that peninsula, using its roads and trails, and a sea-power, using the sea as a highway as to who will have the advantage at the point of contact. (See maps.^^^)
One has to be kind of STUPID to mount an operation against NARVIK and not see BODE right away as critical immediately? Well, the British get around to it, late, (Auchinleck) and even start an airfield in a swamp near there on 26 May 1940. Let’s see, 9 April to 26 May… that’s about 7 weeks without air cover for Mackesy. Okay, the United States Navy professor would give the British army a C- on the Marine portion of this exercise. It is not an F for the reason that the British have just started their war, they are feeling their way forward into an unknown operation (amphibious attack on a defended port) that nobody has succeeded in pulling off since the Crimean War, so the professor allows for the inexperience and start of war logistics problems for the operation.
How Is The Royal Navy Doing?
Not too unexpected the results, considering that they have to cross the North Sea; head up near the Arctic Circle and fight blind in foggy rainy waters into the equivalent of a Cuisinart setup (Ofotfjord); against an enemy who has proven formidably capable of pulling off Wesserebung at sea. The Germans park a lot of destroyers at Narvik (ten of them) and the RN knows it. Credit the British with being canny enough to knock off three disguised German tankers that set off from Russian ports for Narvik, (The Russians NEVER mention this part they play in Wesserebung. McPherson.), so the RN knows going into their first fight that the Germans are trapped, out of fuel and are waiting to be picked off. (See Maps.)

So Washburton Lee with five destroyers enthusiastically charges into the Cuisinart. The Germans do not have their destroyers fueled and actually have clustered half of them near Narvik to suck oil out of the one tanker that did manage to reach Narvik, the whale oil processing ship, Jan Wellem. So Washburton Lee takes a risk that he thinks is a sure winner, but takes too finely a calculated one, that he can push in deep and catch the Germans in the act of fueling; shoot quick and then get out before they react. He presses on into the fjord, without adequate aerial reconnaissance, which he should have had from HMS Furious. Big breakdown in communications somewhere, there, I suspect. It is almost as deleterious to Washburton-Lee as the British destroyers yakking it up among themselves, over the radio, to steer each other through the fog patches as they pokey along at 5 m/s into that treacherous hard to navigate blind without harbor pilots shooting alley. Guess who is RDFing them and setting up the reception as the British come on? In a battle that comes right out of the 1942 American / Japanese playbooks, but in broad daylight. Washburton Lee makes it to Narvik around 0440 hours and his destroyers (HMS Hostile especially) shotgun torpedoes into the helpless shipping moored there sinking a couple of hapless German destroyers and eleven of over twenty freighters, including one BRITISH one at anchor. The Germans still manage to surprise the British, as Washburton Lee retreats from his “successful” raid, with a trio of cleverly sited destroyers who ambush him from Herjangenfjord. Washburton Lee’s force is mauled in a couple of torpedo actions as German and British destroyers quick draw on each other in single ship torpedo duels. The Germans win ALL of these duels. OUCH! Two more German destroyers repeat this exercise from Ballengenfjord. Double OUCH! The five Germans get HMS Hardy and HMS Hunter and HMS Hotspur is a tow-me-out-of-here-coach after the retreat. It is a miserable coda to what had started as a well-executed British raid. The RN retreat could be described after this pair of events as “hurried and disorganized” especially after Washburton-Lee is killed aboard HMS Hardy.
The victory is frankly a lessons learned DISASTER. The British propaganda machine, down to the present, may paint it otherwise, but the RN leaders who ordered it at the time and the destroyer-men who participated in the first battle, knew what a catastrophe it truly was. There would be a round two. For RN morale and for revenge, there had to be a round two.
Enter Victor Crutchley And The Second Battle Of Narvik (CAPT Of The HMS Warspite).
Why risk a battleship after the first operation? VADM William Whitworth was sent in with orders to finish the Germans off. The Germans had lost their own flotilla commander Friedrich Bonte † in the first battle, so the poor guy stuck in the bottle was Erich Bey for round two. (See Map.)

This time there was air cover from HMS Furious in an ineffectual manner, but most of the effective look-down support came from HMS Warspite’s one floatplane, a Fairey Swordfish which caught and bombed the U-64, anchored in the Herjangsfjord near Bjerkvik. The Warspite’s aircraft then spotted and aimed British destroyers and HMS Warpsite’s guns at KMS Erich Koellner, commanded by Alfred Schulze-Hinrichs. She went to the bottom, KMS Wolfgang Zenker tried to torpedo HMS Warspite and was shot up in return. She retreated. KMS Bernd von Arnim, KMS Hans Ludemann and KMS Hermann Künne also took part of this action. They attacked and KMS Bernd von Arnim, KMS Hans Ludemann skedaddled behind artificial smoke and natural fog. KMS Herman Kunne somehow, for whatever reason stayed behind and became the obsession of the HMS Eskimo. There were two torpedo and gun exchanges. HMS Eskimo finally got a hit with a fish in and the KMS Herman Kunne’s depth charges went off. In return HMS Eskimo was hit by a torpedo fired from German destroyer Z2 Georg Thiele. The explosion caused severe damage, blowing off HMS Eskimo's bow. This all occured in Herjangsfjord. In another part of the battle in Narvik harbor by now, KMS Diether von Roeder and KMS Erich Giese, both suffering engine problems, fired upon the British forces while the German ships were helpless at anchor. They made a mess out of HMS Punjabi’s and HMS Cossack’s upper works with remarkably good shooting but they were both blown out of the water by HMS Warspite before they could do serious sinkable harm. The rest of the Germans; KMS Wolfgang Zenker, KMS Georg Thiele, KMS Bernd von Arnim and KMS Hans Lüdemann ran for Rombaksfjord where they scuttled. The last German warship, U-51, bottomed out in Herjangenfjord and survived. Satisfied with their performance, the British under Whitworth pulled out, with HMS Warspite giving Narvik and the surrounding hills a rather pointless beating from her main guns as a parting salute.
How was this action? Would it pass United States Naval War College muster as of circa 1940? Grade F.
Why? HMS Furious had her aircraft up, armed for anti-ship strike and aerial reconnaissance. If there is a situation, where it is demonstrable that the Fleet Air Arm was not the equal of their American or Japanese counterparts, operationally, this is the case example. Eight planes participated in the operation, five attempted attacks and two were German shot down for zip result. Air to ship communications? Zero. Reconnaissance support? Zero.
I can see why the British went in for round two. I can even see bringing in a battleship for gunfire support behind a destroyer screen, but I seriously question why Admiral Whitworth essentially repeated Washburton Lee’s mistakes. He had three destroyers damaged, two badly, essentially falling for the same German sucker play that almost got Washburton-Lee’s force annihilated. And if those German torpedoes had worked… HMS Warspite might not have made it out of Ofotfjord alive.
What about Victor Crutchley?
I cannot fault CAPT Crutchley’s actions. HMS Warspite’s Swordfish communicated well with HMS Warspite and gave her captain almost flawless situation awareness. The battleship promptly dispatched those targets the plane could see and the gunfire support helped the British destroyers a couple of crucial times when the Germans looked to be about to do serious harm to them, especially Warspite’s 152 mm secondaries which dispatched a couple of German pests at anchor. This satisfies me as to how well Crutchley trained his ship and handled her in what must be seen in retrospect as one of the craziest, riskiest and most foolhardy operations ever led by an admiral who seems to have had only two things going for him; Whitworth was a physical hygiene nut, and he knew where all the bodies were buried at the Admiralty because he was a Naval Secretary at the RN personnel section.
Anyway, that was NARVIK as I think Victor Crutchley knew it. I hope it gives you some ideas about how he approached Savo Island?
When discussing the battle of Narvik, one refers to two separate battles that were fought between 9 April and the 8 June 1940. The battles comprised of a naval battle and an air battle in the Norwegian city of Narvik. The battles of Narvik were part of the Norwegian Campaign.
The city of Narvik was used for the end-port transportation of iron ore from Sweden as the harbor was generally ice free due to wind and wave conditions which locally impeded the formation of ice floes. The supply of Swedish iron ore was very important to both sides in the war, with the interest sparking one of the largest scale naval surface battles fought in World War II between the British RN and the German Kriegsmarine. Britain considered Narvik as a landing point for an expedition to aid Finland in the winter war, the opportunity to seize the port also being seen as the opening move to take control of the Swedish iron mines and divert their use to the British war effort. Not being an expert on Scandinavian weather and geography, I did a quick map look at the local terrain and road networks and tried to come up with a force estimate for how the British could pull off such an operation. Taking the port of Narvik and then following the iron ore line to its termini at Kiruna and Luleå, would at least be a corps level exercise from the start.
The Swedes began the track network in 1888 and AFAICD established it what in the United States is known as a United States standard gauge line from the start (1435 mm) which marks it as unusual in a country where the previous standard gauge (narrow) had been the three Swedish foot rail gauge or 891 mm. This was ideal for the Germans who had the right railroad equipment for the "German gauge" Iron Ore Line and could use the existing infrastructure of it to supply troops in and around Narvik by rail from “neutral” Sweden, which despite postwar Swedish denials to the contrary was one of the reasons the Germans could hang on during the Anglo-French land operations during the land battle, when the Alpenkorps were getting their hides skinned despite initial allied land forces bungling. Cut off from the rest of their brethren to the south, with no usable air resupply route, it has often bugged me how Dietl was able to carry on. Surreptitious help across the Swedish frontier was one answer, treason by the Norwegian Colonel Konrad Sundlo was another, and two gentlemen who could not agree on which way was north, Gen Pierse J. Mackesy; a drunk and a security risk according to Alanbrooke; and ADM (Flt) Lord Cork, who was obviously insane, was the other answer.
Long miserable land story short, the French were first on the north shore and south shore of the Ofotsfjord, moved everybody French north, then finally moved them all south. The British were on the south from the beginning. The Polish brigade was always with the French, though it was British equipped. and the Norwegians (6th Division) headed for Bjørnfjell on their own hook. Mackesy, through a series of operations that reminds me a lot of the American civil war General Henry Halleck’s advance on Corinth, Mississippi; crawled forward at a snail’s pace. These various forces were going nowhere. The French had their own problems with a command dislocation between the general in charge and the BGEN commanding the Foreign Legion troops. (They hated each other's guts, McPherson.). Meanwhile the Norwegians were making good progress in their own cockamamie advance toward Bjørnfjel. The allies finally staged an amphibious landing at Bjerkvik. The Norwegians and the French then bungled the closing the jaws of the trap on Dietl. Despite this mistake the route through Bjerkvik lay open to take Narvik around 12 May. By this time, somebody at London who could read a map, noticed that the Germans could come up the road from Bode and put the British south of Ofotfjord in a tight nutcracker and squeeze hard. Exit Mackesy. Enter Gen Claude Auchinleck to fix that problem, which he does. Auchinleck gives BGEN Antoine Béthouart (The French Foreign Legion guy, McPherson.). the job to take Narvik. This makes sense since he was the guy who pulled off the amphibious attack at Bjerkvik. The allies are cooking with gas, just in time for a little emergency named the Battle of France to cause the Allies to shift gears and pull out, just as Dietl was about to retreat into Sweden.
BGEN Antoine Béthouart (France) and MGEN Zygmunt Bohusz-Szyszko (Polish Independent Brigade) seemed to have been the ONLY Allied generals to have known what they were doing.
Anyway, assuming that that the British government had not lost its nerve on 10 June 1940, and the French had not needed the troops home toute suite, the Narvik campaign on land might actually have worked. There were now just enough allied resources (24,000 men with equipment) and enough airpower (about a squadron and a half at Bardufoss) to hold the place and choke off that Swedish iron ore from Narvik. Of course there was the other terminus on the Baltic Sea at Luleå, with Kiruna in between and unless that whole country was taken, the whole campaign was a waste of time, troops and resources. At a quick guess, to take northern Sweden, that would be 100,000 troops trained for mountain warfare operations, 400 aircraft, and 270,000 tonnes of shipping to support the whole shebang for three months, and it would have to be increased to TRIPLE that amount once the Germans and Swedes organized to take it all back. This is the kind of incomplete peripheral operations strategic thinking and planning that was going to get Britain in trouble, again and again and again, in her naval campaigns. (See maps. McPherson.).
First Naval Battle of Narvik
Remember that the purpose of a navy is to allow one to use the sea and to deny the sea to the other fellow in time of war. Insofar as land operations are concerned (Mahan) seapower is either minimized or maximized by land geography. A peninsula is a particular case, (Mahan), because while the sea-power can attack anywhere along the coasts, it will always be a race between the land-power operating on the interior, inside that peninsula, using its roads and trails, and a sea-power, using the sea as a highway as to who will have the advantage at the point of contact. (See maps.^^^)
One has to be kind of STUPID to mount an operation against NARVIK and not see BODE right away as critical immediately? Well, the British get around to it, late, (Auchinleck) and even start an airfield in a swamp near there on 26 May 1940. Let’s see, 9 April to 26 May… that’s about 7 weeks without air cover for Mackesy. Okay, the United States Navy professor would give the British army a C- on the Marine portion of this exercise. It is not an F for the reason that the British have just started their war, they are feeling their way forward into an unknown operation (amphibious attack on a defended port) that nobody has succeeded in pulling off since the Crimean War, so the professor allows for the inexperience and start of war logistics problems for the operation.
How Is The Royal Navy Doing?
Not too unexpected the results, considering that they have to cross the North Sea; head up near the Arctic Circle and fight blind in foggy rainy waters into the equivalent of a Cuisinart setup (Ofotfjord); against an enemy who has proven formidably capable of pulling off Wesserebung at sea. The Germans park a lot of destroyers at Narvik (ten of them) and the RN knows it. Credit the British with being canny enough to knock off three disguised German tankers that set off from Russian ports for Narvik, (The Russians NEVER mention this part they play in Wesserebung. McPherson.), so the RN knows going into their first fight that the Germans are trapped, out of fuel and are waiting to be picked off. (See Maps.)
So Washburton Lee with five destroyers enthusiastically charges into the Cuisinart. The Germans do not have their destroyers fueled and actually have clustered half of them near Narvik to suck oil out of the one tanker that did manage to reach Narvik, the whale oil processing ship, Jan Wellem. So Washburton Lee takes a risk that he thinks is a sure winner, but takes too finely a calculated one, that he can push in deep and catch the Germans in the act of fueling; shoot quick and then get out before they react. He presses on into the fjord, without adequate aerial reconnaissance, which he should have had from HMS Furious. Big breakdown in communications somewhere, there, I suspect. It is almost as deleterious to Washburton-Lee as the British destroyers yakking it up among themselves, over the radio, to steer each other through the fog patches as they pokey along at 5 m/s into that treacherous hard to navigate blind without harbor pilots shooting alley. Guess who is RDFing them and setting up the reception as the British come on? In a battle that comes right out of the 1942 American / Japanese playbooks, but in broad daylight. Washburton Lee makes it to Narvik around 0440 hours and his destroyers (HMS Hostile especially) shotgun torpedoes into the helpless shipping moored there sinking a couple of hapless German destroyers and eleven of over twenty freighters, including one BRITISH one at anchor. The Germans still manage to surprise the British, as Washburton Lee retreats from his “successful” raid, with a trio of cleverly sited destroyers who ambush him from Herjangenfjord. Washburton Lee’s force is mauled in a couple of torpedo actions as German and British destroyers quick draw on each other in single ship torpedo duels. The Germans win ALL of these duels. OUCH! Two more German destroyers repeat this exercise from Ballengenfjord. Double OUCH! The five Germans get HMS Hardy and HMS Hunter and HMS Hotspur is a tow-me-out-of-here-coach after the retreat. It is a miserable coda to what had started as a well-executed British raid. The RN retreat could be described after this pair of events as “hurried and disorganized” especially after Washburton-Lee is killed aboard HMS Hardy.
The victory is frankly a lessons learned DISASTER. The British propaganda machine, down to the present, may paint it otherwise, but the RN leaders who ordered it at the time and the destroyer-men who participated in the first battle, knew what a catastrophe it truly was. There would be a round two. For RN morale and for revenge, there had to be a round two.
Enter Victor Crutchley And The Second Battle Of Narvik (CAPT Of The HMS Warspite).
Why risk a battleship after the first operation? VADM William Whitworth was sent in with orders to finish the Germans off. The Germans had lost their own flotilla commander Friedrich Bonte † in the first battle, so the poor guy stuck in the bottle was Erich Bey for round two. (See Map.)
This time there was air cover from HMS Furious in an ineffectual manner, but most of the effective look-down support came from HMS Warspite’s one floatplane, a Fairey Swordfish which caught and bombed the U-64, anchored in the Herjangsfjord near Bjerkvik. The Warspite’s aircraft then spotted and aimed British destroyers and HMS Warpsite’s guns at KMS Erich Koellner, commanded by Alfred Schulze-Hinrichs. She went to the bottom, KMS Wolfgang Zenker tried to torpedo HMS Warspite and was shot up in return. She retreated. KMS Bernd von Arnim, KMS Hans Ludemann and KMS Hermann Künne also took part of this action. They attacked and KMS Bernd von Arnim, KMS Hans Ludemann skedaddled behind artificial smoke and natural fog. KMS Herman Kunne somehow, for whatever reason stayed behind and became the obsession of the HMS Eskimo. There were two torpedo and gun exchanges. HMS Eskimo finally got a hit with a fish in and the KMS Herman Kunne’s depth charges went off. In return HMS Eskimo was hit by a torpedo fired from German destroyer Z2 Georg Thiele. The explosion caused severe damage, blowing off HMS Eskimo's bow. This all occured in Herjangsfjord. In another part of the battle in Narvik harbor by now, KMS Diether von Roeder and KMS Erich Giese, both suffering engine problems, fired upon the British forces while the German ships were helpless at anchor. They made a mess out of HMS Punjabi’s and HMS Cossack’s upper works with remarkably good shooting but they were both blown out of the water by HMS Warspite before they could do serious sinkable harm. The rest of the Germans; KMS Wolfgang Zenker, KMS Georg Thiele, KMS Bernd von Arnim and KMS Hans Lüdemann ran for Rombaksfjord where they scuttled. The last German warship, U-51, bottomed out in Herjangenfjord and survived. Satisfied with their performance, the British under Whitworth pulled out, with HMS Warspite giving Narvik and the surrounding hills a rather pointless beating from her main guns as a parting salute.
How was this action? Would it pass United States Naval War College muster as of circa 1940? Grade F.
Why? HMS Furious had her aircraft up, armed for anti-ship strike and aerial reconnaissance. If there is a situation, where it is demonstrable that the Fleet Air Arm was not the equal of their American or Japanese counterparts, operationally, this is the case example. Eight planes participated in the operation, five attempted attacks and two were German shot down for zip result. Air to ship communications? Zero. Reconnaissance support? Zero.
I can see why the British went in for round two. I can even see bringing in a battleship for gunfire support behind a destroyer screen, but I seriously question why Admiral Whitworth essentially repeated Washburton Lee’s mistakes. He had three destroyers damaged, two badly, essentially falling for the same German sucker play that almost got Washburton-Lee’s force annihilated. And if those German torpedoes had worked… HMS Warspite might not have made it out of Ofotfjord alive.
What about Victor Crutchley?
I cannot fault CAPT Crutchley’s actions. HMS Warspite’s Swordfish communicated well with HMS Warspite and gave her captain almost flawless situation awareness. The battleship promptly dispatched those targets the plane could see and the gunfire support helped the British destroyers a couple of crucial times when the Germans looked to be about to do serious harm to them, especially Warspite’s 152 mm secondaries which dispatched a couple of German pests at anchor. This satisfies me as to how well Crutchley trained his ship and handled her in what must be seen in retrospect as one of the craziest, riskiest and most foolhardy operations ever led by an admiral who seems to have had only two things going for him; Whitworth was a physical hygiene nut, and he knew where all the bodies were buried at the Admiralty because he was a Naval Secretary at the RN personnel section.
Anyway, that was NARVIK as I think Victor Crutchley knew it. I hope it gives you some ideas about how he approached Savo Island?
Last edited:
McPherson
Banned

Victor Crutchley, Hero of Savo Island (Part 1)
Beginnings
Victor Crutchley is born on 2 November 1893 at 28 Lennox Gardens, Chelsea, London, the only son of Percy Edward (1855–1940) and the Honorable Frederica Louisa (1864–1932), second daughter of Charles FitzRoy, 3rd Baron Southampton. His mother had been maid of honour to Queen Victoria. He is a godchild of Queen Victoria (from whom he derives his first two names). He joins the Royal Navy in 1906. He receives his naval education at the Royal Naval College, Osborne, Isle of Wright, England.
Pre-World War I*, he has a fairly average, but favored career path upward from ensign to junior LT by the outbreak of the first world war. Even for the godson of Queen Victoria, the career advancement for him is glacial by any standards.
World War I
In September 1915 Crutchley was promoted to LT(s.g.). He is posted to a battleship of the Grand Fleet, HMS Centurion. HMS Centurion participates in the Battle of Jutland and does fairly well. After that Beatty botched battle Roger Keyes assumes command of HMS Centurion and acquired a highly favorable impression of Crutchley. Keyes selects Crutchley for the insane Zeebrugge Raid of 23 April 1918; Keyes assigns Crutchley 1st LT to CDR Alfred E. Godsal, also of HMS Centurion, on the obsolete cruiser HMS Brilliant.
HMS Brilliant and HMS Sirius are to be sunk as blockships at Ostend to block the German channel forces inside their main bases. The Germans nix the RN plan by the simple expedient of moving a navigation buoy, so the British ships, because apparently nobody assigned to the mission has examined or has access to proper charts or can freaking navigate an unknown port by simple chain soundings (MARK TWAIN, all is well. Channel deep and straight ahead.) places the HMS Brilliant and HMS Sirius in the wrong place under heavy fire. But despite this problem, Crutchley adapts well to the utter catastrophe and earns the Distinguished Service Cross for his heroics.
Try again. Crutchley volunteers, yet again, for the Second Ostend Raid on 9 May. He is posted to the cruiser HMS Vindictive, again commanded by the apparently luckless and incompetent Godsal. When Godsal dies in action and the navigating officer becomes ineffective to shock; Crutchley assumes command and manages to steer the HMS Vindictive into the proper channel. When a screw snaps off a blade on the sunken stone quay, and causes a vibration casualty which prevents the vessel fully closing the canal, Crutchley orders its scuttling in place and personally oversees the HMS Vindictive’s crew’s evacuation under fire.
Crutchley shifts to the damaged motor launch ML 254. When its wounded captain, LT Geoffrey Drummond succumbs to loss of blood and passes out, Crutchley seizes command. Crutchley orders fatuous failing bucket-bailing Chinese fire drill type operations, standing in water up to his waist, until the destroyer HMS Warwick, carrying Admiral Keyes, comes alongside and saves everybody aboard. Net total result? Same as the first Ostend Raid, it is a complete fiasco.
Although the second raid fails fully to close the Bruges Canal to submarine traffic, Crutchley, Drummond, and Bourke earn Victoria Crosses for the action. When there are more worthy recipients than VCs to award, the men are allowed to elect those to receive a VC. Crutchley is one of the last elected VCs from this complete disaster.
During the final months of the war, Crutchley serves on HMS Sikh in the Dover Patrol, the Channel force commanded by Keyes. This service is uneventful.
Inter War
In 1920, LT Crutchley serves a tour of duty on board the minesweeper, HMS Petersfield on the South American and South Atlantic station. He then serves on the royal yacht Alexandra in 1921, the cadet-training dreadnought HMS Thunderer in 1922–1924, and the royal yacht, Victoria and Albert III, in 1924.
In 1924 he went to the Mediterranean Fleet for four years, serving under Roger Keyes (Remember him?), now Commander-in-Chief at Malta. Crutchley is aboard HMS Queen Elizabeth in 1924–1926, and then on the light cruiser HMS Ceres in 1926-1928.
Crutchley is a world class polo player, and he is invited to play for Keyes' polo team, the “Centurions”. At one point in 1927, Crutchley plays on the same team as Keyes, the Duke of York, and Louis Mountbatten. Is it any wonder that Crutchley becomes a full commander in 1928. In 1930, he marries Joan Elisabeth Loveday of Pentillie Castle, Cornwall, the sister of Air Chief Marshal (ACM) Alec Coryton.
In August 1930, Crutchley signs on to HMS Diomede in the New Zealand Division, beginning his long association with the ANZAC navies. He serves aboard HMS Diomede until 1933. Serving as executive officer, Crutchley is present at the relief operation after the 1931 Hawke's Bay earthquake, and towards the end of his tour, when the captain takes chronically ill (malaria and diabetes), Crutchley, following his usual pattern, assumes command of HMS Diomede, without prior authorization or approval, until he is ex-post facto promoted to captain. He is recalled shortly thereafter in 1933 (Politics.). Crutchley Is parked as senior officer, 1st Minesweeper Flotilla (1st MSF) from 1935-1936 aboard the minesweeper HMS Halcyon at Portland, Dorset. (This experience will have tremendous repercussions for the Battle of Savo Island . McPherson.) In November, 1935 Crutchley leads the 1st MSF to join the Mediterranean Fleet in Alexandria, and cruises to Famagusta, Cyprus for 10 days during the winter on fleet exercises where he runs HMS Halcyon aground, nearly sinking her. He is not censured for this incident. (Pull.). On 16 April 1936, Crutchley is relieved by CPT W. P. C. Manwaring and he is made Captain (s.g.) (Whatever that is? McPherson.), of the Fishery Protection and Minesweeping Service with overall command over the Royal Navy's Minesweeping and armed trawler fleet. Apparently someone thinks he can chase off Icelanders who violate British fishery grounds and is somewhat competent at mine warfare.
On 1 May 1937, Crutchley takes command of HMS Warspite, which has been completely and incompetently refitted, (See remark about the steering gear in short order. McPherson.), in three years at Portsmouth. Due to delayed acceptance trials HMS Warspite cannot be present at the Coronation Fleet Review of King George VI. Additional engineering work on the steering gear (Which has not been repaired from damage inflicted by CADM Hipper’s battle cruisers, taken at Jutland. McPherson) and other equipment (The 5.25 inch guns give nothing but trouble. McPherson) results in weekend leaves for the crew being curtailed, leading to very low morale. Comments appear in British newspapers, which culminate in an anonymous letter from a crew member. This provokes an inquiry into Crutchley, by the Admiralty. The inquiry leads to the removal of three of Crutchley's officers, including his executive officer. Crutchley disagrees with the findings of the Inquiry, and makes sure that the confidential report on his executive officer leads to the latter’s promotion to captain (Political expediency and that PULL again; to shut the chap up about Crutchley’s own part in the HMS Warspite problem. McPherson.). Based on later USN observations of this fellow, Crutchley, he will be deemed a decent leader of men, technologically incompetent by USN standards, and something of a charge at them without thinking admiral. He will get along famously with VADM Halsey. With RADM Turner, it is like gasoline and a match. One thing both the RN and US navies miss, is that Crutchley actually knows how to fight a naval battle. Cannot plan one to save his life, but if someone else gives him a GOOD plan, he can execute it well.
Regarding HMS Warspite; she eventually steams to the Mediterranean Fleet to serve as the flagship of ADM Dudley Pound, Commander-in-Chief Mediterranean Station. Crutchley serves as Flag Captain to first Pound and then to ADM Andrew Cunningham up to the outbreak of war. During this sinecure, he manages not to screw up the staff-work too grossly, but it is honest to suggest that it is a far happier Mediterranean Fleet when he returns to England at the outbreak of WW II.
Just to remind people about our designated hero in this ATL...
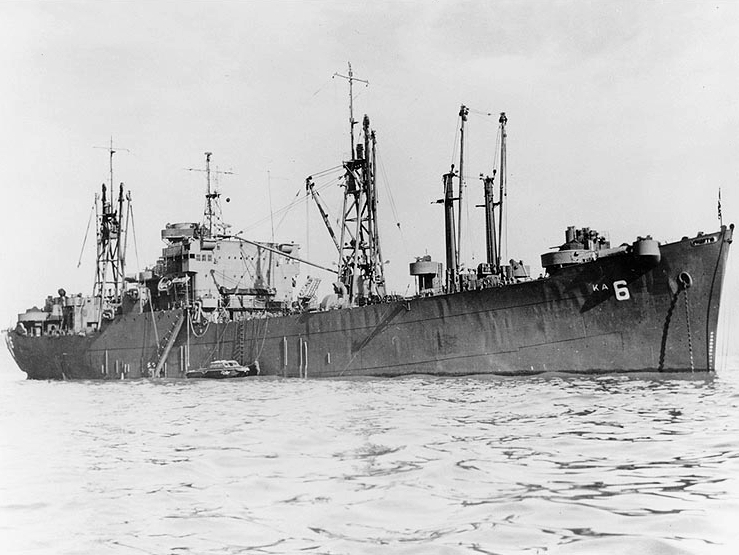
She Does Not Look Like A Minelayer!

Over The Side, Let's Go Men... We're Shoving Them Off … We're Shoving Them Off Again!
==============================================================
Victor Crutchley, Hero of Savo Island (Part 2)
World War II
When World War II breaks out in September 1939, (as previously mentioned in Part 1, McPherson.). CDR Victor Crutchley returns to England, is promoted to CAPT and in April 1940 he participates in the Second Naval Engagement at Narvik, Norway in command of His Majesty’s Battleship Warspite. While the actions of ADM Whitworth during that “questionable exercise” may still be debated among the armchair admirals, the HMS Warspite’s actions under CAPT Crutchley seem to stand up well under analysis (See description of Narvik, above. McPherson.).
The following month after his Narvik heroics, Crutchley is promoted to the rank of CMMDR(2nd class), and receives the plum assignment as commander of the Royal Navy Barracks at Devonport, Plymouth, Devon, England. He manages that shore billet well enough to convince the admiralty that he can administer a squadron. So in February 1942 he boots up to the rank of rear admiral and transfers to the Royal Australian Navy for service in the South West Pacific Area to eventually replace RADM John Crace. Why the rotation of officers immediately in June 1942, just after the BATTLE OF MIDWAY, is necessary, involves the Battle of the Coral Sea, when RADM Crace did not do too badly at the Jomard Passage, and that sad tale, is a bit of a story: as follows.
As near as I can determine, RADM Crace made himself extremely unlikeable and unpopular with the Menzies government with his constant harping about their naval policy from late 1939 onward when he assumed command of the Australian squadron. His criticisms did not change with the Curtin government, which by force of circumstance, still has to support the imperial war effort by sending “Crace’s ships” out of area to sustain the global war against German raiders and U-boats in the Indian Ocean and south Pacific. It did not help matters, further, much when RADM Crace complains about the politically necessary wartime commitments to the ABDA fiasco the Curtin government makes. In addition to this domestic political teapot storm he causes; he does not get along too well with certain allies. Specifically: he finally really torques off the United States Navy (Especially VADM Leary, who complains to GEN MacArthur. McPherson.); when he criticizes them for their RTL handling of the Battle of the Coral Sea to the Australian government and their “subordinating his command authority and responsibility” when he was senior in grade to all the USN officers who fight and lead in that battle. Considering that the USN has just Trafalgared the IJN at Midway and RADM Fletcher, the man Crace criticizes, is one of the chief guys who did it, it is generally considered a poor show, bad sportsmanship and rotten timing for Crace.. Even if Crace, who knows nothing about aircraft carrier battle tactics, has a minor paper point or two about Fletcher’s division of his forces in the middle of the Battle of the Coral Sea, his criticism is actually tactically invalid and both it, and its validity become the nexus of a brouhaha inside Australian and American naval circles, which sparks a minor rift of viewpoint; that lasts down to the present when historians of the two nations discuss that very Battle of the Coral Sea. This is the last thing the hard-pressed Curtin government needs from their Australian-born admiral after Coral Sea, at that time, when they are still up to their necks in Japanese, and they require a certain unhappy ally’s help to enable them save Port Moresby, which is Australia’s Stalingrad, which also is still very much in doubt as Midway and WATCHTOWER are underway. RADM Crace has to go. He has made himself toxic. The Curtin government sends a quiet request to London “to borrow an admiral” for a while, (As early as February, no less! They were prescient. McPherson.). and London looks around at that time in February, for a spare commodore they can bump up, who has good “people skills”. Voila; there sits Victor Crutchley, at the Royal Navy Barracks at Devonport, Plymouth, Devon, England; who is a double bonus in that he is a victor in every naval action in which he fights as a participant; a holder of the Victoria Cross for his heroic actions of WW I (Ostend raids); a proven recent battle winner from the now famous Narvik victory; not too senior in grade to be a technical command problem for the “junior in time of grade American admirals”, and he is “a chap”, who will follow “advice” and “instructions” the Admiralty gives him about how to handle those same “cheeky Americans” to the letter. Victor Crutchley is a “team man” (As his fellow RN polo players from “the Mediterranean crowd” can attest. McPherson.), who can be quickly coached in the game he finds on whatever pitch he lands. Basically as I understand it, “cooperate” and “mollify” are part of those Admiralty instructions; along with “work for inter-Allied harmony” and “look out for the Empire’s interest”. He acts as a easy going supernumerary; until Crace, who might suffer from a case of permanent foot in mouth disease, says one wrong thing too many and finally is packed off to England. Now bear in mind, that RADM Crace makes this doubly easy for the frustrated Australian government, for at one point in July 1941, Crace asks the British admiralty to be relieved of his responsibility, in the middle of a shooting war no less, and be reassigned elsewhere, and in October of that same year tries to resign his post of responsibility, again, through the British admiralty.
It has to have severe consequences, eventually, for all the personages involved. Crace gets the ax on 13 June 1942, and is “reassigned”. He reaches the UK and is put in charge of the Chatham Naval Dockyard. Bumped up to vice admiral, and then admiral. He is actually “half-payed” (Politics; RN style, McPherson.), and made a wartime administrator in what amounts to “counting crabs in the Aleutians”.
His career is over. He is beached.
As for our waiting in the wings; RADM Crutchley; what about him, as the Curtin government solves RADM Crace? RADM Crutchley is put into the ANZAC barrel, thoroughly unready in late June; just in time to participate for Australia in the planning for WATCHTOWER. He is appalled at the lash-up the USN operation actually is; but the RN choose their man well. He is a team player, gets along with everyone, but Richmond Kelly Turner, but then only a naval saint (Raymond Spruance) can get along with Turner, when he goes off his nut, which happens immediately after the Battle of Savo Island. Crutchley stoically accepts the putative blame for Savo Island and never says a word cross to his many critics at the time, publicly or privately. This earns him huge points with both the Curtin government and with the United States Navy, both, who appreciate his tact and common sense. There is enough blame for Savo Island to make an admirals’ massacre very likely in the courts martial that should have been held for it; if Crutchley names names and digs up dead bodies after that bloody shambles. The powers that be reward him with their continued confidence in his proven ability to lead and inspire from the front. (Nimitz, and through him, Halsey, and later when Crutchley returns to SWPOA command; Gen MacArthur. McPherson.). RTL he remains in theater until the end of hostilities in the Pacific at his post. In August 1945 he becomes a vice admiral, RN. His final command is as the Flag Officer Commanding Gibraltar, which shows the RN, even in his career twilight, thinks he is capable of handling a critical Sinecure for them. (There was trouble with Franco’s Spain in 1946, and a sure “political hand” with battle honors for show the flag was needed at that station. McPherson.). He retires in 1947 with 41 years of continued military service. In addition to the Victoria Cross, his awards and decorations include the Knight Commander, Order of the Bath, the Distinguished Service Cross, the 1914-15 Star, the British War Medal (1914-20), the Victory Medal (1914-19, with Mentioned in Despatches oak leaf.), the 1939-45 Star, the Atlantic Star, the Pacific Star, the Defence Medal (1939-45), the War Medal (1939-45), the Australia Service Medal (1939-45), the King George V Silver Jubilee Medal (1935), the King George VI Coronation Medal (1937), the Queen Elizabeth II Coronation Medal (1953), the Queen Elizabeth II Silver Jubilee Medal (1977), the Polish Order of Polonia Restituta (Commander), the US Army Chief Commander, Legion of Merit (MacArthur issues this one on his own hook. McPherson.), and the French Croix de Guerre (de Gaulle). In 1949 he is elevated to the rank of admiral on the retired list. He dies in Nettlecombe, Dorset, England at the age of 92.
His Victoria Cross citation reads:
"The KING has been graciously pleased to approve of the award of the Victoria Cross to the undermentioned Officers in recognition of their gallantry and devotion to duty as described in the foregoing despatch. Lieutenant Victor Alexander Charles Crutchley DSC - Royal Navy. This officer was in 'Brilliant' in the unsuccessful attempt to block Ostend on the night of 22nd / 23rd April 1918, and at once volunteered for a further effort. Crutchley acted as 1st Lieutenant of HMS 'Vindictive' and worked with untiring energy fitting out that ship for further service. On the night of 9th / 10th May 1918, after his commanding officer had been killed and the second in command severely wounded, Lieutenant Crutchley took command of 'Vindictive' and did his utmost by manoeuvring the engines to place that ship in an effective position. He displayed great bravery both in the 'Vindictive' and in 'ML254', which rescued the crew after the charges had been blown and the former vessel sunk between the piers of Ostend harbour, and did not himself leave the 'Vindictive' until he had made a thorough search with an electric torch for survivors under a very heavy fire. Lieutenant Crutchley took command of 'ML254' when the commanding officer sank exhausted from his wounds, the second in command having been killed. The vessel was full of wounded and very seriously damaged by shell fire, the fore part being flooded. With indomitable energy and by dint of baling with buckets and shifting weight aft, Lieutenant Crutchley and the unwounded kept her afloat, but the leaks could not be kept under, and she was in a sinking condition, with her forecastle nearly awash when picked up by HMS 'Warwick'. The bearing of this very gallant officer and fine seaman throughout these operations off the Belgian coast was altogether admirable and an inspiring example to all thrown in contact with him."
His Victoria Cross and other medals, as of the present, remain on loan to the National Museum of the Royal Navy at Portsmouth, Hampshire, England.
All in all, quite a man; he was and is. Wish the USN (presently) had a few dozen like him.
I will try to do better by him in this ATL. See if I can wave away some of his bad luck of 9 August 1942.
McPherson.
Last edited:
McPherson
Banned

Kickoff to Savo Island
On 8 August 1942 the U.S. Task Force 62, which supports the invasion of Guadalcanal is tired. The crews of the ships have conducted combat operations including naval gunfire support missions, fending off numerous Japanese air attacks, guarding against submarine attacks for two days. The primary covering force, TG 62.2, (5 CAs, 2 CLs, 10 DDs; two CAs and 1 CL being Royal Australian Navy ships), the allied cruiser / destroyer surface action group under the command of RADM Victor Crutchley; RN, has been broken up and run ragged and scattered, higgly-piggly, running through every square kilometer of ocean between Savo Island and the Sealark Channel; responding to the lunatic and exasperating demands of RADM Turner for ships to shell, this empty piece of coast, west of Lunga Point, land Marine raiders on Vanuatu and Florida Islands, and rush to the Tulagi anchorage to provide anti-aircraft and antisubmarine defense for the transports there. What RADM Richmond K. Turner is not doing, is that he is not immediately organizing an efficient unloading operation at the key area for this fiasco, which is Lunga Point: that is, he is not moving the urgently needed materials, equipment and supplies required by the men of the 1st Marine Division who TF 62.1’s transports put ashore on the morning of 7 August 1942. In other words, Turner, who is supposed to handle ship to shore movements and let Crutchley handle the purely naval details about tactical operations afloat, including gun-fire support and AAA and ASW defense missions, has fudge-packed the whole WATCHTOWER operation to hello and gone for two entire days with his jumping the chain of responsibility and not letting the proper commanders do their designated jobs in the proper order.
On the afternoon of the 8 August VADM Frank “Jack” Fletcher unintentionally adds to the chaos, (Turner has not told him about the delays in unloading the transports) when he informs RADM Turner that TF 61 is pulling out of Japanese land based aircraft to refuel. Fletcher notifies Turner that he does not have enough fighter aircraft. There are 79 Skyrockets which remain of the original 98 planes allotted. Four planes are lost to enemy air action in Fletcher’s support of Turner. The rest of the fighters, 14 of them, have attrited; because the green pilots who are replacements for the veterans killed at Coral Sea and Midway have smashed themselves up in botched traps [4], gotten lost and crashed into the sea [4], or Murphy knows what happens to the rest [6] of them. Fletcher lacks the planes to mount CAP over his own decks [16] and patrol over the invasion in progress [36 in 2 shifts] as per plan. His destroyer screen is also dangerously low on fuel. The carriers have been in continuous action for 36 hours, day and night, themselves. Fletcher’s prudent reasons for his withdrawal, as he expects to fight an air sea battle against Kido-Butai soon, are a complete mystery to RADM Turner, who has not a clue as to why the veteran aircraft carrier commander has to withdraw to refuel at all. Whatever. Fletcher pulls back out of Japanese land-based aircraft to prepare his forces for what he assumes will be Nagumo hustling down from Chu’uk (Truk) with the three surviving Japanese big boys (Zuikaku, Kaga, and Ryujo.) To Turner and his subordinate commanders the responsibility of remaining in the area without Fletcher’s air support with the transports still full of badly needed supplies and equipment is both unwelcome and it is a decidedly a surprise.


Admiral Gunichi Mikawa Heads For His Destiny
As the American confusion piles up to the east/southeast, the Japanese move forces into position to strike the Americans. VADM Gunichi Mikawa commander of the 8th Fleet and Outer South Seas Force based at Rabaul, New Britain, quickly marshals a force of 5 heavy cruisers, the 14,000 ton monstrous Atago Class cruiser, Chokai, and the four smaller ships of the Kako/Furutaka Classes: the Aoba, Kako, Kinugasa and Furutaka. He adds the light cruisers Yubari and Tenryu and the destroyer Yunagi, too, just for grins and giggles. Mikawa raises his flag aboard Chokai and the force speeds down “The Slot”; that portion of George’s Channel which runs the length of the of the Solomon Islands chain, from Bougainville, past Choiseul, all the way to terminate at Savo Island, the sentry island which splits the north and south channel entrances into what is about to enter maritime mapmakers lexicons as “Ironbottom Sound.” Mikawa has not a clue as to what he exactly intends to do. All he knows, is that the Tulagi garrison and the seaplane base, that “Shipwreck” Shima established back in May, during the Battle of the Coral Sea, radios it is under attack, then is squelched by powerful radio jamming and the airbase under construction on Guadalcanal has gone off the air as well. All attempts to raise by radio on the 7th having failed, the base force (Rikkos of the 11th Air Fleet, 25th and 26th Air Attack flotillas; VADM Nizhiso Tsukuhara, OTC at Rabaul and Lae) mounts reconnaissance flights on the 7th and actual air raids on the 8th. The Rikkos are mauled by Fletcher’s fighters posted over Lunga Point and over Tulagi, as CAPs; who hack up the two separate raids of approximately 30 Japanese planes, a ½ mix of fighter (Zeros) and bombers (Bettys), blasting 4 Zeros and 5 Bettys confirmed out of the sky and losing 4 of their own planes. The American fighter pilots are green, green, green. AAA accounts for another 6 Japanese aircraft. All this reconning and raiding is not passed on to Mikawa. The Americans are jamming the radio spectrum, all frequencies locally. Mikawa will have to do his own reconnaissance with his own resources as he heads southeast, and that will bite him in his posterior.
The Americans have warning of Mikawa’s coming before their jamming takes full effect. The first sighting is by B-17Rs before the Japanese forces have reached Rabaul from their start port of Kavieng, New Ireland. The B-17Rs have to clear the local jamming and cannot report clearly until they are some 500 kilometers from Cooktown, but by 1500 of 7August, the USN has the word through MacArthur’s brasshat, MGEN Brereton that the Japanese have moved ships to Rabaul. The second report is by the USS Mola, a Mackerel class submarine, at 2000 on 7 August when Mikawa’s force is 885 kilometers (550 miles) away not far from Rabaul. This report is discounted because 1.) it would not be unusual to find a number of fleet units steaming near a major naval base and fleet headquarters and 2.) LTCDR Gordon C. Campbell is still in in command of USS Mola and he is regarded as someone, who is less than reliable as a contact reporter. The last sighting which should have alerted the allies, that something was wrong in George’s Channel, was a sighting by a Royal Australian Air Force patrol aircraft on the morning of 8 August. However the pilot did not report the sighting until he returned from his mission, “due to all the unusual interference in the ether” ^1. Instead he returned to his base and had his tea and made his report. The eight hour delay in reporting the information as well as Visual Identification (VID) errors in it which reported 2 submarine tenders as part of the force lulled the Allied forces into believing that the Japanese were setting up a seaplane base somewhere in the vicinity of Choiseul and posed no immediate threat to the Guadalcanal invasion forces. It was a fatal error of reporting by the pilot and a fatal error in SWPOA judgement that could have cost the Allies the Guadalcanal, if not for two prescient men.
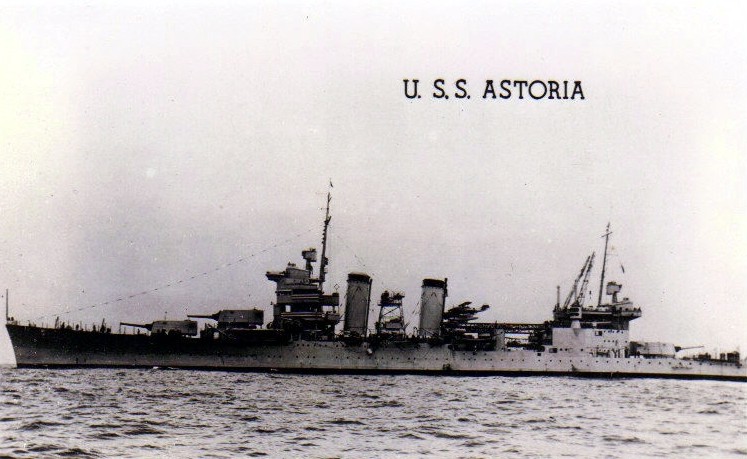

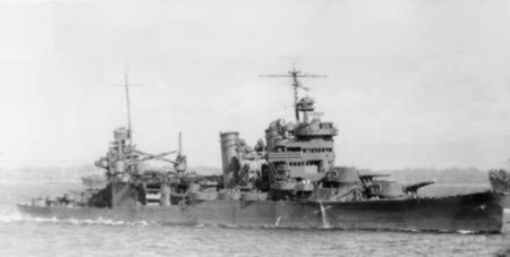
USS Astoria And USS Chicago
^1 A bit of real history to keep the record straight and honest.
From: Mackenzie Gregory
Subject: Battle of Savo.
Date: Thu, 22 Feb 2001 16:23
Jim,
Thank you for your gracious response.
This is going to be a long E-Mail to you and I apologize in advance.
Here goes: Morison was published in 1951, Gill in his Vol 2 of the official history of the RAN in WW2. was probably the first to refute the story of the Hudson's role in sighting Mikawa's fleet.
Two later books published in Australia take up the Savo story.
At the time of Savo, Bruce Loxton was the Captain's Midshipman on Canberra's bridge, he was severely wounded and, I did not think he could survive, but he did, to complete a distinguished Naval career, and retire as a Commodore. His service included a spell as Naval Attaché in Washington D.C. and Director of Naval Intelligence in Australia.
- Warner, Denis and Peggy. "Disaster in the Pacific. New Light on the Battle of Savo Island". Allen & Unwin. Sydney 1992. [Naval Institute Press, Annapolis, 1992.]
- Loxton, B. with Coulthard-Clark, C. "The Shame of Savo. Anatomy of a Naval Disaster". Allen & Unwin. St.Leonards. NSW. 1994.. [Naval Institute Press, Annapolis, 1994.]
Bruce lives in Sydney, and I live in Melbourne, the two cities about 500 miles apart. As most of the RAN's records about Savo were housed in archives in Melbourne, I did a good deal of research for Bruce here in Melbourne.
As we wanted to learn about the Hudson's story first hand, and both the Hudson's pilot and navigator lived in Melbourne, Bruce flew to Melbourne, and we both interviewed former Sergeant Bill Stutt, the pilot, and Wilbur Courtis, the navigator over lunch. We discussed the aircraft's sighting of Mikawa, how they broke wireless silence to make an enemy report, and tried to raise their base at Fall River over a period of time but without success. Post war, it was discovered in RAAF records, in the signal log of ACH Townsville, that from 1032 to 1100, Fall River radio had closed because of an air raid alert.
Link to Hudson Aircraft Report
It was interesting to learn that at Stutt's briefing he was informed they might sight some US ships, but no mention was made about the WatchTower Operation, so, when they actually sighted the Japanese ships at 1025, on August 8 1942, they thought they were friendly. They were most surprised to discover that this sighting comprised 8 Japanese warships.
A Japanese floatplane was in the vicinity of the Japanese ships, and Stutt thought it was a Zero type fighter with floats that was out to attack him, and he quickly made off to the NW. On the way home they sighted two surfaced submarines, bombed them without success, then landed at Fall River at 1242, and were taken by a jeep for an immediate debriefing.
Flight Lieutenant Lloyd Milne had been in charge of the 5 Hudson's at Fall River, and had flown Hudson A16-157 that day, but did not sight Mikawa.
Another Hudson, A16-185, flown by Flying Officer Mervwn Williams had also sighted Mikawa at 1103, he also thought the force was friendly until Chokai opened fire, hitting this aircraft in three places with splinters. Williams withdrew, but unlike Stutt completed his mission, he did attempt to send an enemy report to Falls River, but was told to maintain radio silence. William's debriefing officer for some inexplicable reason failed to accept his enemy report of 2 heavy cruisers, two light cruisers, and 1 small unknown type ( he had not sighted all 8 of Mikawa's ships.)
Although Williams had a blazing row with his debriefing officer, he did not convince him about the ships sighted, he gave up, noted his sighting in his log book as well as the damage to his aircraft.
Jim, the various times reported in different accounts of Savo need to be clarified.
The Japanese Fleet kept -9 time ( ie 9 hours ahead of GMT ) the Hudsons kept -10 time ( ie 10 hours ahead of GMT ) whilst at Guadalcanal, the Allied Force kept -11 time ( ie 11 hours ahead of GMT ). Thus the Hudson's first sighting of Mikawa at 1025, was 0925 for Mikawa, and, 1125 at Guadalcanal.
In Chokai, Stutt's enemy report had been intercepted. Lloyd Milne's wife Nancy had been trying to document the Hudson's sighting of Mikawa, and that the flagship had read and recorded Stutt's radio transmission. Her husband Lloyd had died, and in 1983 Nancy contacted Commander Sadao Seno a retired Japanese Naval Officer, ( he had worked with the Warners on their book: "Kamikaze. The Sacred Warriors 1944-45" )
Seno found in Chokai's action report a record of the interception of the Hudson's message. ( whilst no formal copy of Chokai's action report had survived post war, an Engineer officer had kept an illegal copy he had made, it was amongst papers he gave to the Japanese National Institute of Defense in 1963 )
The Institute has authenticated this copy, and Bruce Loxton received a letter from Captain Itonoga dated 8 August 1990, confirming this fact. At long last, Stutt and his crew had been vindicated. Now to Bagley, and the possibility of Canberra picking up one of her torpedoes.
By our early maneuvers, I believe we evaded the Japanese torpedoes, all their attack came from our port side, I vividly recall being at my action station in the fore control above the bridge which I had recently left, looking out to port at the looming Japanese cruisers, no more than a few thousand yards away, with them firing at us, and remarking out loud. "My God this is bloody awful." We had listed quite heavily to starboard, consistent with water rushing in a hole on our starboard side as a result of a torpedo hit on that side of the ship. In "The Shame of Savo", Bruce Loxton, with track charts, using both Bagley's and Canberra's turning circles, the position of Bagley, on our starboard side, the timing of her firing her torpedoes etc, mounts a compelling argument for one of Bagley's torpedoes finding us.
I have not seen any response from the USA, or any other source that refutes his claim since his book came out in 1994.
I sincerely believe at this distance from the night in question, that from Loxton's work, Canberra was torpedoed on her starboard side amidships, at about 0147 on August 9 1942, and that Bagley had fired that torpedo.
Wow! I have gone on a long time Jim, again I apologize, if you have any more questions please fire them off to me.
It would be great if you put a link on your page to AHOY.
John Sauvageau, who has looked after my site since inception, is about to retire from such activities, and I will need to learn how to look after it myself. John is preparing a CD to help in that direction. I have now completed work on "Marauders of the Sea. Armed German Merchant Ships of WW1", this is to round out these ships in WW2 already on my site, so it will in due course complete this work. So! I will have much to keep me busy in the future.
It is great to meet you via the Web, please do keep in touch.
Best regards.
Mac.
It is the best eye witness evidence extant of the USS Bagley's blue on blue with Canberra, and a clear refutation of the Hudson pilot, Flying Officer Mervwn Williams, not reporting his contact via radio. As for Flight sergeant Stutt, I think the shutdown of Fall River's radio due to an air raid, prevented the pilot from reaching his station. For this fake history, I change things up a bit. I have already alluded to American electronic warfare tactics as early as the Doolittle raid in this timeline when I give the USN's ships (Heavy cruisers; specifically.) powerful broadcasters that can jam UHF and VHF radio frequencies. This is well within WW II American capabilities. They are good at electronic warfare. It shows up here to explain the Hudson plane myth as an ATL established "fact", due to an utter misapplication of such EW technology (Have we noticed that theme yet? McPherson.), and it will show up again... at Savo Island.
Last edited:
McPherson
Banned
I tend to put real history into this thread whenever appropriate.
The Price of Admiralty
They were not the only ones...
What makes it so bitter is that nobody listened to him before First Savo Island or First Guadalcanal.
The Battle of Cape Esperance was all his, though. A victory and a morale boost when the USN desperately needed one.
The Price of Admiralty
The Song Of The Dead
(Rudyard Kipling)
Hear now the Song of the Dead -- in the North by the torn berg-edges --
They that look still to the Pole, asleep by their hide-stripped sledges.
Song of the Dead in the South -- in the sun by their skeleton horses,
Where the warrigal whimpers and bays through the dust
of the sear river-courses.
Song of the Dead in the East -- in the heat-rotted jungle hollows,
Where the dog-ape barks in the kloof --
in the brake of the buffalo-wallows.
Song of the Dead in the West --
in the Barrens, the waste that betrayed them,
Where the wolverene tumbles their packs
from the camp and the grave-mound they made them;
Hear now the Song of the Dead!
I
We were dreamers, dreaming greatly, in the man-stifled town;
We yearned beyond the sky-line where the strange roads go down.
Came the Whisper, came the Vision, came the Power with the Need,
Till the Soul that is not man's soul was lent us to lead.
As the deer breaks -- as the steer breaks -- from the herd where they graze,
In the faith of little children we went on our ways.
Then the wood failed -- then the food failed -- then the last water dried --
In the faith of little children we lay down and died.
On the sand-drift -- on the veldt-side -- in the fern-scrub we lay,
That our sons might follow after by the bones on the way.
Follow after -- follow after! We have watered the root,
And the bud has come to blossom that ripens for fruit!
Follow after -- we are waiting, by the trails that we lost,
For the sounds of many footsteps, for the tread of a host.
Follow after -- follow after -- for the harvest is sown:
By the bones about the wayside ye shall come to your own!
When Drake went down to the Horn
And England was crowned thereby,
'Twixt seas unsailed and shores unhailed
Our Lodge -- our Lodge was born
(And England was crowned thereby!)
Which never shall close again
By day nor yet by night,
While man shall take his life to stake
At risk of shoal or main
(By day nor yet by night).
But standeth even so
As now we witness here,
While men depart, of joyful heart,
Adventure for to know
(As now bear witness here!)
II
We have fed our sea for a thousand years
And she calls us, still unfed,
Though there's never a wave of all her waves
But marks our English dead:
We have strawed our best to the weed's unrest,
To the shark and the sheering gull.
If blood be the price of admiralty,
Lord God, we ha' paid in full!
There's never a flood goes shoreward now
But lifts a keel we manned;
There's never an ebb goes seaward now
But drops our dead on the sand --
But slinks our dead on the sands forlore,
From the Ducies to the Swin.
If blood be the price of admiralty,
If blood be the price of admiralty,
Lord God, we ha' paid it in!
We must feed our sea for a thousand years,
For that is our doom and pride,
As it was when they sailed with the ~Golden Hind~,
Or the wreck that struck last tide --
Or the wreck that lies on the spouting reef
Where the ghastly blue-lights flare.
If blood be the price of admiralty,
If blood be the price of admiralty,
If blood be the price of admiralty,
Lord God, we ha' bought it fair!
They were not the only ones...
Norman Scott Rear Admiral, United States Navy – A BRAVE HOOSIER SAILOR
By
Duane Vachon
-
March 22, 2015
BY DUANE ALLEN VACHON, PH.D. Norman Scott was born August 10, 1889 in Indianapolis, Indiana. Appointed to the Naval Academy in 1907, he graduated four years later and received his commission as Ensign in March 1912. During 1911-13, Ensign Scott served in the battleship USS Idaho (BB-24), then served in destroyers and related duty. In December 1917, he was Executive Officer of USS Jacob Jones (DD-61) when she was sunk by a German submarine and was commended for his performance at that time. During the rest of World War I, Lieutenant Scott had duty in the Navy and as Naval Aide to President Woodrow Wilson. In 1919, while holding the temporary rank of Lieutenant Commander, he was in charge of a division of Eagle Boats(PE) and commanded Eagle PE-2 and Eagle PE-3.
During the first years of the 1920s, Norman Scott served afloat in destroyers and in the battleship USS New York (BB-34) and ashore in Hawaii. From 1924 to 1930, he was assigned to the staff of Commander Battle Fleet and as an instructor at the Naval Academy. He commanded the destroyers USS MacLeish (DD-220) and USS Paul Jones (DD-230) in the early 1930s, then had further Navy Department Duty and attended the Naval War College‘s Senior Course. After a tour as Executive Officer of the light cruiser USS Cincinnati (CL-6), Commander Scott was a member of the U.S. Naval Mission to Brazil in 1937-39. Following promotion to the rank of Captain, he was Commanding Officer of the heavy cruiser USS Pensacola (CA-24) until shortly after the United States entered World War II in December 1941.
Captain Scott was assigned to the Office of the Chief of Naval Operations during the first months of 1942. After becoming a Rear Admiral in May, he was sent to the south Pacific, where he commanded a fire support group during the invasion of Guadalcanal and Tulagi in early August. Rear Admiral Scott continued to lead surface task units for the next three months, as the campaign to hold Guadalcanal intensified. On 11-12 October 1942, he commanded a cruiser-destroyer force in the Battle of Cape Esperance, the U.S. Navy’s first surface victory of the campaign. A month later, on November 13, he was second-in-command during the initial night action of the Naval Battle of Guadalcanal. In that wild and brutal fight, Rear Admiral Norman Scott was killed in action when his flagship, the light cruiser USS Atlanta (CL-51), was fatally damaged by gunfire, possibly from the heavy cruiser USS San Francisco (CA-38), as well as an enemy torpedo. For his “extraordinary heroism and conspicuous intrepidity” in the October and November battles, he posthumously received the Medal of Honor.
As with his fellow Admiral Callaghan, Admiral Scott was buried at sea.
Congressional Medal of Honor
Awarded Posthumously
NORMAN SCOTT
Rank and organization: Rear Admiral, U.S. Navy.
Born: 10 August 1889, Indianapolis, Indiana.
Appointed from: Indiana.
For extraordinary heroism and conspicuous intrepidity above and beyond the call of duty during action against enemy Japanese forces off Savo Island on the night of 11-12 October and again on the night of 12-13 November 1942. In the earlier action, intercepting a Japanese Task Force intent upon storming our island positions and landing reinforcements at Guadalcanal, Rear Adm. Scott, with courageous skill and superb coordination of the units under his command, destroyed 8 hostile vessels and put the others to flight. Again challenged, a month later, by the return of a stubborn and persistent foe, he led his force into a desperate battle against tremendous odds, directing close-range operations against the invading enemy until he himself was killed in the furious bombardment by their superior firepower. On each of these occasions his dauntless initiative, inspiring leadership and judicious foresight in a crisis of grave responsibility contributed decisively to the rout of a powerful invasion fleet and to the consequent frustration of a formidable Japanese offensive. He gallantly gave his life in the service of his country.
//Franklin D. Roosevelt// President
==============================================================
It was one of the most stunning reversals in naval history, evocative of the Battle of Samar 25 October 1944, also characterized by a great disparity in forces. But the cost of stopping the enemy was very heavy. In addition to the loss of several destroyers – along with their captains – the USS Atlanta was lost along with Dan’s classmate and friend Admiral Norman “Scotty” Scott, commanding the other surface cruiser Task Force. During the battle the cruisers USS Portland and Juneau were badly damaged, and the latter was sunk the next day by enemy submarine I-26 along with Captain Lyman K. Swensen and nearly all hands, including all five Sullivan brothers.
Rear Admiral Scott is memorialized at the Manila American Cemetery and Memorial, Manila. Plot: No Known Grave; name is listed on the Tablets of the Missing.
What makes it so bitter is that nobody listened to him before First Savo Island or First Guadalcanal.
The Battle of Cape Esperance was all his, though. A victory and a morale boost when the USN desperately needed one.
McPherson
Banned
Didn't you sink Shokaku at Coral Sea, ITTL? I seem to recall you covering that in multiple posts.
Yes I did. Mudskipper went down with her. Why?
Yes I did. Mudskipper went down with her. Why?
You have her mentioned as coming down from Truk with the Zuikaku and Ryujo in post #792. Based on Coral Sea and Midway, the only two big carrriers left should be Zuikaku and Kaga. I wasn't sure if it was a typo, or if you have it so the US doesn't realize Shokaku is gone or what.
It shouldn't make a difference for Savo Island, but I was wondering which it was, as it will have an impact at Eastern Solomons, assuming of course the Japanese have enough ships to pull that off.
Last edited:
After the Japanese get their butts kicked at Savo Island, even if they do commit to the operation that resulted in Eastern Solomons, I'm wondering if they're going to be able to pull it off as soon as they did.
Given losses of troop laden transports at Coral Sea and Midway, a lot of the shipping, and in fact some of the ground troops that OTL where sent to fight on Guadalcanal simply don't exist here. Of the 10 transports carrying the Midway landing force, you sank 5 of them. That's a lot of army and SNLF personnel that just aren't there anymore. Oh sure, the Japanese can probably pull units from elsewhere, but that just means that either some other operation isn't going to have enough resources, or some garrison or reserve units are going to start being whittled down sooner then OTL.
Given losses of troop laden transports at Coral Sea and Midway, a lot of the shipping, and in fact some of the ground troops that OTL where sent to fight on Guadalcanal simply don't exist here. Of the 10 transports carrying the Midway landing force, you sank 5 of them. That's a lot of army and SNLF personnel that just aren't there anymore. Oh sure, the Japanese can probably pull units from elsewhere, but that just means that either some other operation isn't going to have enough resources, or some garrison or reserve units are going to start being whittled down sooner then OTL.
McPherson
Banned
After the Japanese get their butts kicked at Savo Island, even if they do commit to the operation that resulted in Eastern Solomons, I'm wondering if they're going to be able to pull it off as soon as they did.
Given losses of troop laden transports at Coral Sea and Midway, a lot of the shipping, and in fact some of the ground troops that OTL where sent to fight on Guadalcanal simply don't exist here. Of the 10 transports carrying the Midway landing force, you sank 5 of them. That's a lot of army and SNLF personnel that just aren't there anymore. Oh sure, the Japanese can probably pull units from elsewhere, but that just means that either some other operation isn't going to have enough resources, or some garrison or reserve units are going to start being whittled down sooner then OTL.
I'm still mapping out the Battle of Savo Island, with all of its butterflies. I'm wondering if the future campaigns are even possible as described based on the cruiser slaughter that is underway?
Threadmarks
View all 11 threadmarks
Reader mode
Reader mode
Recent threadmarks
Post 4 - Testing Efforts And The Search For A Bigger Boom, 1923 Post 5 - Developing Alternatives and Live Testing, 1923 Post 6 - The Fish Has Wings and Some Unpleasant Truths, 1925-1930 Post 7 - Frustration and Progress, 1930-1935 Post 8 - New Paths, "One Hell of a Wallop", And Some Fortunate Angina, 1935-1940 Post 9 - Gearing Up For War, 1941 Post 10 - Side Bar: A Discussion of Submarine Tactics - 1941-1942 Post 11 - Initial Action in the Philippines - 1941-1942
Share: